background image

11

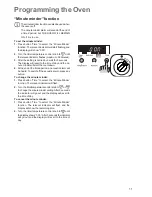
“Minute minder” function

The minute minder function can also be used when
the oven is off.
The minute minder alarm will sound at the end of
a timed period, but THE OVEN WILL REMAIN

ON, if it is in use.

To set the minute minder:
1.

Press button “Time” to select  the “Minute Minder”
function. The relevant indicator will start flashing and
the display will show “0.00”.

2.

Turn the time/temperature control knob to 

 until

the relevant indicator flashes (maximum: 99 minutes).

3.

After the setting is carried out, wait for 5 seconds.
The display will revert to the time of day and the mi-
nute minder will start the countdown.

4.

At the end of the timed period, an acoustic alarm will
be heard. To switch off the acoustic alarm, press any
button.

To change the minute minder:
1.

Press button “Time” to select  the “Minute Minder”
function. The relevant indicator will flash.

2.

Turn the time/temperature control knob to 

 or 

to change the minute minder setting. After 5 seconds
the indicator will go out and the display will revert to
the time of day.

To cancel the minute minder:
1.

Press button “Time”


to select  the “Minute Minder”

function. The relevant indicator will flash and the
display will show the remaining time.

2.

Turn the time/temperature control knob to 

 until

the display shows “0.00”. After 5 seconds the indicator
will go out and the display will revert to the time of
day.

Programming the Oven

Содержание ZCM 650

Страница 1: ...MIXED FUEL COOKERS ZCM 650 ZCM 651 INSTRUCTION BOOKLET Please read this instruction booklet before using the appliance GB ...

Страница 2: ...2 ...

Страница 3: ...ith a venting hose When using the cooker for a long period of time the ventilation should be improved by opening a window or increasing the extractor speed Do not use this cooker if it is in contact with water Do not operate the cooker with wet hands Ensure the control knobs are in the OFF position when not in use During use the appliance becomes hot Care should be taken to avoid touching heating ...

Страница 4: ...tions 33 Commissioning 34 Conversion from Natural Gas to LPG 34 Important Safety Information 3 Control Panel 5 The Gas Hob Controls 6 Electric Oven 7 Electric Programmer 8 Before the First Use of the Cooker 10 Programming the Oven 11 Safety and Energy saving functions 14 Using the Oven 15 Hints and Tips 15 Using the Conventional Oven 16 Cooking Chart Conventional Oven 17 Pizza Oven 18 Grilling 19 ...

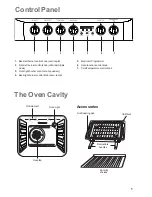
Страница 5: ...nti tip shelves Control Panel 1 Back left burner control knob semi rapid 2 Front left burner control knob ultra rapid triple crown 3 Front right burner control knob auxiliary 4 Back right burner control knob semi rapid 5 Electronic Programmer 6 Oven function control knob 7 Time Temperature control knob 5 4 3 2 1 6 7 ...

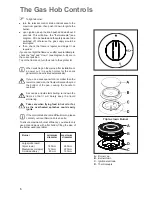
Страница 6: ...generator to be activated automatically If you use a saucepan which is smaller than the recommended size the flame will spread beyond the bottom of the pan causing the handle to overheat As soon as a liquid starts boiling turn down the flame so that it will barely keep the liquid simmering Burner minimum maximum diameter diameter Large ultrarapid triplecrown 180 mm 260 mm Medium semi rapid 120 mm ...

Страница 7: ...ime Temperature Control knob The time temperature control knob allows you to select the time minute minder cooking duration and end of cooking time and temperature Turn it clockwise and hold it in the turned position to increasethetime temperaturesetting Turnitanticlockwise andholditintheturnedpositiontodecreasethetime temperaturesetting Thecount uporcount downspeed increases the longer the knob i...

Страница 8: ... the correct time of day is set before using the oven To set the correct time of day 1 Turn the Time Temperature control knob to or to adjust the time in 1 minute degree step 2 After the setting is carried out wait for 5 seconds the Time indicator will go out and the display will show the set time The appliance is ready for use To reset the correct time of day 1 Press button Time repeatedly to sel...

Страница 9: ...mperature level indicators As soon as the oven heats up the temperature level indicators light up indicating the degree to which the oven is currently heated When the required temperature is reached an acoustic alarm will sound for a short time and all the temperature level indicators will light permanently After the oven is switched off the indicators will stay on until the temperature reaches 40...

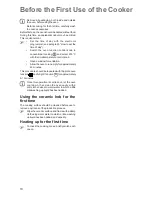
Страница 10: ...window for ventilation Allow the oven to run empty for approximately 45 minutes This procedure should be repeated with the pizza oven function and full grill function for approximately 5 10 minutes Once this operation is carried out let the oven cool down then clean the oven cavity with a soft cloth soaked in warm water to which a little mild washing up liquid has been added Using the ceramic hob ...

Страница 11: ...will start the countdown 4 At the end of the timed period an acoustic alarm will be heard To switch off the acoustic alarm press any button To change the minute minder 1 Press button Time to select the Minute Minder function The relevant indicator will flash 2 Turn the time temperature control knob to or to change the minute minder setting After 5 seconds the indicator will go out and the display ...

Страница 12: ... and an acoustic alarm will be heard and the relevant indicator will start flashing The display shows 0 00 4 To switch off the acoustic alarm turn the oven function control knob to the OFF position 0 If you press a button other than the knob the alarm will switch off and the display will show C This means that the oven cannot be operated Turn the oven control knob to the OFF position 0 to reset th...

Страница 13: ...elevant indicators will come on and the display will show the set temperature The oven will switch on and off according to the set programmes and an acoustic alarm will be heard when cooking time is over 5 To switch off the acoustic alarm turn the oven function control knob to the OFF position 0 If you press a button other than the knob the alarm will switch off and the display will show C This me...

Страница 14: ... display Fig 15 After a few seconds the display will revert to the time of day The oven is now locked Neither oven functions nor temperatures can be selected To unlock the oven 1 Turn the time temperature control knob to and hold it in the turned position 2 At the same time press button Time and keep it pressed for about 3 seconds The indication SAFE will go off The oven can now be operated How to...

Страница 15: ...elf positions are counted from the bottom of the oven as shown in the diagram It is important that these shelves are correctly positioned as shown in the diagram Warning Donotplaceobjectsonthebottom of the oven and do not cover it with aluminium foil while cooking as you can damage the enamelled surfaces and the food you are cooking Always place pans heat resisting pans and aluminium foils on the ...

Страница 16: ... position allows for the best heat distribution To increase base browning simply lower the shelf position To increase top browning raise the shelf position The material and finish of the baking trays and dishes used will affect base browning Enamelware dark heavy or non stick utensils increase base browning while oven glassware shiny aluminium or polished steel trays reflect the heat away and give...

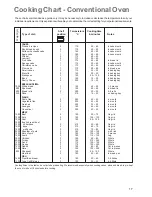
Страница 17: ... 500 Rye bread 1 190 30 45 In bread tin 500 Bread rolls 2 200 20 35 6 8 rolls 250 Pizza 1 210 15 30 on baking tray FLANS Pasta flan 2 200 40 50 in mould Vegetable flan 2 200 45 60 in mould Quiches 1 200 35 45 in mould Lasagne 2 180 45 60 in mould Cannelloni 2 200 40 55 in mould MEAT 1000 Beef 2 190 50 70 On grid 1200 Pork 2 180 100 130 On grid 1000 Veal 2 190 90 120 On grid 1500 English roast beef...

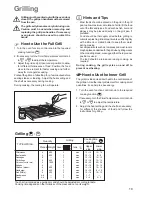
Страница 18: ... cooking function 2 If necessary turn the Time Temperature control knob to or to adjust the temperature Pizza Oven 4 3 2 1 700 Pizza large 1 200 15 25 on baking tray 500 Pizza small 1 200 10 20 on baking tray or on grid 500 Flat cake 1 200 15 25 on baking tray Weight gr TYPE OF DISH Level temp C Cooking time minutes NOTES Pizza Oven Pizza function Cooking times in the table do not include pre heat...

Страница 19: ...butter to keep them moist during cooking Accompaniments such as tomatoes and mushrooms may be placed underneath the grid when grilling meats When toasting bread we suggest that the top runner position is used The food should be turned over during cooking as required During cooking the grill cycles on and off to prevent overheating How to Use the Inner Grill The grill provides quick direct heat to ...

Страница 20: ...0 60 Defrostopen Food Defrostingtime Mins Standing time Mins Notes Defrosting The oven fan operates without heat and circulates the air at room temperature inside the oven This increases the speed of defrosting However please note that the temperature of the kitchen will influence the speed of defrosting This function is particularly suitable for delicate food which could be damaged by heat e g cr...

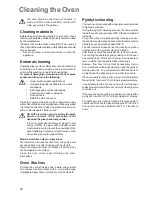
Страница 21: ...nd is used Pan Supports The hob has cast iron pan supports Take care when removing them They are fairly heavy and could damage the hob or your kitchen furniture if you let them fall down Wash the pan supports using hot soapy water If necessary a paste cleaner or a soap impregnated steel wood pad can be used with caution The Burners The burner caps and crowns can be removed for cleaning Wash the bu...

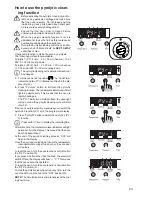
Страница 22: ...tant to high temperatures During the pyrolytic cleaning process the temperature insidetheovencanreachabout500 Cthusburningfood residuals For your security during the pyrolityc cleaning process theovendoorautomaticallylockswhenthetemperature inside the oven approaches about 300 C The door remains locked during the cleaning operation until the end of the pyrolytic cleaning function Aftertheovencavit...

Страница 23: ... been locked At the end of the pyrolitic cleaning process 0 00 will flash in the display Once the oven has cooled down check the temperature level indicators coming off one by one the oven door will unlock To reset the oven turn the oven function control knob to the OFF position 0 If you press a button other than the knob the alarm will switch off and the display will show C This means that the ov...

Страница 24: ...unction 2 Press button Time twice to display the end time of the cleaning cycle After the setting is carried out the Cook Time and End Time indicators will light permanently 3 Turn the time temperature control knob to to select the the end time of the cleaning cycle The pyrolytic cleaning cycle will start according to the programmed time The temperature level indicators will light up alternatively...

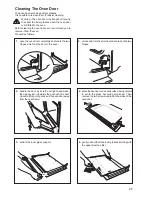
Страница 25: ...oor completely and locate the two hinges which link the door to the oven 2 unlockandturnthesmallleverslocatedonthetwo hinges 3 handle the door by its left and right hand sides then slowly turn it towards the oven until it is half closed atthispoint gentlypulltheovendooraway fromtheovenframe 5 extract the inner glass support 6 gentlyextractthethreeinnerglasses starting with the uppermost one first ...

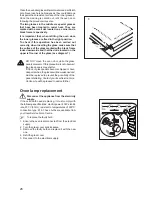
Страница 26: ...rner and a black frame respectively It is important that when refitting the oven door the inner glasses are fixed in the right position To check if this operation has been carried out correctly when inserting the glass make sure that the surface of the glass marked with a black frame looks downwards and that the dot is located on the upper left corner of the glass see diagram 7 Oven lamp replaceme...

Страница 27: ...has not tripped if fitted Check the mains fuse has not blown Check the burner cap and crown have been replaced correctly e g after cleaning Check the main jet is not blocked and the burner crown is clear of food particles Check the burner cap and crown have been replaced correctly e g after cleaning Check that a cooking function has been selected Check the oven is in manual operation Check that th...

Страница 28: ...3 Clear and concise details of the fault 4 The model and serial number of the appliance found on the rating plate 5 The purchase date Please note that a valid purchase receipt or guarantee documentation is required for in guarantee service calls Service and Spare Parts In the event of your appliance requiring service or if you wish to purchase spare parts please contact your local Service Force Ce...

Страница 29: ...able parts of glass or plastic Costs incurred for calls to put right an appliance which is improperly installed or calls to appliance outside the United Kingdom Appliances found to be in use within a commercial or similar environment plus those which are the subject to rental agreements Products of Electrolux Zanussi manufacture which are not marketed by Electrolux European Guarantee If you should...

Страница 30: ... NOZZLEREFERENCE 146 Adjust 96 Adjust 70 Adjust NOMINALTHERMAL POWERkW 4 0 1 20 2 0 0 45 1 0 0 33 NOMINALFLOW RATE g h 288 86 144 32 72 24 NOZZLEREFERENCE 98 56 71 32 50 28 NATURAL GAS 20 mbar TYPEOF GAS CHARACTERISTICS LPG GAS 28 30 37 mbar 1 100 mm 1 100 mm VALUE Hs 49 92 MJ Kg Ws 82 09MJ m3 VALUE Hs 37 78 MJ m3 Ws 50 72MJ m3 Instructions for the Installer The cooker should not be installed in a...

Страница 31: ...1 Location of the appliance This appliance must not be installed in a bed sitting room of volume less than 20m or in a bathroom shower room or garage It is essential that the appliance is positioned as stated below see fig 1 i e shelves wall cabinets and cooker hoods must be fitted a minimum of 787mm directly above the top of the hotplate and 400mm above the hotplate when fitted in line with the o...

Страница 32: ...hen measure height from floor level to engagement edge on back of cooker dimension A of Fig 2 Assemble upper bracket to lower bracket so that underside of bracket is dimension A 3mm 1 8 above floor level Re position cooker and check that top bracket engages into cooker back to a depth of 75mm 3 as shown in Fig 2 Should the stability bracket currently installed not allow the cooker to stand correct...

Страница 33: ...lexible supply cord The cooker should be connected to a double pole switch with a minimum gap of 3mm between the switch contacts and of a type suitable for the required load in compliance with the current electric regulations The switch should be sited within 2m of the hob and be easily accessible upon completion of the installation The switch must not break the yellow and green earth cable at any...

Страница 34: ...injector Turnontheburnergassupplyandigniteanotherburner supply The pressure reading should be nominally 20mbar and must be between 17 mbar and 25mbar Turn off the burner supplies Conversion from Natural Gas to LPG It is important to note that this model is designed for use with natural gas but can be converted for use with butane or propane gas providing the correct injectors are fitted and the ga...

Страница 35: ...35 ZCM 650 651 0 78 kWh 41 min 56 1130 cm 0 79 kWh 43 min ...

Страница 36: ...x Group The world s No 1 choice The Electrolux Group is the world s largest producer of powered appliances for kitchen cleaning and outdoor use More than 55 million Electrolux Group products such as refrigerators cookers washing machines vacuum cleaners chain saws and lawn mowers are sold each year to a value of approx USD 14 billion in more than 150 countries around the world ...

Отзывы: