background image

Hints and tips

Warning! Refer to Safety chapters.

The temperature and baking times in the

tables are guidelines only. They depend

on the recipes and the quality and

quantity of the ingredients used.

Cooking recommendations

The oven has four shelf positions.
Count the shelf positions from the bottom of the oven

floor.
Your oven may bake or roast differently to the oven you

had before. The below tables provide you with the

standard settings for temperature, cooking time and

shelf position.
If you cannot find the settings for a special recipe, look

for the similar one.
The oven has a special system which circulates the air

and constantly recycles the steam. With this system you

can cook in a steamy environment and keep the food

soft inside and crusty outside. It decreases the cooking

time and energy consumption.
Baking cakes

Do not open the oven door before 3/4 of the set cooking

time is up.
If you use two baking trays at the same time, keep one

empty level between them.
Cooking meat and fish

Leave the meat for approximately 15 minutes before

carving so that the juice does not seep out.
To prevent too much smoke in the oven during roasting,

add some water into the deep pan. To prevent the

smoke condensation, add water each time after it dries

up.
Cooking times

Cooking times depend on the type of food, its

consistency, and volume.
Initially, monitor the performance when you cook. Find

the best settings (heat setting, cooking time, etc.) for

your cookware, recipes and quantities when you use

this appliance.

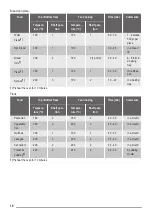
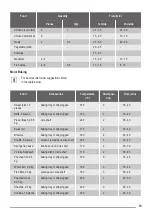
Baking and roasting table

Cakes

Food

Top / Bottom Heat

Fan Cooking

Time (min)

Comments

Tempera-

ture (°C)

Shelf posi-

tion

Tempera-

ture (°C)

Shelf posi-

tion

Whisked
recipes

170

2

165

2 (1 and 3)

45 - 60

In a cake
mould

Shortbread
dough

170

2

160

2 (1 and 3)

20 - 30

In a cake
mould

Butter-milk
cheese cake

170

1

165

2

70 - 80

In a 26 cm
cake mould

Apple cake
(Apple pie)

170

1

160

2 (1 and 3)

80 - 100

In two 20
cm cake
moulds on a
wire shelf

Strudel

175

2

150

2

60 - 80

In a baking
tray

Jam-tart

170

2

160

2 (1 and 3)

30 - 40

In a 26 cm
cake mould

8

Содержание KOU20722XK

Страница 1: ...KOU20722XK User Manual Oven Benutzerin formation Backofen ...

Страница 2: ...and knowledge if they have been given supervision or instruction concerning the use of the appliance in a safe way and understand the hazards involved Children between 3 and 8 years of age and persons with very extensive and complex disabilities shall be kept away unless continuously supervised Children of less than 3 years of age should be kept away unless continuously supervised Do not let child...

Страница 3: ...ollow the installation instructions supplied with the appliance Always take care when moving the appliance as it is heavy Always use safety gloves and enclosed footwear Do not pull the appliance by the handle The kitchen cabinet and the recess must have suitable dimensions Keep the minimum distance from other appliances and units Install the appliance in a safe and suitable place that meets instal...

Страница 4: ...e appliance directly on the bottom do not put aluminium foil directly on the bottom of cavity of the appliance do not put water directly into the hot appliance do not keep moist dishes and food in the appliance after you finish the cooking be careful when you remove or install the accessories Discoloration of the enamel or stainless steel has no effect on the performance of the appliance Use a dee...

Страница 5: ...e Warning Refer to Safety chapters Initial Cleaning Remove all accessories and removable shelf supports from the oven Refer to Care and cleaning chapter Clean the oven and the accessories before first use Put the accessories and the removable shelf supports back to their initial position Preheating Preheat the empty oven before first use 1 Set the function Set the maximum temperature 2 Let the ove...

Страница 6: ...t interrupted and to ensure that the oven operates with the highest energy efficiency possible When you use this function the tempera ture in the cavity may differ from the set temperature The heating power may be reduced For general ener gy saving recommendations refer to Energy Efficiency chapter Energy Saving This function was used to comply with the energy efficiency class according to EN 6035...

Страница 7: ... Wire shelf and baking tray together Push the baking tray between the guide bars of the shelf support and the wire shelf on the guide bars above Small indentation at the top increase safety The indentations are also anti tip devices The high rim around the shelf prevents cookware from slipping of the shelf Additional functions Cooling fan When the oven operates the cooling fan turns on automatical...

Страница 8: ...king trays at the same time keep one empty level between them Cooking meat and fish Leave the meat for approximately 15 minutes before carving so that the juice does not seep out To prevent too much smoke in the oven during roasting add some water into the deep pan To prevent the smoke condensation add water each time after it dries up Cooking times Cooking times depend on the type of food its con...

Страница 9: ... In a bread tin Small cakes 170 3 166 3 1 and 3 25 35 In a baking tray Biscuits1 150 3 140 3 1 and 3 30 35 In a baking tray Meringues 100 3 115 3 35 40 In a baking tray Buns1 190 3 180 3 80 100 In a baking tray Choux1 190 3 180 3 1 and 3 15 20 In a baking tray Plate tarts 180 3 170 2 25 35 In a 20 cm cake mould Victoria sandwich 180 1 or 2 170 2 45 70 Left right in a 20 cm cake mould Rich fruit ca...

Страница 10: ... 190 1 20 30 On a deep pan Scones1 200 3 190 2 10 20 In a baking tray 1 Preheat the oven for 10 minutes Flans Food Top Bottom Heat Fan Cooking Time min Comments Tempera ture C Shelf posi tion Tempera ture C Shelf posi tion Pasta flan 180 2 180 2 40 50 In a mould Vegetable flan 200 2 200 2 45 60 In a mould Quiches 190 1 190 1 40 50 In a mould Lasagne 200 2 200 2 25 40 In a mould Cannelloni 200 2 20...

Страница 11: ...d a deep pan English roast beef medium 210 2 200 2 51 55 On a wire shelf and a deep pan English roast beef well done 210 2 200 2 55 60 On a wire shelf and a deep pan Shoulder of pork 180 2 170 2 120 150 On a deep pan Shin of pork 180 2 160 2 100 120 2 pieces on a deep pan Lamb 190 2 190 2 110 130 Leg Chicken 200 2 200 2 70 85 Whole Turkey 180 1 160 1 210 240 Whole Duck 175 2 160 2 120 150 Whole Go...

Страница 12: ...Quantity Time min Pieces Quantity kg 1st side 2nd side Fillet steaks 4 0 8 12 15 12 14 Beef steaks 4 0 6 10 12 6 8 Sausages 8 12 15 10 12 Pork chops 4 0 6 12 16 12 14 Chicken cut in 2 2 1 30 35 25 30 Kebabs 4 10 15 10 12 Breast of chicken 4 0 4 12 15 12 14 Hamburger 6 0 6 20 30 Fish fillet 4 0 4 12 14 10 12 Toasted sandwiches 4 6 5 7 Toast 4 6 2 4 2 3 Turbo Grilling Set the maximum temperature of ...

Страница 13: ...0 2 35 40 Pizza frozen 0 35 kg wire shelf 220 2 35 40 Swiss roll baking tray or dripping pan 170 2 30 40 Brownie baking tray or dripping pan 180 2 30 40 Soufflè 6 pieces ceramic ramekins on wire shelf 200 3 30 40 Sponge flan base flan base tin on wire shelf 170 2 20 30 Victoria Sandwich baking dish on wire shelf 170 2 35 45 Poached fish 0 3 kg baking tray or dripping pan 180 3 35 45 Whole fish 0 2...

Страница 14: ...es medi terrean 0 7 kg baking tray or dripping pan 180 4 35 40 Information for test institutes Tests according to IEC 60350 1 Food Function Accesso ries Shelf posi tion Tem pera ture C Time min Comments Small cake Conventional Cooking Baking tray 3 170 20 30 Put 20 small cakes per one baking tray Apple pie Conventional Cooking Wire shelf 1 170 80 120 Use 2 tins 20 cm di ameter diagonally shifted S...

Страница 15: ...g aggressive agents sharp edged objects or a dishwasher It can cause damage to the nonstick coating Moisture can condense in the oven or on the door glass panels To decrease the condensation operate the oven for 10 minutes before cooking Clean the moisture from the cavity after each use Stainless steel or aluminium ovens Clean the oven door with a damp cloth or sponge only Dry it with a soft cloth...

Страница 16: ...anel before you remove the oven door Caution Do not use the oven without the internal glass panel 1 Open the door fully and hold both hinges 2 Lift and turn the levers fully on both hinges 3 Close the oven door halfway to the first opening position Then lift and pull forward and remove the door from its seat 4 Put the door on a soft cloth on a stable surface 5 Release the locking system to remove ...

Страница 17: ...o do if Problem Possible cause Remedy The cooking zones do not operate Refer to the operating instructions for the built in cooking surface The oven does not heat up The oven is deactivated Activate the oven The oven does not heat up The fuse is blown Make sure that the fuse is the cause of the malfunction If the fuse is blown again and again contact a qualified electrician The lamp does not opera...

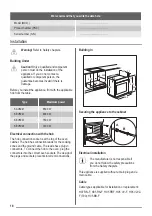
Страница 18: ...e hob connection socket is at the top of the oven cabinet The hob has connection leads for the cooking zones and the ground cable The leads have plug in connectors To connect the hob to the oven plug the connectors into the correct oven sockets The design of the plugs and sockets prevents incorrect connections Building In min 550 20 600 min 560 591 598 594 114 19 21 540 570 558 Securing the applia...

Страница 19: ...n clamp 1 2 3 4 5 1 2 3 4 5 1 2 3 4 5 1 2 3 4 5 230V 3 230V 1 400V 2N 400V 3N L1 L1 N L2 L1 N N L2 L3 L1 L2 L3 PE PE PE PE Energy efficiency Product Fiche and information according to EU 65 66 2014 Supplier s name Zanker Model identification KOU20722XK Energy Efficiency Index 94 9 Energy efficiency class A Energy consumption with a standard load conventional mode 0 83 kWh cycle Energy consumption ...

Страница 20: ...the residual heat to warm up other dishes Keep breaks between baking as short as possible when you prepare few dishes at one time Cooking with fan When possible use the cooking functions with fan to save energy Keep food warm Choose the lowest possible temperature setting to use residual heat and keep a meal warm Moist Baking Function designed to save energy during cooking Environmental concerns R...

Страница 21: ...geistigen Fähigkeiten oder mit mangelnder Erfahrung und oder mangelndem Wissen nur dann verwendet werden wenn sie durch eine für ihre Sicherheit zuständige Person beaufsichtigt werden oder in die sichere Verwendung des Geräts eingewiesen wurden und die mit dem Gerät verbundenen Gefahren verstanden haben Kinder zwischen 3 und 8 Jahren und Personen mit schweren Behinderungen oder Mehrfachbehinderung...

Страница 22: ... Scheibe führen Wenn das Netzkabel beschädigt ist muss es vom Hersteller seinem autorisierten Kundenservice oder einer gleichermaßen qualifizierten Person ausgetauscht werden um Gefahren durch elektrischen Strom zu vermeiden Ziehen Sie die Einhängegitter erst vorne und dann hinten von der Seitenwand weg und nehmen Sie sie heraus Führen Sie zum Einsetzen der Einhängegitter die obigen Schritte in um...

Страница 23: ...ngen Überlastschalter Sicherungen Schraubsicherungen müssen aus dem Halter entfernt werden können Fehlerstromschutzschalter und Schütze Die elektrische Installation muss eine Trenneinrichtung aufweisen mit der Sie das Gerät allpolig von der Stromversorgung trennen können Die Trenneinrichtung muss mit einer Kontaktöffnungsbreite von mindestens 3 mm ausgeführt sein Das Gerät entspricht den EC Richtl...

Страница 24: ...des Oberflächenmaterials zu verhindern Reinigen Sie das Gerät mit einem weichen feuchten Tuch Verwenden Sie ausschließlich Neutralreiniger Benutzen Sie keine Scheuermittel scheuernde Reinigungsschwämmchen Lösungsmittel oder Metallgegenstände Falls Sie ein Backofenspray verwenden befolgen Sie die Anweisungen auf der Verpackung Reinigen Sie die katalytische Emailbeschichtung falls vorhanden nicht mi...

Страница 25: ...Pflege Reinigen Sie den Backofen und die Zubehörteile vor der ersten Inbetriebnahme Setzen Sie das Zubehör und die herausnehmbaren Einhängegitter wieder in ihrer ursprünglichen Position ein Vorheizen Heizen Sie den leeren Backofen vor der ersten Inbetriebnahme vor 1 Stellen Sie die Funktion ein Stellen Sie die Höchstemperatur ein 2 Lassen Sie den Backofen 1 Stunde lang eingeschaltet 3 Stellen Sie ...

Страница 26: ...uchte heißluft Die Backofentür sollte während des Garvorgangs geschlossen bleiben damit die Funktion nicht unterbro chen wird So wird gewährleistet dass der Backofen mit der höchsten Energieeffizienz arbeitet Wenn Sie diese Funktion nutzen kann die Temperatur im Garraum von der eingestellten Temperatur abwei chen Die Heizleistung kann redu ziert werden Die allgemeinen Ener giesparempfehlungen find...

Страница 27: ...ngeschaltet 3 Zum Einstellen der gewünschten Kochstufe siehe Kochstufen Verwendung des Zubehörs WARNUNG Siehe Kapitel Sicherheitshinweise Einsetzen des Zubehörs Kombirost Schieben Sie den Kombirost zwischen die Führungsschienen der Einhängegitter mit den Füßen nach unten zeigend Backblech Schieben Sie das Backblech zwischen die Führungsschienen der Einhängegitter Kombirost und Backblechzusammen Sc...

Страница 28: ...die Einschubebene Finden Sie für ein bestimmtes Rezept keine konkreten Angaben orientieren Sie sich an einem ähnlichem Rezept Der Backofen ist mit einem speziellen System ausgestattet das die Luft zirkulieren lässt und den Dampf ständig wiederverwendet Mit diesem System macht das Garen mit Dampf Ihre Speisen innen weich und außen knusprig So verringert sich die Gardauer und der Energieverbrauch Ba...

Страница 29: ...n 20 cm auf dem Kombirost Strudel Stol len 175 2 150 2 60 80 Auf dem Backblech Marmela denkuchen 170 2 160 2 1 und 3 30 40 In einer Ku chenform 26 cm Früchteku chen 170 2 155 2 50 60 In einer Ku chenform 26 cm Biskuit Bis kuit ohne Butter 170 2 160 2 90 120 In einer Ku chenform 26 cm Stollen Üppiger Früchteku chen 170 2 160 2 50 60 In einer Ku chenform 20 cm Rosinenku chen1 170 2 165 2 20 30 In ei...

Страница 30: ...s Ku chenform 20 cm Üppiger Früchteku chen 160 1 150 2 110 120 In einer Ku chenform 24 cm Englischer Sandwich kuchen à la Victoria1 170 1 160 1 50 60 In einer Ku chenform 20 cm 1 Backofen 10 Min vorheizen Brot und Pizza Speise Ober Unterhitze Umluft Dauer Min Bemerkun gen Temperatur C Einschub ebene Temperatur C Einschub ebene Weißbrot1 190 1 195 1 60 70 1 2 Stück 500 g pro Stück Roggenbrot 190 1 ...

Страница 31: ...lauf 200 2 200 2 45 60 In einer Auf laufform Quiche 190 1 190 1 40 50 In einer Auf laufform Lasagne 200 2 200 2 25 40 In einer Auf laufform Cannelloni 200 2 200 2 25 40 In einer Auf laufform Yorkshire Pudding1 220 2 210 2 20 30 6 Pudding formen 1 Backofen 10 Min vorheizen Fleisch Speise Ober Unterhitze Umluft Dauer Min Bemerkun gen Temperatur C Einschub ebene Temperatur C Einschub ebene Rindfleisc...

Страница 32: ...m tiefen Blech Lamm 190 2 190 2 110 130 Keule Hähnchen 200 2 200 2 70 85 ganz Pute 180 1 160 1 210 240 Ganz Ente 175 2 160 2 120 150 Ganz Gans 175 1 160 1 150 200 Ganz Hasenbra ten 190 2 175 2 60 80 Zerlegt Hase 190 2 175 2 150 200 Zerlegt Fasan 190 2 175 2 90 120 Ganz Fisch Speise Ober Unterhitze Umluft Dauer Min Bemerkun gen Temperatur C Einschub ebene Temperatur C Einschub ebene Forelle Seebras...

Страница 33: ...astbrote 4 6 5 7 Toast 4 6 2 4 2 3 Heißluftgrillen Stellen Sie die Höchsttemperatur von 200 C ein Nutzen Sie die dritte Einschubebene Speise Menge Dauer Min Stück kg 1 Seite 2 Seite Rollbraten Pute 1 1 30 40 20 30 Hähnchen in zwei Hälften 2 1 25 30 20 30 Hähnchenunter schenkel 6 15 20 15 18 Wachteln 4 0 5 25 30 20 25 Gemüsegratin 20 25 Jakobsmuscheln 15 20 Makrele 2 4 15 20 10 15 Fischscheiben 4 6...

Страница 34: ...kblech oder tiefes Blech 180 3 35 45 Fischfilet 0 3 kg Pizzapfanne auf Kombirost 180 3 35 45 Fleisch pochiert 0 25 kg Backblech oder tiefes Blech 200 3 40 50 Schaschlik 0 5 kg Backblech oder tiefes Blech 200 3 25 35 Plätzchen 16 Stück Backblech oder tiefes Blech 180 2 20 30 Makronen 20 Stück Backblech oder tiefes Blech 180 2 40 45 Muffins 12 Stück Backblech oder tiefes Blech 170 2 30 40 Gebäck pik...

Страница 35: ...ackofens einschieben Nach der Hälfte der Gar dauer die Speise wenden Backofen 3 Min vor heizen Reinigung und Pflege WARNUNG Siehe Kapitel Sicherheitshinweise Hinweise zur Reinigung Feuchten Sie ein weiches Tuch mit warmem Wasser und einem milden Reinigungsmittel an und reinigen Sie damit die Vorderseite des Ofens Reinigen Sie die Metalloberflächen mit einem speziellen Reinigungsmittel Reinigen Sie...

Страница 36: ... der Einhängegitter Nehmen Sie die Einhängegitter Vorsicht Vorsicht beim Herausnehmen der Einhängegitter 1 Ziehen Sie das Einhängegitter vorne von der Seitenwand weg 2 Ziehen Sie das Einhängegitter hinten von der Seitenwand weg und nehmen Sie es heraus 2 1 Führen Sie zum Einsetzen der entfernten Zubehörteile die oben beschriebenen Schritte in umgekehrter Reihenfolge durch Aus und Einbauen der Tür ...

Страница 37: ...chlossen ist bauen Sie die Glasscheibe und anschließend die Backofentür ein Bei korrektem Einbau macht die Türabdeckung ein Klickgeräusch Achten Sie darauf die innere Glasscheibe richtig in die Aufnahmen einzusetzen A Austauschen der Lampe WARNUNG Stromschlaggefahr Die Lampe kann heiß sein 1 Schalten Sie den Backofen aus Warten Sie bis der Backofen abgekühlt ist 2 Trennen Sie den Ofen von der Netz...

Страница 38: ...fen Lassen Sie die Speisen nach Been digung des Gar oder Backvorgangs nicht länger als 15 20 Minuten im Backofen stehen Servicedaten Wenn Sie das Problem nicht selbst lösen können wenden Sie sich an Ihren Händler oder einen autorisierten Kundendienst Die vom Kundendienst benötigten Daten finden Sie auf dem Typenschild Das Typenschild befindet sich am Frontrahmen des Garraums Entfernen Sie das Type...

Страница 39: ...den die aufgrund der Nichtbeachtung der in den Sicherheitshinweisen beschriebenen Sicherheitsvorkehrungen entstehen Das Gerät wird ohne Netzstecker und Netzkabel geliefert Kabel Einsetzbare Kabeltypen für Montage oder Austausch H07 RN F H05 RN F H05 RRF H05 VV F H05 V2V2 F T90 H05 BB F Näheres zum Kabelquerschnitt siehe Gesamtleistung auf dem Typenschild Anschluss der Klemmleiste Das Gerät ist mit...

Страница 40: ...llgeräte Verfahren zur Messung der Gebrauchseigenschaften Energie sparen Der Backofen verfügt über Funktionen mit deren Hilfe Sie beim täglichen Kochen Energie sparen können Allgemeine Tipps Achten Sie darauf dass die Backofentür während des Ofenbetriebs richtig geschlossen ist Die Gerätetür darf während des Garvorgangs nicht zu oft geöffnet werden Halten Sie die Türdichtung sauber und stellen Sie...

Страница 41: ...lung wenn Sie die Restwärme zum Warmhalten von Speisen nutzen möchten Feuchte heißluft Diese Funktion ist entwickelt worden um während des Garvorgangs Energie zu sparen Umwelttipps Recyceln Sie Materialien mit dem Symbol Entsorgen Sie die Verpackung in den entsprechenden Recyclingbehältern Recyceln Sie zum Umwelt und Gesundheitsschutz elektrische und elektronische Geräte Entsorgen Sie Geräte mit d...

Страница 42: ...42 ...

Страница 43: ...43 ...

Страница 44: ...www electrolux com shop 867348655 A 402018 ...

Отзывы: