Zamel Exta Life RCR-21 Скачать руководство пользователя страница 4

ADDING SENSOR TO THE EFC-01 CONTROLLER

1. Switch on the EFC-01 controller and log in correctly to the mobile application EXTA LIFE.

2. Go to the screen Devices » Sensors and press the button “+”. The controller will enter the sen-

sor search mode. The search process takes the maximum of 60 s. After this time, the process 

needs to be resumed by pressing the “+” button again in the screen Sensors. 

3.

4. Press the button ‘Stop’ and select the sensor to be paired. Next, press the button ‘Pair’. 

5. After pairing, the sensor is visible on the screen “Sensors”. 

If the given sensor does not appear in the list of sensors to be paired 

during the search process:

- check whether the sensor is no longer paired with the controller / is 

visible in the list of sensors (if so, the sensor will not be displayed 

again during the pairing process),

- check whether the sensor is not marked as paired (this can happen 

during an error in the removal process - consequently, the sensor is 

not visible in the list of sensors but is still marked as ‘paired’) - then 

reset the sensor to factory settings.

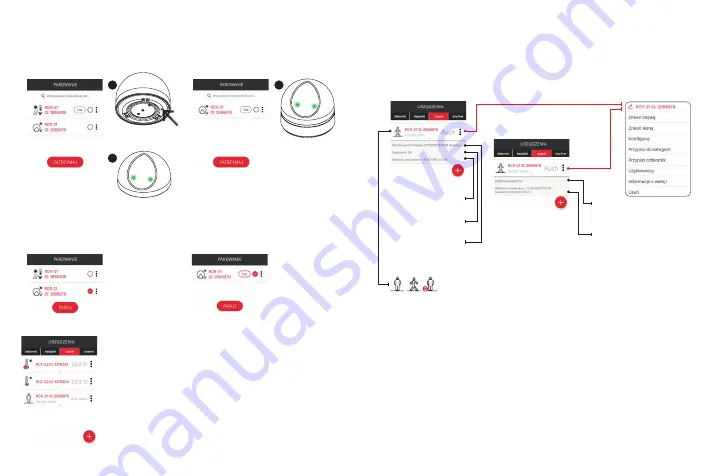
APPEARANCE OF THE SENSOR IN THE APPLICATION

The RCR-21 sensor is visible in the application right after pairing. The sensor can be named indi-

vidually and can be assigned an individual icon. It can be assigned to HOME category or to a user 

NOTE: The illuminance sensor is only used for motion sensor operation depending on the 

time of day or intensity of sunlight. The currently measured value of illuminance is only 

displayed in the configuration screen in case of selecting night or day mode.

Items in the context menu:

• 

Change the name 

 – allows for entering the sensor name.

• 

Change the icon

 – allows for assigning the icon to the sensor.

• 

Configure

 – allows for going to the sensor configuration screen (only for sensors powered by 

an external voltage source).

• 

Assign to category

 – allows for assigning the sensor to a category created in the screen 

HOME.

• 

Assign receiver

 – allows for assigning the sensor to the selected EXTA LIFE system receiver 

(applies only to the receivers that co-operate directly with the RCR-21 sensor bypassing the 

controller).

• 

Users

 – allows for assigning the sensor to a specific standard user.

• 

Version information

 – allows for displaying information about the current version of the sen-

sor’s software and its update.

• 

Delete 

 – allows for removing the sensor from the system (from the EFC-01 controller).

Battery-powered sensor

When pressing the 

button ‘TEST’, the 

LEDs in the paired 

sensor will light up 

green (this allows 

for identifying the 

sensor)

The LEDs will blink green 

and the sensor will appear 

in the list of sensors to be 

paired

Externally powered sensor

The LEDs blink green 

and after some time 

the sensor will appear 

automatically in the 

list of sensors to be 

paired

1

1

2

Press the PROG. button

for a short time (0.5 s)

Battery-powered sensor

Externally powered sensor

information about 

battery status

information on the time 

when the sensor last 

sent synchronisation 

data to the controller

information about the

last sensor status change

an icon changing depending on the cur-

rent sensor status: no motion / motion / 

battery discharged

context menu

information on the sensor’s 

power supply from an external 

voltage source

information about the anti-

tamper alarm if the anti-tamper 

function is enabled (in addition, 

the alarm occurrence is 

signalled by an icon)

Содержание Exta Life RCR-21

Страница 1: ...used device should be stored in designated areas For this purpose you can dispose of household waste free of charge and in any quantity to a collection point set up as well as to the shop when you buy new equipment Hereby ZAMEL Sp z o o declares that the radio equipment type RCR 21 is in compliance with Directive 2014 53 EU The full text of the EU declaration of conformity is available at the foll...

Страница 2: ...ace or in a metal switchgear High power overhead and underground power lines as well as mobile phone transmitters situated in close proximity to the devices also have a negative impact on the operating range Some functions are only available when using the PCL 21 power cradle Applies to a sensor mounted at a height of approx 2 2 m The range is only adjusted through the mobile application configura...

Страница 3: ...the time when the last synchronisation of the sensor with the controller occurred The time of the last change of the sen sor status and the time of the tamper alarm occurrence is provided both in the case of external and battery power supply CONNECTING POWER TO THE PCL 21 CRADLE The PCL 21 cradle works correctly in the voltage range from 6 to 24 VAC DC Polarity polarisa tion of the connected volta...

Страница 4: ...xt menu Change the name allows for entering the sensor name Change the icon allows for assigning the icon to the sensor Configure allows for going to the sensor configuration screen only for sensors powered by an external voltage source Assign to category allows for assigning the sensor to a category created in the screen HOME Assign receiver allows for assigning the sensor to the selected EXTA LI...

Страница 5: ... as set in the configuration screen 20 s by default After counting down this time the sensor sends the disabling frame and the status frame again If motion is detected again during counting down the delay time counting down the time stops and the sensor is waiting for the motion to stop When motion ceases the time is counted down from the beginning By default motion detection is signalled by the L...

Страница 6: ... can be checked from the level of configuration menu of the selected re ceiver on the screen Sensor assignment You can also delete the sensor from the receiver at this level DELETING THE SENSOR FROM THE SYSTEM When deleting the RCR 21 sensor from EXTA LIFE system we may encounter three situations 1 The sensor has been added to the system and operates as a battery sensor In order to delete it selec...

Страница 7: ...he given channel press for a short time 0 5 s the PROG button in the RCR 21 sensor 3 After pressing the PROG button the LEDs in the sensor light up orange and then blink green which signals the sending of programming frames The stage of assigning the sensor to the receiver ends with the LEDs lighting up blue DISCHARGED BATTERY SIGNALLING Battery discharge status is only signalled in the mobile app...

Страница 8: ...1 retransmitter If the signal from the sensor passes through the retransmitter in order to update move the sensor closer to the controller or possibly temporarily remove the retransmitter from the system and again add it after the update is completed 1 2 3 SOFTWARE UPDATE Update requirements the update can only be performed by a user with Root or Administrator rights update is available for the se...

Страница 9: ...ransmitter added to the EFC 01 controller When the sensor and retransmitter are added to the controller one can deal with two cases 1 The retransmitter and sensor are paired with the EFC 01 controller In this case only status frames are retransmitted automatically It is required to pair the retrans mitter with the EFC 01 controller The sensor has to be added to the system using the PCL 21 power cr...

Отзывы: