background image


            CONFIDENTIAL

                                DOC-USR-0030-12 


___________________________________________________________________________________________ 

Z3 Technology, LLC 

 100 N 8

th

 ST, STE 250 

 Lincoln, NE 68508-1369 USA 

 +1.402.323.0702 

19 

7.0


   RUNNING THE ENCODER 


This section gives step-by-step instructions on taking the Z3-DM8107-SDI-RPS and using it to stream 1080p or 
1080i video to VLC running on your PC.  In addition to the Z3-DM8107-SDI-RPS, an SDI source (or HDMI source 
with an HDMI->SDI converter) and a PC are required. 
 

7.1


Set up the HD Source 


(1)


Select a video source with SDI output 
-Alternately, a video source with HDMI output and an HDMI->SDI converter can be used.  In this 

case, an HDMI source with non-HDCP output must be used (Z3 uses the Brite-View BV-5005HD for 
HDMI testing). 


-Power on the video Source  


-Connect the source to a monitor 


-Select content you would like to stream 


If you see playback on the monitor, you’ve confirmed the source works.  If you are using an HDMI 
source, you should move the HDMI cable from the monitor to the HDMI->SDI converter. 


7.2


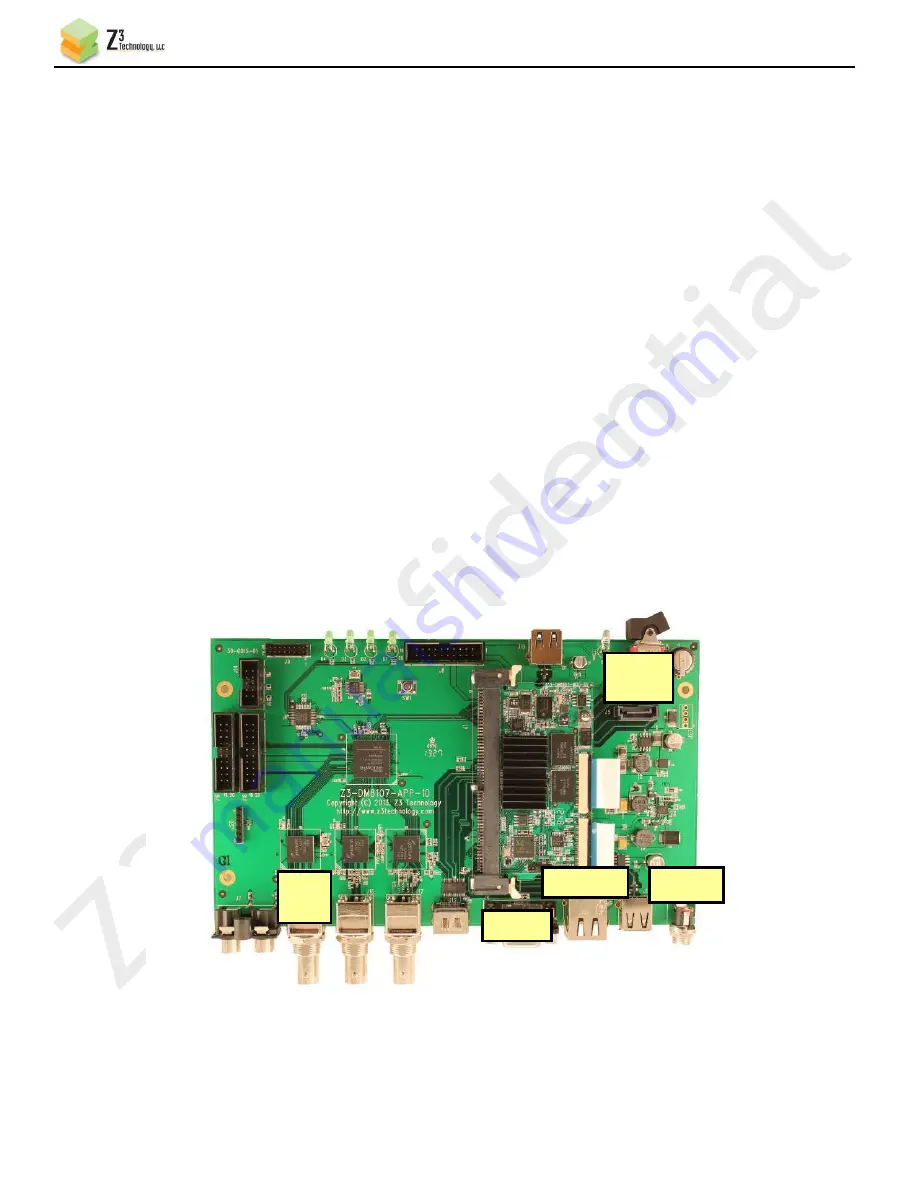
Connect the Board 


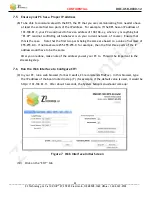
For these steps, please refer to 

Figure 5

.


Figure 5  Encoder Example Connections for the Z3-DM8107-APP-10 

Serial 

Power 

Switch 

12V In 

Ethernet 

SDI  
In 1 

Содержание Z3-DM8107-SDI-RPS

Страница 1: ...nd save the manual for future use This document contains proprietary and confidential information of Z3 Technology LLC Z3 This document may not be used reproduced disclosed or disseminated to anyone w...

Страница 2: ...removed unnecessary commands in TFTP and NFS setup Added description of using passwords in Section 11 Updated Status Tab values changed description of B frame parameter added GDR refresh rate modified...

Страница 3: ...Preparing the Linux Environment 12 5 2 Making the Directories and Running the Make Script 12 6 0 CODE OVERVIEW 14 6 1 Directory Structure 14 6 2 Z3 Application Overview 15 6 3 RDK Documentation 17 7...

Страница 4: ...the Image File 42 10 2 Method 2 Running Your Code through TFTP NFS 44 10 3 Other Available u boot Commands 48 11 0USING THE PASSWORD FEATURE 49 12 0SUMMARY OF OPTIONS 51 12 1 The System Setup Tab 51 1...

Страница 5: ...put Showing Lower Bit Rate 28 Figure 18 Changing TS Rate 29 Figure 19 TS Rate and Lower Bit Rate Reflected in VLC 30 Figure 20 Tuning for Various Use Cases 31 Figure 21 The User Presets Tab 32 Figure...

Страница 6: ...10 board The software bundle consists of the necessary components for developing advanced multimedia graphics and DSP applications The Z3 DM8107 MOD is a compact OEM module which supports up to1080p60...

Страница 7: ...odule The Z3 DM8107 APP 10 application board has 2 SDI inputs 1 of which can also be used for composite 1 SDI output 1 set of L R analog stereo audio inputs 1 HDMI output and 4 LEDs for status Figure...

Страница 8: ..._______________________________________________________________ Z3 Technology LLC 100 N 8th ST STE 250 Lincoln NE 68508 1369 USA 1 402 323 0702 8 The figure below shows a block diagram of the Z3 DM810...

Страница 9: ...r latency and using DHCP Details on running the Decoder can be found in Section 8 0 RUNNING THE DECODER on page 37 2 2 If You Already Have a System from Z3 and Need to Update the Firmware You can upda...

Страница 10: ...ln NE 68508 1369 USA 1 402 323 0702 10 3 0 INCLUDED PARTS LIST 1 x Z3 DM8107 MOD 1 x Z3 DM8107 APP 10 1 x Z3 DM8168 DEB 01 JTAG connector attaches to DM8107 MOD 1 x Cable Strip for connecting the Z3 D...

Страница 11: ...ut Gigabit Ethernet USB 2 0 SATA x2 1 GB DDR3 256 MB NAND Flash Control through serial port or HTTP High density connectors to all signals 4 1 Supported Input Resolutions Encode SDI 1080p60 1080p50 10...

Страница 12: ...g toolchain You can determine whether your OS is 64 bit by using the uname p command A 64 bit OS will return x86_64 while a 32 bit OS will return i386 i586 or i686 For 64 bit Ubuntu you can get the ne...

Страница 13: ...nd 30 40 minutes You will also need to type in the sudo password a few times toward the end of the build The outcome of the build process should be newly created image files in the images directory Yo...

Страница 14: ...hat comes with the Z3 DM8107 SDI RPS is run from the run sh script in dvr rdk dvr_rdk bin ti810x This code calls the z3_dvr_rdk_demo_mcfw_api out binary which initializes and runs the encoder This bin...

Страница 15: ...in the same directory 3 z3 This directory contains the base code for RTP tx and rx as well as the base code for audio capture and output 6 2 Z3 Application Overview 6 2 1 Application Names and Locati...

Страница 16: ...prompt You can then enter commands to encode For example encode instance 1 source SDI1 dst rtp 192 168 0 6 5004 size 1280x720 audio off This will start encode from SDI1 streaming to 192 168 0 6 at por...

Страница 17: ...VR_RDK_Audio_Notes pdf DM81xx_DVR_RDK_AVSync_Notes pdf DM81xx_DVR_RDK_Boot_Logo_and_External_Device pdf DM81xx_DVR_RDK_Customer_Display_Resolution pdf DM81xx_DVR_RDK_Debug_Statistics pdf DM81xx_DVR_RD...

Страница 18: ...IF_16CIF_DVR pdf DM814x_DVR_RDK_UseCaseGuide_Decode_Display pdf DM816x_DVR_RDK_UseCaseGuide_16D1_DVR pdf DM816x_DVR_RDK_UseCaseGuide_32D1_Decode_Display pdf DM816x_DVR_RDK_UseCaseGuide_SD_HD_Encode_Ca...

Страница 19: ...t up the HD Source 1 Select a video source with SDI output Alternately a video source with HDMI output and an HDMI SDI converter can be used In this case an HDMI source with non HDCP output must be us...

Страница 20: ...her your PC or a hub your PC is connected to The next step is to set up a terminal to view the activity of the board 7 3 Set up the Terminal Window 5 If you are running from a Windows PC run TeraTerm...

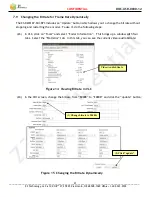
Страница 21: ...Power on the Board 7 Connect the 12V power supply and turn the power switch on You should see the board booting up within the terminal window After about a minute you will see the RPS Main Menu Figur...

Страница 22: ...whatever is on your current network of course Ensure that this is the case Note that the first two parts being the same are based on a value of netmask of 255 255 0 0 If netmask were 255 255 255 0 fo...

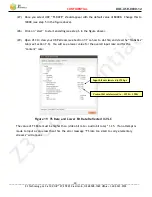
Страница 23: ...to the IP address of your PC in this example 192 168 0 6 Also make note of the value of Dest Port should be 5004 by default Note If you want to encode 1080p60 you must first change Operating Mode at...

Страница 24: ...input is detected If that occurs just click stop first The status should change from IDLE or STOPPED to RUNNING 7 7 Run VLC to View Stream 13 Run VLC on your PC version used in testing at Z3 2 1 5 14...

Страница 25: ...simple to change to RTP streaming All that is needed is a few parameter changes To stream using RTP do the following steps 17 In the CH1 configuration tab click on stop to stop the current encoding s...

Страница 26: ...192 168 81 7 is the IP address of the Z3 DM8107 SDI RPS and name is z3 1 for unicast streaming and z3 1m for multicast streaming For example if the IP address of the Z3 DM8107 SDI RPS is the default v...

Страница 27: ...allows you to change the bitrate without stopping and restarting the encoder To use it do the following steps 23 In VLC click on Tools and select Codec Information This brings up a window with four ta...

Страница 28: ...8 25 You should see the video bitrate drop and the quality of the picture in VLC change If you click on the status page and click Refresh you will also see the updated bitrate reflected You can also u...

Страница 29: ...f the factory is a value of 8Mbps corresponding to 6Mbps for the video There are times however when it is desirable to make this value higher For example if the encoder bit rate is very low below 1Mbp...

Страница 30: ...ncoding see step 6 in the figure above 29 Open VLC to view your UDP stream see Section 7 7 on how to do this and view the Statistics tab see Section 7 9 You will see a lower value for the overall inpu...

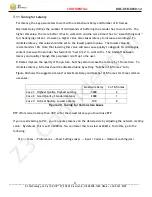
Страница 31: ...ent because the encoder has fewer bits over time to work with The tradeoff between latency and quality through this parameter is left up to the user B frames improve the quality of the picture but the...

Страница 32: ...assigned can be seen either through the serial interface or through the ZFinder tool running on a PC To see how DHCP support works you can do the following steps 30 The first thing you need to do is...

Страница 33: ...the screen and select as the preset the z3_test configuration you just created 33 As soon as you select z3_test the screen will reload Check the Use DHCP box 34 Now that DHCP is set in z3_test save th...

Страница 34: ...aved it to the configuration z3_test and specified that z3_test will be used when the system restarts go ahead and reboot the Z3 DM8107 SDI RPS 37 A new IP address is assigned to the unit through DHCP...

Страница 35: ...ur Windows PC The ZFinder window appears ZFinder does a scan of the network and lists the location of all Z3 systems connected to the network In this case the Z3 DM8107 SDI RPS appears with the IP add...

Страница 36: ...Z3 Technology LLC 100 N 8th ST STE 250 Lincoln NE 68508 1369 USA 1 402 323 0702 36 A web browser will then open at the IP address of the Z3 DM8107 SDI RPS and you should see the Web GUI Figure 30 Web...

Страница 37: ...nitor with SDI input or use an SDI HDMI converter 8 2 Set Up the Decoder Board to Work with the Encoder Board As shipped the Decoder board will have the same IP address as the Encoder board 192 168 81...

Страница 38: ...23 0702 38 8 3 Configure the Encoder 4 Going back to the Encoder board 192 168 0 7 change the settings to match those in the figure below Here a multicast address is used You can also try streaming un...

Страница 39: ...192 168 81 7 in this example The first thing you want to do is switch to Decoder mode This can be done by changing Operating Mode in the lower right corner 6 Once you do this the description at the to...

Страница 40: ...guration 8 If you haven t already go back to the Encoder board and click start 9 The decoder then initializes the SDI output About 5 10 seconds later decode should start and you should see a picture h...

Страница 41: ...onfiguration and store in the default or other files Serial menus can be used instead of the web based GUI More detailed system information can also be gained from the options in the serial interface...

Страница 42: ...E CODE YOU BUILT ON THE BOARD There are two ways to take the image files you built in Section 5 0 and run them on the board 1 Updating the image file and 2 Setting up NFS TFTP to link to your developm...

Страница 43: ...u to the Software Updater screen Click Browse and browse to the directory z3 dm810x z3 centaurus dm810x_sdi_rps date images and select the image file z3 centaurus upd img 4 Click Open 5 Click Upload a...

Страница 44: ...is example An example of a tftp file would be service tftp disable no socket_type dgram protocol udp wait yes user nobody server usr sbin in tftpd server_args s home c Start TFTP sudo etc init d xinet...

Страница 45: ...econd stage u boot to start c As soon as the second stage u boot starts press the space bar immediately to make it stop in the u boot prompt d The next step is to prepare the environment variable scri...

Страница 46: ...put from a file If you are using minicom type ctl A then Z This should bring up the minicom Command Summary From here type T to bring up the Terminal Settings window From here set Newline tx delay ms...

Страница 47: ...r and netmask to make sure it conforms to your network You can use setenv to change anything that needs to be modified n Set boot mode to NFS Z3 DM385 setenv bootcmd run boot nfs o Save your changes Z...

Страница 48: ...s Get kernel from NAND root file system from NFS setenv bootcmd run nand_boot_jffs2 Get kernel from NAND root file system from NAND JFFS2 setenv bootcmd run nand_boot_ubifs Get kernel from NAND root f...

Страница 49: ...ATURE The Z3 DM8107 SDI RPS includes an optional password to prevent unauthorized users from accessing the Web GUI The steps for using it are shown below 1 In the System Setup tab click on go next to...

Страница 50: ...369 USA 1 402 323 0702 50 3 Wait for the password options to disappear This indicates that the password has changed 4 Retype the IP address in the web browser You should then see a prompt for a user n...

Страница 51: ...boot is needed for changes to this value to take effect Default Gateway 192 168 a b 192 168 0 1 Sets the network gateway to use for the Z3 DM8107 SDI RPS Note that a save of these settings and a reboo...

Страница 52: ...ent from the default is desired the user would change to the desired value and then click the Set Display button Note 1 Resolutions supported HDMI and SDI 1080i30 1080i29 97 1080i25 1080p60 1080p59 94...

Страница 53: ...5 means a key frame is inserted every two seconds Width Width of encoded picture Height Height of encoded picture A small I will appear if interlaced is being encoded Audio Status Channel The channel...

Страница 54: ...tion based on the capture resolution Note 1 Video Bit rate 100 12000K 6000K The bit rate for channel 1 Video Profile High Main Baseline The H264 profile of the bitstream Generally High is used for 108...

Страница 55: ...t Rate 12Kbps 320Kbps 128Kbps The bit rate of the audio Mode Mono Stereo Select between stereo and mono inputs Source HD SDI1 HD SDI2 Analog None Where to get audio for that subchannel Pid 0 8191 120...

Страница 56: ...f this is selected you should type the path name of the file in Dest Address for example media sda1 test ts FILE will write raw h264 and raw aac to 2 separate files If this is selected you should type...

Страница 57: ...Normally this value should be set to 1 25 video bit rate audio bit rate This can be set to higher values to allow leeway for times when many bits are needed to encode This can be especially useful for...

Страница 58: ...es Input Interface RTP UDP TSFILE FILE Where to get input for channel 1 See the description in Output Format in the Encode section for details Address x y z w 225 1 2 3 The IP address that the decoder...

Страница 59: ...Can also add more profiles by clicking on new in the User Presets tab Save Click to save value that what was selected Operating Mode Encoder Interlaced Progressive Encode Single Ch No Scale Encode 1...

Страница 60: ...M 1 GiB NAND setting chip delay to 15us HW ECC BCH8 Selected 256 MiB Using default environment The 2nd stage U Boot will now be auto loaded Please do not interrupt the countdown till DM385_EVM prompt...

Страница 61: ...ytes read OK Booting kernel from Legacy Image at 81800000 Image Name Linux 2 6 37 Image Type ARM Linux Kernel Image uncompressed Data Size 2984932 Bytes 2 8 MiB Load Address 80008000 Entry Point 80008...

Страница 62: ...pkmap 0xbfe00000 0xc0000000 2 MB modules 0xbf000000 0xbfe00000 14 MB init 0xc0008000 0xc0042000 232 kB text 0xc0042000 0xc05af000 5556 kB data 0xc05b0000 0xc0601100 325 kB SLUB Genslabs 11 HWalign 64...

Страница 63: ...troller setup bio create slab bio 0 at 0 vgaarb loaded SCSI subsystem initialized usbcore registered new interface driver usbfs usbcore registered new interface driver hub usbcore registered new devic...

Страница 64: ...nd hub 2 0 1 0 1 port detected musb hdrc musb hdrc 1 USB Host mode controller at d0832800 using DMA IRQ 19 NET Registered protocol family 2 IP route cache hash table entries 2048 order 1 8192 bytes TC...

Страница 65: ...f port 0x100 irq 59 omap2 nand driver initializing omap2 driver probed NAND device Maf ID 0xad Chip ID 0xda Hynix NAND 256MiB 3 3V 8 bit erasesize 0x20000 writesize 2048 oobsize 64 Scanning device for...

Страница 66: ...trol Model driver for USB modems and ISDN adapter s Initializing USB Mass Storage driver usbcore registered new interface driver usb storage USB Mass Storage support registered mice PS 2 mouse device...

Страница 67: ...ry needed UBIFS recovery completed UBIFS mounted UBI device 0 volume 0 name rootfs UBIFS file system size 195289088 bytes 190712 KiB 186 MiB 1538 LEBs UBIFS journal size 9023488 bytes 8812 KiB 8 MiB 7...

Страница 68: ...art num len 13 Part number 6slx16csg324 Date 2014 02 22 Time 13 13 32 Bitstream size 464196 Wrote 464196 bytes Check done FPGA DONE 0x0001 BoardID 275 omap_i2c omap_i2c 1 controller timed out i2cset y...

Страница 69: ...id 1 iface MIXER name PCM Playback Volume type INTEGER access rw R values 2 min 0 max 127 step 0 values 127 127 dBscale min 63 50dB step 0 50dB mute 0 numid 22 iface MIXER name Line DAC Playback Volum...

Страница 70: ...ck status 0x00000000 c6xdsp Remote Debug Shared Memory 0xbff00000 m3video Remote Debug Shared Memory 0xbff05020 m3vpss Remote Debug Shared Memory 0xbff0a040 m3vpss Received character s c6xdsp Remote D...

Страница 71: ...N 8th ST STE 250 Lincoln NE 68508 1369 USA 1 402 323 0702 71 1 Change channel 1 H 264 RES 1280x720 URL rtp 192 168 0 6 5004 VSRC HD SDI1 2 Change channel 2 H 264 RES 720x480 URL udp 192 168 0 6 5006 V...

Страница 72: ...the network turned off o Try connecting the PC directly to the board without any routers etc Can the Linux PC and target board see each other on the network o Try pinging the Z3 DM8107 SDI RPS IP add...

Страница 73: ...work conflicting with the IP address of the tftp server Problem NFS does not work Please see the items in Web interface does not come up Is the link to filesys properly set up see step 3 on page 45 Do...

Отзывы: