


LED LIGHT REMOTE CONTROL - INSTRUCTIONS FOR USE
Your desk includes an integrated LED light strip with customizable RGB LED lights. The lights are controlled using the included LED
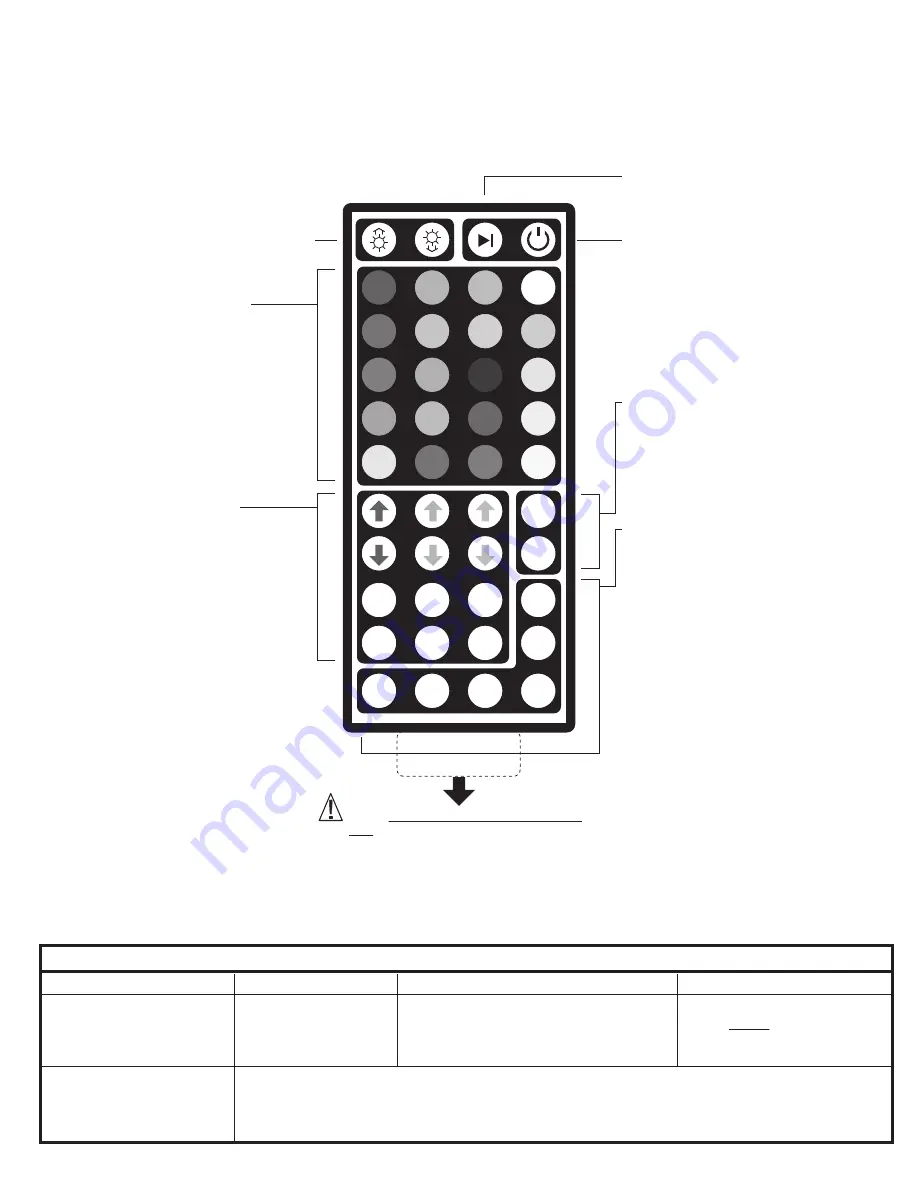
Remote Control. Please refer to the Button Feature Diagram below for an outline of the remote’s functions. A Troubleshooting FAQ is also
included below for frequently asked questions and general usage troubleshooting. This remote uses a single CR2025 3V Lithium coin
battery, located in the pull out battery tray tab on the back-bottom edge of the remote.
LED Light Remote Control:
Button Feature Diagram
NOTE: When using the remote for the first
time, you will need to pull the clear plastic
tab out from the battery tray to activate it
from storage mode. The remote will now
function as shown.
REMOVE CLEAR TAB
LED Brightness
INCREASE/DECREASE
Speed Section:
Increase/Decrease
transition speed of effects
from the Mult-Color RGB
Effects Section.
Programmable Do-it-Yourself
(DIY) Section:
Preset FIXED Red, Green, Blue
(RGB) and White Color Section:
To save your own custom FIXED LED light
color, follow the steps below:
1. Press any DIY # Button ONCE. The LED
lights should change to solid white color.
2. Use any of the RGB DOWN arrows to
REMOVE that respective color from the
color mixture. To ADD a color back to
the color mixture, use the respective
RGB UP arrows.
3. When you have reached the desired
custom LED color, press the SAME DIY
# button that you selected in Step 1. The
custom LED color is now saved, and
can be recalled by pressing the DIY #
button.
Multi-Color RGB Effects Section
(Press to Select):
•
AUTO:
Automatically cycle through all RGB color
ranges, while alternating between the “FLASH”
and “FADE7” effects.
•
FLASH:
Cycle through all RGB color ranges, with
an abrupt flashing transition effect between
colors.
•
FADE7:
Cycle through all RGB color ranges, with
a smooth fading transition effect between colors.
See “Speed Section” for additional customization.
•
FADE3:
Cycle through only Red, Green, Blue
colors, with a smooth fading transition between
colors. See “Speed Section” for additional
customization.
•
JUMP7:
Cycle through all RGB color ranges, with
an abrupt transition from one color to the next.
See “Speed Section” for additional customization.
•
JUMP3:
Cycle through only, Red, Green, Blue
colors, with an abrupt transition between colors.
See “Speed Section” for additional customization.
To select a preset color, simply press the
desired color button within each of the RGB
color mixtures to set the LED light color.
The LED lights will change to a FIXED
(Solid) color based on the selection.
Q: LED Lights won’t turn ON?
Double check that LED Power Supply is
connected to the LED strip on the desk and the
power supply is plugged into a power outlet.
Press the power
On/Off Button.
When first programming the DIY section, the lights will start off white. Hold DOWN any of the RGB colored arrows firmly
until you see the light begin to shift in color. Once a color range has been removed, it is easier to begin customizing the
DIY color. Make sure to press the SAME DIY # button you first pressed during the programming process to save the
custom color.
Remove the clear tab from the battery
tray on first use. After prolonged
usage, the battery (CR2025 3V
Lithium) may need to be replaced.
Q: DIY lights will not program?
Pause/Play
Multi-Color Effects
LED Power
On/Off
NOTE:
The LED lights should automatically power
ON when the LED Power Supply is connected to a
power outlet.
TROUBLESHOOTING FAQ
Problem:
Solution:
Also Check:
Also Check:
DIY 1
R
G
B
W
DIY 2
DIY 3
QUICK
SLOW
AUTO
FLASH
DIY 4
DIY 5
DIY 6
FADE7
JUMP3
JUMP7
FADE3
ADDENDUM B
Содержание 1.2 Series
Страница 1: ......
Страница 2: ......
Страница 3: ......
Страница 4: ...TOP FR O N T...
Страница 5: ......
Страница 6: ...A A A A 7 9 6 3 4 TOP FR O N T...
Страница 7: ...12 13 14 H H 3 4 5 6...
Страница 8: ...10 3 4 11...
Страница 9: ...10...
Страница 10: ......
Страница 11: ...26 66 cm...
Страница 14: ......
Страница 16: ......