14
SUBSEQUENT START-UP
ATTENTION:
If the grill fails to light or the fire in the Firepot goes out while cooking, it is vital
to follow these steps when sufficient pellets are still in the Pellet Hopper. Failure to follow the
steps may cause a hazardous
“
over-firing
”
of your grill due to an excess of unburned pellets
in the Firepot.
1.Turn OFF the appliance and unplug the Power Cord. After the grill cools down, remove all
food, the Porcelain Grills, Grease Drain Pan and the Heat Baffle.
2.Remove all unburned pellets and ash from inside and around the Firepot (See instruction
for proper handling and disposal of ash).
3.Plug the Power Cord and turn on the grill. Pellets should fall into the Firepot and the Hot
Rod should begin to heat (it will start to turn red).
4.If this step is successful, you will see flames come out of the Firepot.
Then turn the Temperature Dial to SHUT DOWN CYCLE and let it cool down. Next, put
components back in place, open the lid and turn the Temperature Dial to SMOKE. Wait a
few minutes until you see whitish-gray smoke coming out of the grill, then close the lid and
turn the Temperature Dial to any cooking setting desired.
5.If this step is not successful, see TROUBLESHOOTING or contact Z GRILLS Technical
Support to help diagnose the problem.
SHUTDOWN CYCLE
Auger turns off
Fan continues to run for 10 minutes
After you have finished cooking, turn the Temperature Dial to Shutdown Cycle position. The
function of this setting is to leave the Draft Induction Fan running for 10 minutes to burn
redundant pellets in the firepot. After the fan runs for 10 minutes, the fan will stop and the
controller will power off.
CAUTION:
The main power switch will shut the power off to the controller and the
Temperature Dial Knob switch will cut off power to the grill components only. When servicing
the controller or any parts ensure that the power supply is disconnected by unplugging the
grill to avoid a shock hazard.
Содержание ZPG-200A
Страница 2: ......
Страница 4: ...2 SAVE THIS MANUAL FOR FUTURE REFERENCE...
Страница 10: ...8 ASSEMBLY INSTRUCTIONS PARTS DIAGRAM...
Страница 14: ...12 6 HANG ON THE GREASE BUCKET Hang the Grease Bucket 33 on the hook as shown...
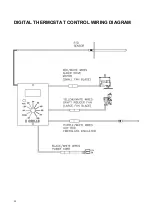
Страница 22: ...20 DIGITAL THERMOSTAT CONTROL WIRING DIAGRAM...


