background image

DCWL-7962OT Outdoor AP   
Installation Manual                               Chapter 1 Device Introduction 

1-1 

Chapter 1  Device Introduction 

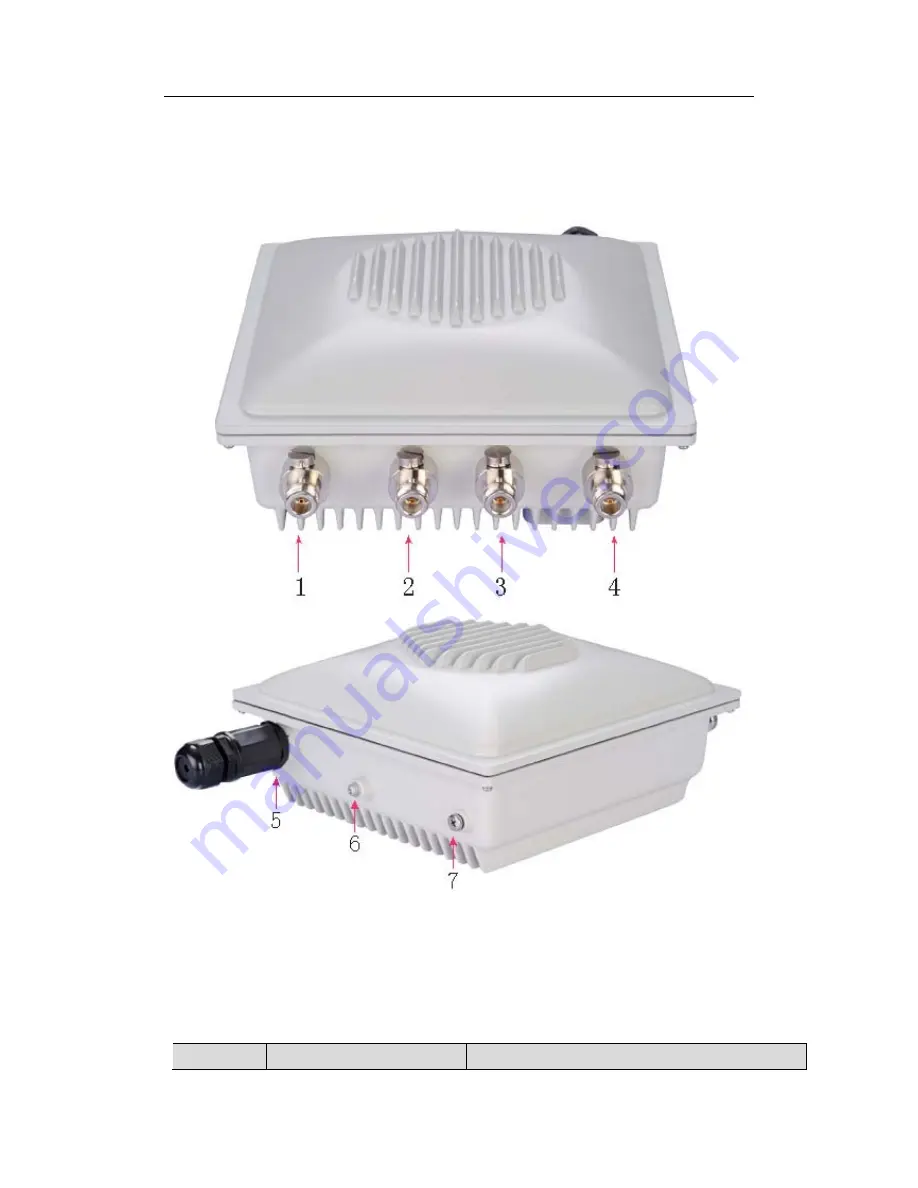
DCWL-7962OT(R5) outdoor AP is shown as below: 


Fig 1-1 DCWL-7962OT

R5

  AP 


The ports explanation of DCWL-7962OT outdoor AP is as below: 


Table 1-1 ports explanation 


No. 

Name 

Explanation 

Содержание DCWL-7962OT

Страница 1: ...DCWL 7962OT Outdoor AP Installation Manual DCWL 7962OT 室外型无线接入点产品 安装指导 Manual Version v1 1 ...

Страница 2: ...R 3 AP INSTALLATION 3 1 3 1 INSTALLATION PROCESS 3 1 3 2 CHECKING BEFORE INSTALLATION 3 2 3 3 ENSURE THE INSTALLATION POSITION 3 2 3 4 INSTALL DCWL 7962OT R5 3 2 3 4 1 Column Holding Installation 3 2 3 4 2 Wall Hanging Installation 3 4 3 5 CONNECT CABLES 3 6 3 5 1 Connect Network Cables 3 6 3 5 2 Connect Ground Cables 3 7 3 5 3 Connect RF Cables 3 7 3 6 AP POWER 3 8 3 6 1 Checking before Power 3 8...

Страница 3: ...l Chapter 1 Device Introduction 1 1 Chapter 1 Device Introduction DCWL 7962OT R5 outdoor AP is shown as below Fig 1 1 DCWL 7962OT R5 AP The ports explanation of DCWL 7962OT outdoor AP is as below Table 1 1 ports explanation No Name Explanation ...

Страница 4: ...rface 6 GND Ground point 7 Reset AP reset hole The basic configuration of DCWL 7962OT outdoor AP is as below Table 1 2 basic configuration Product Model Applicable Protocols Antenna Maximum Power DCWL 7962OT R5 IEEE802 11a b g n Double Radiofrequency Provide external antenna 24W The shape size and weight of DCWL 7962OT outdoor AP is as below Table 1 3 the shape size and weight Product Model Shape ...

Страница 5: ...e the anti skid measures Keep the device clean without dirt Do not put the device and the installation tools in the walking area 2 2 Installation Environment Requirements Before the installation please check the installation conditions of the device to make sure that the device is in the good operating environment in a long time Check this with the following aspects The temperature and humidity en...

Страница 6: ...stallation 2 2 2 4 Installation Tools When installing DCWL 7962OT outdoor AP the following tools may be used user owned Horizontal ruler Permanent marker Knife Wire stripper Network pliers Impact drill 1 and some supporting drills Rubber hammer Phillips screwdriver Ladder ...

Страница 7: ...CWL 7900 series indoor AP is high normally the maintenance personal cannot maintain and debug through the console port to login the device after installation We suggest user conducting the basic configuration according to need before installing the AP to the appointed position 3 1 Installation Process Fig 3 1 AP installation flow diagram ...

Страница 8: ...below Cut back the obstacles such as walls between AP and the user terminal device as much as possible Make the AP s position far away from the electrical device that can bring the RF noise such as the microwave The installation position should be hidden as much as possible to prevent disturbing the inhabitants 3 4 Install DCWL 7962OT R5 The following two installation methods are supported for DCW...

Страница 9: ...PCS stainless tight hoop strip on the stick by passing through the mounting bracket and lock the fastening screws Fig 3 3 Column holding installation of DCWL 7962OT R5 AP 3 Install the device with the backplane to the mounting kit on the column and fix the device and mounting kit together by using 2pcs short screws and 1pcs long screws ...

Страница 10: ...ng method the steps are as below 1 As shown in the fig 3 1 install the backplane at the bottom of DCWL 7962OT R5 first 2 Make the AP wall mounting kit flat against the wall and mark the holes that the crews needs to be installed into and then punch four holes with the impact drill Insert the expansion bolt into the holes and use the rubber hammer beating it until the expansion bolt got into the wa...

Страница 11: ...lt holes on the wall and make the crews pass through the installation holes of the wall mounting kit Lock the wall mounting kit to the wall Fig 3 6 Install the wall mounting kit 4 Install the device with the backplane to the mounting kit on the column and fix the device and mounting kit together by using 4pcs short screws and 1pcs long screws ...

Страница 12: ... DCWL 7962OT R5 outdoor AP supports the 802 3at PoE power The power and the network cables should be isolated with water Please install the waterproof kit onto the network cables as the sequence in the following figure Fig 3 8 The installation sequence of the waterproof kit After installed insert the cables into the AP and screw the waterproof kit as the sequence ...

Страница 13: ...ables or antenna onto the RF interface The cables interface cannot be installed with a mistake The 5G cable should be connected in the 5G RF interface and the 2 4G cable should be connected in the 2 4G RF interface After connection wrap 3 layers of waterproof tape on the connection point The waterproof tape should be elongated first to make its width turn into the half of the original width and th...

Страница 14: ...Power User can use the Ethernet cable to connect the Ethernet interface of the AP and the switch which supports PoE function to power to the AP 3 6 3 Checking after Power Check if the LED of AP works normally after connecting the power The explanation of LED status is seen in the product spec 3 7 Connect AP to Internet In the actual use AP can be uplink connected to the Internet or MAN through the...

Страница 15: ...件 2 1 2 3 设备附件 2 1 2 4 安装工具 2 2 第 3 章 安装 AP 3 1 3 1 安装流程 3 1 3 2 安装前检查 3 2 3 3 确定安装位置 3 2 3 4 安装 DCWL 7962OT R5 3 2 3 4 1 抱柱安装方式 3 2 3 4 2 壁挂安装方式 3 4 3 5 连接线缆 3 6 3 5 1 连接网线 3 6 3 5 2 连接接地线 3 6 3 5 3 连接射频线 3 6 3 6 AP 供电 3 7 3 6 1 上电前检查 3 7 3 6 2 PoE 供电 3 7 3 6 3 上电后检查 3 7 3 7 将 AP 连接到网络 3 8 ...

Страница 16: ...DCWL 7962OT 室外型无线接入点产品安装指导 第 1 章 设备简介 1 1 第1章 设备简介 DCWL 7962OT R5 室外型无线接入点产品如下图 图1 1 DCWL 7962OT R5 AP DCWL 7962OT 室外型 AP 端口说明如下表 表1 1 产品端口说明列表 序号 名称 说明 ...

Страница 17: ...4G的天线接口1 4 2 4G 2 2 4G的天线接口2 5 PoE PoE接口 PoE供电和以太网接口 6 GND 接地点 7 Reset AP复位孔 DCWL 7962OT 室外型 AP 基本配置如下表 表1 2 产品基本配置列表 产品型号 产品适用协议和特点 天线 最大功耗 DCWL 7962OT R5 IEEE802 11a b g n 双射频 另配外置天线 24W DCWL 7962OT 室外型 AP 的外形尺寸及重量如下表 表1 3 外形尺寸及重量 产品型号 外形尺寸 重量 DCWL 7962OT R5 W D H 220 220 100mm 3 80kg ...

Страница 18: ...必须仔细阅读 设备提供的相关安全介绍 采取适当的安全措施避免人身伤害和设备损坏 请将设备放置在干燥 平整的地方 并且做好防滑措施 保持设备洁净无灰尘 请不要将设备和安装工具放在行走区域内 2 2 检查安装条件 在准备安装之前 还应该对设备的安装条件进行检查 以保证设备长期处于良好的运行 环境之中 可从以下方面对安装条件进行检查 设备工作的温度 湿度环境要求如下 表 2 1 设备工作温度 湿度指标 项目 取值范围 标准工作环境温度 室外 40 60 存储温度 45 70 工作湿度 非凝露 5 95 2 3 设备附件 DCWL 7962OT R5 室外型 AP 随机发货的附件参考装箱清单 ...

Страница 19: ...DCWL 7962OT 室外型无线接入点产品安装指导 第 2 章 安装准备 2 2 2 4 安装工具 在安装 DCWL 7962OT R5 室外型 AP 时 可能需要用到下列的工具 以下工具需要 用户自备 水平尺 记号笔 小刀 剥线钳 网线钳 冲击钻 1个 以 及配套钻头 若干 橡胶锤 十字螺丝刀 梯子 ...

Страница 20: ...DCWL 7962OT 室外型无线接入点产品安装指导 第 3 章 安装 AP 3 1 第3章 安装 AP 由于 DCWL 7962OT R5 室外型 AP 的安装位置通常较高 AP 安装好后维护人员无法 通过Console口登录设备进行维护和调试 所以建议用户在把AP设备安装到指定位置之前 根据客户需求 进行相关基础配置 3 1 安装流程 图 3 1 AP 设备安装流程图 ...

Страница 21: ...wer over Ethernet 以 太网供电 电源 请先记录AP设备的MAC地址和序列号 MAC地址和序列号标识在AP设备背面 便于后续查找使用 3 3 确定安装位置 确定安装位置时的原则如下 尽量减少 AP 和用户终端间的障碍物 如 墙壁 数量 使 AP 的安装位置远离可能产生射频噪声的电子设备或装置 如 微波炉 安装位置尽量隐蔽 不妨碍居民的日常工作和生活 3 4 安装 DCWL 7962OT R5 DCWL 7962OT R5 室外 AP 支持以下两种安装方式 抱柱安装方式 壁挂安装方式 3 4 1 抱柱安装方式 将 DCWL 7962OT R5 室外 AP 安装在柱子上的时候 请参考下面三个步骤 1 将底板安装在 DCWL 7962OT R5 底部上 用十字螺丝刀拧紧 4PCS 短螺钉固定底 板 将长螺杆穿过底板孔依次套上平垫 弹簧垫片并锁上螺母 以不锁紧为准 如下图所示 ...

Страница 22: ...7962OT 室外型无线接入点产品安装指导 第 3 章 安装 AP 3 3 图 3 2 DCWL 7962OT R5 AP 底板安装示意图 2 将 2PCS 不锈钢紧箍条穿过安装支架锁在杆上 并锁紧紧固螺丝 如图下图所示 图 3 3 DCWL 7962OT R5 AP 抱柱安装示意图 3 将装好底板的设备安装到柱子的安装件上 用扳手将 2pcs 短螺钉与 1PCS 长螺钉 将设备与安装件紧固在一起 如下图所示 ...

Страница 23: ...装 AP 3 4 图 3 4 DCWL 7962OT R5 AP 固定安装示意图 3 4 2 壁挂安装方式 将 DCWL 7962OT R5 室外 AP 进行壁挂式安装的时候 请参考下面几个步骤 1 参考图 3 1 先将底板安装在 DCWL 7962OT R5 底部上 2 将 AP 壁挂安装套件平贴在墙面 画出需要安装螺钉的孔的位置标记 在标记处用 冲击钻钻四个孔 将膨胀塑胶螺管插入墙面上已钻好的孔中 再用橡胶锤敲打膨胀塑胶螺管 直至将膨胀塑胶螺管全部敲入墙内 见下图 ...

Страница 24: ... 7962OT 室外型无线接入点产品安装指导 第 3 章 安装 AP 3 5 图3 5 墙面钻孔 3 将壁挂安装套件的螺钉孔对准墙面上的膨胀塑胶螺管孔 将螺钉穿过壁挂安装套件 上对应的安装孔 将壁挂安装套件锁紧在墙面上 见下图 图3 6 壁挂安装套件的安装 4 将装好底板的设备安装到柱子的安装件上 用扳手将 4pcs 短螺钉与 1PCS 长螺钉 把设备与安装件紧固在一起 见下图 图 3 7 AP 的壁挂安装 ...

Страница 25: ...3at PoE 供电 供电和上联网线接口需做好 防水 请按照下图的顺序依次将防水套件安装在网线上 图3 8 防水套件的安装顺序示意图 按照上图示意装好后 将网线插入 AP 然后依次将防水套件拧紧 图 3 9 防水套件的安装示意图 3 5 2 连接接地线 请将接地线安装在 AP 的接地点上 3 5 3 连接射频线 请将射频线缆或天线安装在射频接口上 主要天线接口不要弄错 5G 的天线接在 5G 的射频口上 2 4G 的天线接在 2 4G 的射频口上 连接完成后 在连接处缠上 3 层防水胶 带 缠绕防水胶带时需要均匀拉伸防水胶带使其宽度为原来的二分之一后再缠绕 每缠一层 都须拉紧压实 ...

Страница 26: ...AP 3 7 图 3 10 天线安装示意图 3 6 AP 供电 3 6 1 上电前检查 AP 安装完毕后 每次上电前均要进行检查 检查事项如下 AP 设备采用 802 3at 标准 PoE 供电时 请确认 PoE 供电设备良好接地 3 6 2 PoE 供电 可以使用以太网线连接 AP 设备的以太网接口和支持 PoE 功能的交换机给 AP 供电 3 6 3 上电后检查 AP 电源连接好后需要检查 AP 设备的指示灯是否正常显示 设备指示灯状态的详细描 述请参见产品 spec ...

Страница 27: ...DCWL 7962OT 室外型无线接入点产品安装指导 第 3 章 安装 AP 3 8 3 7 将 AP 连接到网络 AP 设备在实际使用中 可以通过以太网口上行接入 Internet 或城域网 将 AP 设备的 以太网口与以太网交换机的端口连接 实现 AP 设备通过以太网口上行接入到 Internet ...

Страница 28: ...DCWL 7962OT Outdoor Wireless AP ...

Страница 29: ...utomatic emergency mechanism This mechanism enables an AP to intelligently detect links When detecting that the wireless AC is down the AP quickly switches its operating mode so that it may continue to forward data while enabling new users to access the network This mechanism attains high availability in the entire wireless network and really helps wireless users to be always online Broad operatin...

Страница 30: ...to complex applications involved in migration from an IPv4 network to an IPv6 network They not only provide IPv4 service to customers on an IPv6 network but also enable users on an IPv4 network to log in to the network through the IPv6 protocol at ease Network wide seamless roaming DCN wireless ACs support an advanced wireless AC cluster technology which enables multiple ACs to synchronize online ...

Страница 31: ...t power Maximum 27 dBm for all rate levels and modulation modes Power adjustment granularity 1 dBm AP access speed 802 11n 20 MHz BW 6 5 7 2 13 14 4 19 5 21 7 26 28 9 39 43 3 52 57 8 58 5 65 72 2 78 86 7 104 115 6 117 130 144 Mbps 40 MHz BW 13 5 15 27 30 40 5 45 54 60 81 91 108 120 121 5 135 140 150 162 180 216 240 243 270 300 Mbps 802 11g 54 48 36 24 18 12 11 9 6 5 5 2 1 Mbps 802 11b 11 5 5 2 1 M...

Страница 32: ...trol of terminals based on airtime fairness Yes High density application optimization Yes 11n enhancements 40 MHz bundling Yes 300Mbps PHY Yes Frame aggregation A MPDU Yes Maximum likelihood demodulation MLD Yes Transmit beam forming TxBF Yes Maximum ratio combining MRC Yes Space time block coding STBC Yes Low density parity check code LDPC Yes Security Encryption 64 128 WEP dynamic WEP TKIP and C...

Страница 33: ... Fast roaming across ACs AP switching reference Signal strength bit error rate RSSI S N whether neighboring APs are normally operating etc WDS Yes QoS WMM Yes Priority mapping Ethernet port 802 1P identification and marking Mapping from wireless priorities to wired priorities QoS policy mapping Mapping of different SSIDs VLANs to different QoS policies Mapping of data streams that match with diffe...

Страница 34: ...al antenna 802 3at PoE The PoE adapter waterproof kit and outdoor antenna need to be separately purchased Mandatory DCWL PoEINJ G 10 100 1000 Mbps 1 port 802 3at PoE module Optional TDJ D2400GB Outdoor panel antenna with a 2xN female antenna port an operating frequency of 2400 to 2483 5 MHz an azimuth of 65 degrees and an antenna gain of 15 dBi Optional KBT90DP14 5158RT0 Outdoor panel antenna with...

Страница 35: ...ceiver Connect the equipment into an outlet on a circuit different from that to which the receiver is connected Consult the dealer or an experienced radio TV technician for help This device complies with Part 15 of the FCC Rules Operation is subject to the following two conditions 1 this device may not cause harmful interference and 2 this device must accept any interference received including int...

Отзывы: