


Getting
Started
Before you begin to assemble your Typhoon
4K, it is important to prepare the SD card that
comes with the package. Inside the accessories
box you will find the SD card. Remove it and
insert it into the hard drive on your computer.
Move all essential files from the SD card to
your computer. It is recommended to delete
files from the SD card so that you have more
space on it.
STEP 1
Plug in your power supply into a suitable
power source and connect your smart charger
into the power supply plug. A green light will
indicate when your battery is ready to charge.
Once the green light blinks, insert cord into
battery. Allow batteries to charge fully before
flight. Charging will take approximately
two hours. The next step is to charge the
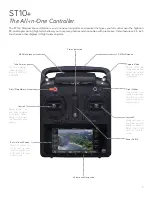
ST10+remote control. You can charge your
ST10+ with any micro USB connection or use
the included USB wall charging adapter.
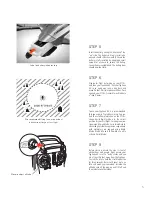
STEP 3
Take out the four propellers and remove
the aircraft from the box. To install the
propellers, simply match the “A” propellers
to the “A” section and the “B” propellers to
the “B” section. An “A” propeller is installed
by twisting it counterclockwise and a “B”
propeller is installed by twisting it clockwise.
STEP 2
Before taking off, remove gimbal proptective
cover and remove lens protective film.
Insert the SD card into the CGO3 and put
your aircraft aside.
Tip
: If you land your
Typhoon and shut it off before turning off
the “capture video,” the file on the SD card
will get corrupted. However, if your file does
get corrupted, it can be repaired. Simply put
the SD card back in the CGO3 and power on
the ST10+ transmitter and Typhoon. Wait ten
seconds and the file will be repaired.
STEP 4
4
Содержание Typhoon 4K
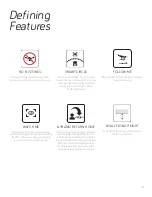
Страница 1: ...Product Overview FUN EASY SAFE TO FLY ...


