YUNEEC ST10+ Скачать руководство пользователя страница 5

dot  next  to  the  time  length  of  the  recording  near  the  upper  right-hand 

corner on the screen of the ST10+.

TAKING PHOTOS AND RECORDING VIDEO

The ST10+ seamlessly integrates control of the CGO2+ so you can easily 

take still photos and start/stop video recording using the corresponding 

buttons located on top:

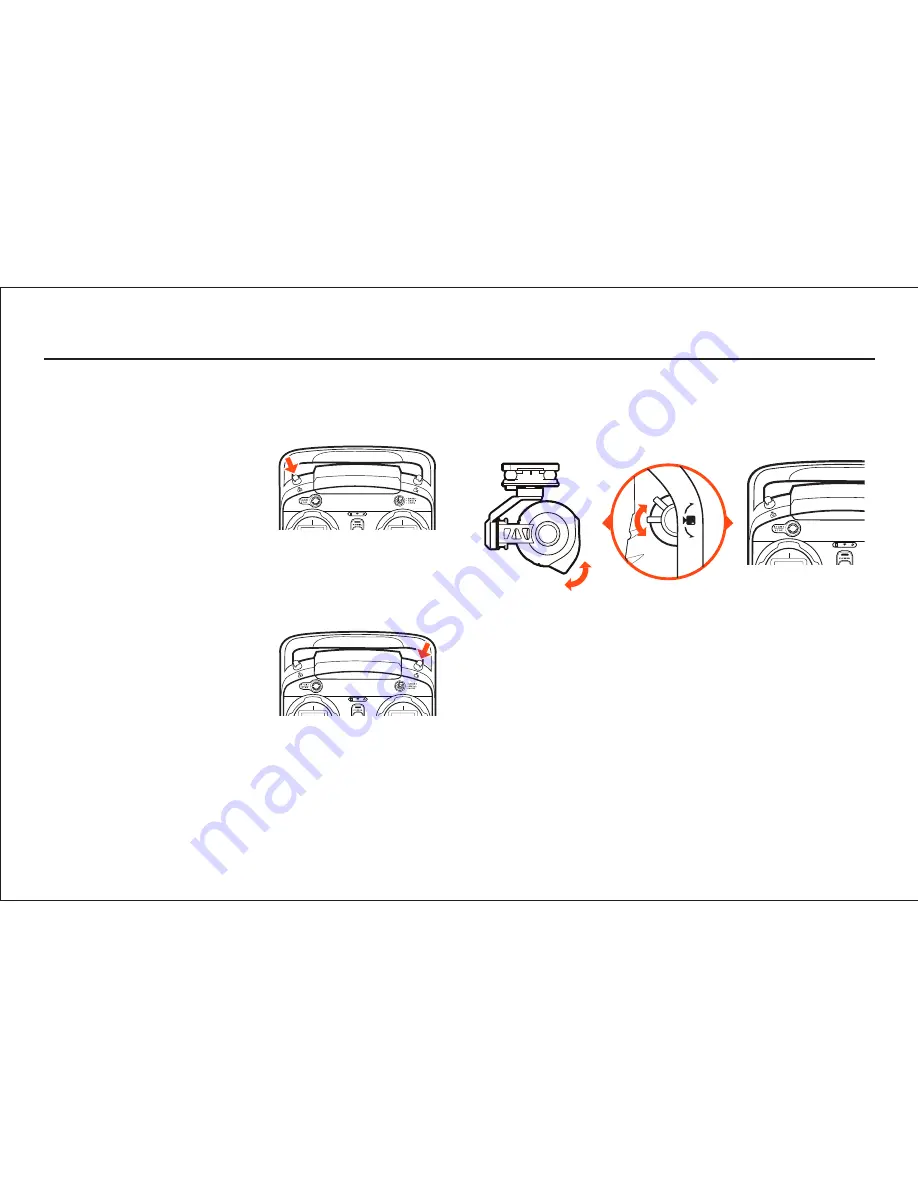
TO TAKE A STILL PHOTO

TO START/STOP RECORDING VIDEO

Press  the  button  located  near  the  top 

right corner of the ST10+. You’ll hear an 

audible indication from the ST10+ each 

time  the  recording  starts/stops.  And 

while video is recording the LED indica-

tor on the front of the CGO2+ will flash 

blue and green, and there will be a red 

Press the button located near the top 

left corner of the ST10+. You’ll hear an 

audible  ‘shutter’  sound  from  the 

ST10+  and  the  LED  indicator  on  the 

front of the CGO2+ will change from 

glowing  solid  green  to  glowing  solid 

blue.  It  will  take  approximately  5 

seconds to capture the photo and before you can take another still photo.

IMPORTANT NOTE:

 You cannot take still photos while recording video. 

You MUST stop recording video in order to take still photos.

IMPORTANT NOTE: 

You can choose to record video at 48, 50 (PAL) or 60 

(NTSC) frames per second by tapping the corresponding button near the 

upper left-hand corner on the screen of the ST10+. And keep in mind that 

the delay in the live video stream will be lowest at 48  and 50 as compared 

to 60 frames per second.

The  slider  located  on  the  left  side  of  the  ST10+  allows  you  to  set  the 

pitch/tilt position of the CGO2+ from approximately straight ahead (when 

the  slider  is  in  the  uppermost  position)  to  approximately  straight  down 

(when  the  slider  is  in  the  lowermost  position).  And  you  can  easily  set  a 

position in between by adjusting the slider accordingly. 

QUICK TIP: 

There’s an adjustable counterbalance located on the rear of 

the  CGO2+.    This  counterbalance  has  been  adjusted  at  the  factory  to 

provide  the  best  balance  and  performance  overall  so  typically  it  should 

NOT need to be adjusted. However, if you find that the CGO2+ is making 

any ‘buzzing’ sounds while powered on, carefully twist the counterbalance 

in or out until the sound stops in order to achieve the best balance, perfor-

mance and photo/video quality.

4

Содержание ST10+

Страница 1: ......

Страница 2: ...flight duration or failure of the battery entirely LiPo cells should not be discharged to below 3 0V each under load Store the LiPo battery at room temperature and in a dry area for best results When charging transporting or temporarily storing the LiPo battery the temperature range should be from approximately 40 120 F 5 49 C Do not store the battery or aircraft in a hot garage car or direct sunli...

Страница 3: ...battery will blink blue while the battery is charging and will glow solid blue when the battery is fully charged It will take approximately 5 5 hours to charge a fully discharged not over discharged battery NOTE The AC plug type will vary depending on the region in which the product was imported purchased AU Australian EU European UK United Kingdom US United States 2 1 2 3 4 5 6 7 8 9 10 11 12 13 ...

Страница 4: ...anging various settings and viewing real time telemetry data and streaming video during flight QUICK TIP Double tap on the screen to increase the size of the video viewing area to full screen and double tap again to return to the standard size WARNING NEVER attempt to fly TYPHOON via First Person View FPV There s a slight lag in the CGO2 streaming video downlink to the ST10 and as a result the strea...

Страница 5: ... photos while recording video You MUST stop recording video in order to take still photos IMPORTANT NOTE You can choose to record video at 48 50 PAL or 60 NTSC frames per second by tapping the corresponding button near the upper left hand corner on the screen of the ST10 And keep in mind that the delay in the live video stream will be lowest at 48 and 50 as compared to 60 frames per second The sli...

Страница 6: ...WiFi connection process Step 3 Tap the Model Select button and if required press OK to bypass any pop up warnings alerts Step 4 Select the existing model for example TYPHOON you would like to bind to or create a New Model and if required press OK to bypass any pop up warnings alerts Step 5 Tap the Flight Settings button and if required press OK to bypass any pop up warnings alerts Step 6 Tap the B...

Страница 7: ...op up warnings alerts Step 6 Tap the Bind button and select the CGO2_XXXXXX camera listed in the column under Camera then enter the password 1234567890 when prompted and tap OK after the connection has b Step 2 Tap the Model Select button and if required press OK to bypass any pop up warnings alerts Step 3 Select the existing model for example TYPHOON you would like to bind to or create a New Mode...

Страница 8: ...ation This equipment generates uses and can radiate radio frequency energy and if not installed and used in accordance with the instructions may cause harmful interference to radio communications However there is no guarantee that interference will not occur in a particular installation If this equipment does cause harmful interference to radio or television reception which can be determined by tu...

Страница 9: ......

Отзывы: