Yunca Gas 930 Скачать руководство пользователя страница 9

Revised 04/04/08

ALLURE Outdoor Install Apr08

Page 9 of 19

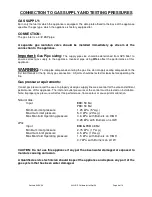
GAS PRESSURE TESTING

This fire should be installed in accordance with “Gas Installation Code AG601", and/or any
local authority rules.

Each Yunca Allure Fire is factory set to the appropriate operating pressure for the gas type
that it is factory equipped. If gas pressure requires adjustment, or a gas type conversion
is required, the operating pressure can be tested at the test nipple on the side of the BM
733 control. Operating pressure is adjusted at either the LPG or NG in line regulator.

Gas Type, Pressures and jet sizes appear on data plate.

The Allure Outdoor Fire uses the BM733 control valve, a functional view of this is shown
below.

Legend to functional diagram

1. Valve body, top section

 6. Disk valve

11. Pressure test nipple

2. Valve body, bottom section  7. Flame failure device 12. Main gas inlet
3. Control knob

 8. Pilot gas filter

13. Main gas outlet

4. Min. Setting screw

 9. Piezo hammer

14. Pilot gas outlet

5. Max. Setting screw

10. Piezo crystal

15. Thermocouple Connection

(Fig 3)

Содержание 930

Страница 1: ...e 1 of 19 ALLURE OUTDOOR GAS OPEN FIRES Stainless Steel Fascia Gunmetal Black Fascia 930 730 MODELS APRIL 2008 INSTALLATION OPERATION MAINTENANCE WARRANTY INFORMATION These instructions should be stor...

Страница 2: ...CE 17 Appendix D WARRANTY REGISTRATION 19 INTRODUCTION Welcome and congratulations on purchasing your YUNCA ALLURE OUTDOOR MANUAL CONTROL flued gas open fire Please read these Operating Instructions c...

Страница 3: ...NCE DO NOT SPRAY AEROSOLS IN THE VICINITY OF THIS APPLIANCE WHILE IT IS OPERATIONAL STAINLESS STEEL FASCIAS and WEATHER COVERS are shipped with protective plastic in place to reduce the risk of damage...

Страница 4: ...vailable is a Bottom Fascia Strip for each model This strip 85 mm high is fitted below a regular three sided fascia for a picture frame look Timber frames Should a timber frameout be used outdoors the...

Страница 5: ...mm in front of and 100mm from side of firebox opening 6mm minimum thickness using heat resistant materials Built in heat cell zero clearance requires minimum 25mm from combustibles all around Mantel 3...

Страница 6: ...ing once hood is in place 3 Lay a squiggled line of mastic or silicone type sealant on the surface the hood is to be attached to repeat the same on the rear of the SS hood Allow sealant to go tacky be...

Страница 7: ...ed before the fire is finally positioned Fig 2 6mm dia x 50mm Coach Bolts Supplied If the appliance is being attached to a concrete floor dyna bolts should be used If the floor is wooden the bolts use...

Страница 8: ...for leaks before operating the fire Gas pressure requirements Correct gas pressure and the use of a properly sized gas supply line are essential for the safe and efficient performance of this applian...

Страница 9: ...sted at the test nipple on the side of the BM 733 control Operating pressure is adjusted at either the LPG or NG in line regulator Gas Type Pressures and jet sizes appear on data plate The Allure Outd...

Страница 10: ...may be fitted along the base of a regular three sided fascia shown above to give a picture frame effect When the fascia front is removed you will see where the bottom strip is fitted using two screws...

Страница 11: ...e screw from centre hole and lift out 5 Rear Tray Remove screw from right and left side lift out 6 Burners Lift out 7 Manifold Baffles Lift out left and right baffles SETTING THE FIRE 1 Replace all pa...

Страница 12: ...er row The 730 model uses 10 coals per row layout as shown below from left to right Bottom Rear Row Bottom Front Row Top Rear Row Top Front Row 930 26 x No1 Coals 26 x No2 Coals 4 rows of 13 730 20 x...

Страница 13: ...x No1 13 x No2 730 10 x No1 10 x No2 Layout shown is for the 930 model using 13 coals per row The 730 model uses 10 coals per row layout as shown below from left to right Rear Row Front Row Logs 930...

Страница 14: ...hod of lighting is the same 1 Push the control knob fully in and turn anti clockwise left to the Ignition position you will feel a slight resistance hold in for 5 15 seconds 2 Continuing to hold it in...

Страница 15: ...outlet No Supply Gas LPG Refill tank Natural Check with gas supplier Pilot will not stay lit Weak or improperly located pilot flame Adjust the height of thermocouple The flame should engulf the top 6m...

Страница 16: ...6599GOB Injector 0 7 LPG 6599GOW Injector Washer Injector 1 3 NAT 6599GOC Injector 1 2 NAT Burner Pipe 6791GO9 930 Manifold Assembly No Jets 6791GO7 730 Manifold Assembly No Jets 6624GO Fan Assembly M...

Страница 17: ...esigned for OUTDOOR USE ONLY and CANNOT be used indoors If you are in any doubt please contact the manufacturer Yunca Gas Dunedin 03 488 4342 N B DUE TO ADVERSE CONDITIONS e g salt air the ALLURE OUTD...

Страница 18: ...Revised 04 04 08 ALLURE Outdoor Install Apr08 Page 18 of 19 This page intentionally blank...

Страница 19: ...Manufactured by Yunca Gas Dunedin PO Box 500 DUNEDIN 9054 Telephone 03 488 4342 Email yuncagas southnet co nz Cut here and return MANUFACTURER COPY This section must be returned within 10 days of pur...

Отзывы: