background image

104 


Alarm Recording Time: 

When an event happens, the DVR can record the video 

at event time-point, and send it to mail or FTP. Adjust the recording video length. 


Mobile Record: 

Enable it, and DVR will record the streaming for mobile viewing, 

so that you can view playback video on mobile phone. 


Record Mode: 

Manual, Alarm-trigger, or Schedule recording

.   


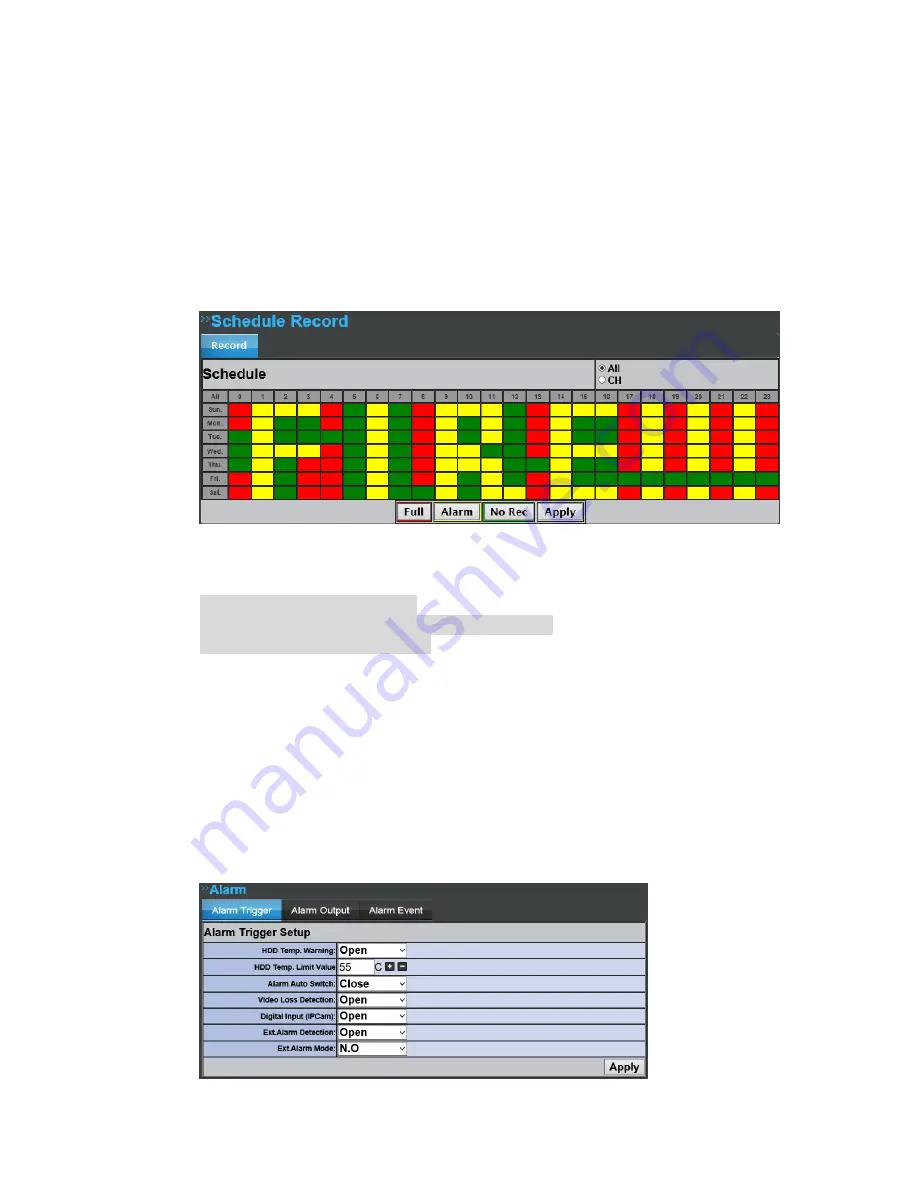
D-2. Schedule Record


Select tags at the bottom of the interface to click on the calendar with. 


Red

 stands for full recording. 

Yellow

 stands for recording triggered by alarm. 

Green

 stands for no recording. 

Click 

“Apply” to confirm. 


If you select 

“Schedule” in record mode option, the DVR will record videos 

following the schedule. 


Tip: You can select a whole row of grids by clicking on the title of the day or hour. 
For example, click on SUN will end up selecting the time range from 0~22. (12am 
to 12pm)


D-1. Alarm Trigger


Содержание YDS-1621HF

Страница 1: ...1 16CH Tribrid DVR V1 0 2_1608 User Manual...

Страница 2: ...PROVIDE REASONABLE PROTECTION AGAINST HARMFUL INTERFERENCE WHEN THE EQUIPMENT IS OPERATED IN A COMMERCIAL ENVIRONMENT THIS EQUIPMENT GENERATES USES AND CAN RADIATE RADIO FREQUENCY ENERGY AND IF NOT I...

Страница 3: ...AMERA SETUP 23 RECORD SETUP 37 ALARM SETUP 42 NETWORK SETUP 48 USER SETUP 57 DISK MANAGEMENT 60 SYSTEM SETUP 63 vi HDD PLAYBACK 68 vii PC REMOTE ACCESS 76 PC SITE SETUP 76 REMOTE PLAYBACK 81 REMOTE CO...

Страница 4: ...er to the presence of important operating and maintenance servicing instruction in the literature accompanying the product SYSTEM USERS OF THE SYSTEM ARE RESPONSIBLE FOR CHECKING AND COMPLYING WITH AL...

Страница 5: ...240 FPS 1080P Real time Live Display Support 2 Megapixel IP Camera for IP camera channel Audio 4 in 1 out Support internal HDDs x4 Support CMS Central Management System control Smart search Support t...

Страница 6: ...els Analog Resolution 1080P NTSC 1920 x 1080 PAL 1920 x 1080 720P NTSC 1280 x 720 PAL 1280 x 720 960H NTSC 960 x 480 PAL 960 576 D1 NTSC 720 x 480 PAL 720 576 Analog Live time Display Rate 16 x 30 Fra...

Страница 7: ...280 x 720 960H NTSC 960 x 480 PAL 960 x 576 D1 NTSC 720 x 480 PAL 720 x 576 Half D1 NTSC 720 x 240 PAL 720 x 288 CIF NTSC 360 x 240 PAL 360 x 288 Recording Rate Per Channel 1080P Simplex Up to 15fps D...

Страница 8: ...ture 10 55 C 14 131 F Humidity 0 80 RH non condensing Language Type English Traditional Chinese Simple Chinese Russian Italian Japanese Czech France Germany Spanish Portuguese Physical Color Black Dim...

Страница 9: ...R Sensor For Remote Control 2 LED Led Indicator 3 4 3 2 1 5 7 6 8 19 9 21 20 10 11 12 16 17 18 15 14 13 22 USB Connector USB Mouse Connector 4 MIC IN Microphone input Phone Jack B BACK PANEL NO LABEL...

Страница 10: ...45 connector 8 Alarm in x4 Relay out x1 9 Audio In Audio input 10 Video In BNC video input 11 Fan 2 HDD QUICK INSTALLATION 1 Loosen the 4 screws on the back of DVR 2 Loosen the 3 screws on the one sid...

Страница 11: ...ue circle can be loosen and the holder can be moved in order to put the HDD more smoothly data cables on the main board to the HDD 7 Put back the cover and lock all the screws For a detailed Hard Disk...

Страница 12: ...e external relay built in buzzer can be triggered c The alarm time point can be recorded in the event list and you can search for the event in playback d On the channel which the alarm is triggered th...

Страница 13: ...the event list and you can search for the event in playback c On the channel which the alarm is triggered the icon pops up to remind the user 2 ALARM IN CONNECTION Alarm 1 8 receive the external alarm...

Страница 14: ...e connection between the DVR and a PTZ camera joystick controller To control the PTZ camera via DVR please check the CAMERA ID BANDRATE default at 9600 bps and the RS 485 cable Under Two Core connecti...

Страница 15: ...15...

Страница 16: ...icking off the box under the Lock Control There are two types of Live Viewing Modes Split Screen Mode Full Screen Mode Split Screen Mode Usually displayed at default Usually displayed at default You m...

Страница 17: ...igning an IP address to the IP Cameras for getting automatic connection The system will check addresses from 192 168 X 50 with X being the DVR LAN Once the user executes the function the IP address of...

Страница 18: ...nds on IP Camera settings at Image Setup On split screen the switch dwell interval is 5 sec D DISPLAY CONTROL On Live viewing and Playback modes switch the camera channels with display control icons E...

Страница 19: ...ing the mouse the arrow will follow the mouse and change direction On this mode the user can click on the live view to control direction instead of using the direction key on the control panel If a fi...

Страница 20: ...en use the 4 direction arrows and the zoom in zoom out icon for E PTZ control 7 Control Mode Select the E PTZ moving mode step by step or continuous 8 The AutoPan Stop and Patrol buttons are invalid h...

Страница 21: ...e or Single Screen Mode K SOUND INPUT SOUND OUTPUT PTZ CONTROL The tiny icons displayed on the top right of the live video of every channel Click to enable sound output Click to show the control board...

Страница 22: ...L REC period Record mode Manual Recording M FAST SWITCH Whether you are on Split Screen mode or Single Screen Mode right click on the mouse to display a list all channels Move your mouse cursor up and...

Страница 23: ...23 CAMERA SETUP Click to enter the administration page Click to exit return to live video page Click to enter the camera setup page...

Страница 24: ...sed on the camera type which is currently connected a IP Cam Setup Channel 1 4 support both IP CAM operations a 1 IP Cam Quick Search Click IPCam Quick Search and click Search Device The DVR will sear...

Страница 25: ...t Click Save to confirm the change a 2 Normal Mode 1 Enable Choose Normal Mode 2 IP Address Insert the IP address of the connecting device 3 Port Insert the port number of the connecting device Defaul...

Страница 26: ...video and video recording under RTSP Mode Other functions like motion detection are not supported Key in the IP address port username and password of the device you are connecting to the DVR You can f...

Страница 27: ...920x1080 streaming for single channel view mode and 640x480 streaming for split screen mode 1920 x 1080 N A Fill in nothing on RTSP Path 2 Error Message Invalid Substream Resolution Please modify IP C...

Страница 28: ...or both single channel view and split screen However it can only allow 640x480 resolution for split screen so it shows error in return a 5 Attached This function allows users to set up the channel as...

Страница 29: ...the live view b FHD Camera All channels support FHD CAM operations B Video Setup For IP cameras the setup will be Video Setup For analog or FHD cameras the setup will be Record Setup B1 Resolution Cl...

Страница 30: ...ard Medium Low The highest resolution option is Best B3 Frame Rate Click drop down list to change the frame rate of your connecting device C Image Setup Setup Page for IP Camera Setup Page for FHD Cam...

Страница 31: ...can adjust two different image settings and apply them at different periods of time C10 Day Night IP Cam Image Setup only There are 3 different modes for your IP camera to perform at different time o...

Страница 32: ...o enable Motion Detect for FHD analog camera channels D4 Area1 2 3 Sensitivity For IP Cam only Press or to change the sensitivity value of setup motion in 3 Areas from 1 2 and 3 Click Motion Area Setu...

Страница 33: ...e mouse button to display the mini menu First highlight to activate Enable option to select your desired area for motion detection Select Clean All to cancel your selection Then you may click on each...

Страница 34: ...ifferent frames Each framed area is assigned to each color E2 Area Setup Right click the mouse button and a mini menu will pop up just like how it is operated in Motion mode Select Exit With Saving to...

Страница 35: ...prefer to set the mask on by clicking on the color button A color palette will show up with a selection of colors In this case the selected color is yellow When you tick Enable to activate the maskin...

Страница 36: ...eo On the contrary no sound will be recorded in the playback video of the channel which is not ticked Note Audio is only supported up to 4 channels G PIR Detection Setup Adjust the Buzzer Dwell time a...

Страница 37: ...37 RECORD SETUP Click to enter the administration page Click to exit return to live video page Click to enter the record setup page...

Страница 38: ...set 5 sec for pre alarm and 5 sec for post alarm the alarm recording length will be total 10 sec B Mobile Streaming Setup Choose ON to record the streaming for mobile viewing C Record Mode The record...

Страница 39: ...n list from the Record Mode on the right and select Schedule There will be three Setup options popping up Schedule Setup Mail Schedule Setup and FTP Schedule Setup Users can assign the schedule to any...

Страница 40: ...s all the alarm types Tip You can select a whole row of grids by clicking on the title of the day or hour For example click on SUN will end up selecting the time range from 0 22 12am to 12pm 2b Mail S...

Страница 41: ...ded during NO MAIL time period even when motion detection is triggered The tag ALARM refers to both external alarm and DI from camera C3 Alarm Trigger Start recording when any type of alarm event occu...

Страница 42: ...42 ALARM SETUP Click to enter the administration page Click to exit return to live video page Click to enter the alarm setup page...

Страница 43: ...am Choose Enable Disable from the drop down list to switch on off Digital Input from the IP camera The alarm will be triggered when DI signal is received A 4 Ext Alarm Detect Choose Enable Disable fro...

Страница 44: ...nt value is from off to 99 seconds Moreover among Relay Time option the user can hold or sign on the screen to set the external buzzer time and video loss buzzer time The adjustment value is from off...

Страница 45: ...Motion detection External Alarm DI IP CAM Video Loss Switch to Single Channel Screen Split Screen Condition Alarm Setup Alarm Trigger Setup Alarm Auto Switch set to Full Screen Split Screen X X X Trig...

Страница 46: ...ord Setup Mail FTP Schedule Setup It s on Motion Alarm Mail FTP period when alarm is triggered It s enabled when both necessary nondition and one of above three conditions are met p Mail FTP server se...

Страница 47: ...e met E External Alarm CH Setup You can assign external alarms to different channel s depending on the type of NVR which supports the external alarm device Hold or sign on the screen with the mouse to...

Страница 48: ...48 NETWORK SETUP Click to enter the administration page Click to exit return to live video page Click to enter the network setup page A IP ADDRESS SETUP...

Страница 49: ...Set the DVR IP Address A 3 NetMask Set the subnet mask which is usually set to 255 255 255 0 A 4 Gateway Set DVR gateway A 5 DNS1 DNS2 Key in DNS1 and DNS2 that provided by ISP A 6 WEB Page Port Set...

Страница 50: ...r the password again to confirm the password B 5 State Present the current status of PPPoE function B 6 Send Mail After Dialed Click the drop down list to enable or disable the function B 7 Subject In...

Страница 51: ...er apply for DDNS Updating Information update Idle Stop service DDNS registered successfully now log by http username ddns camddns com Registered successfully Updating Failed the name is already regis...

Страница 52: ...ification will be sent via email once the image or the Internet connection is lost D 1f Load Default A notification will be sent via email when the DVR loads the default settings D 1g HDD Warning This...

Страница 53: ...D 10 Secure Connection Tick the box to choose between SSL or TSL connection E FTP SETUP E 1 Enable Tick Alarm to upload video files to FTP when external alarm or DI from IP Cam is triggered Tick Moti...

Страница 54: ...d the DVR can be act as the DHCP server The DVR will assign or distribute one of the IP address which is according to the setup IP address range start and end IP Address to the connecting IP CAM setup...

Страница 55: ...e the virtual keypad to insert the external http port G 3 External RTSP Port Use the virtual keypad to insert the external RTSP port H Network Streaming Setup Network Streaming Mode There are two mode...

Страница 56: ...onnection Status Click on the Connection Status button to browse through details of your connection status You may consider how you want to set up your streaming mode by acquiring information provided...

Страница 57: ...57 USER SETUP Click to enter the administration page Click to exit return to live video page Click to enter the user setup page...

Страница 58: ...thorization of password protection D Keyboard Lock Tick the checkbox to enable or disable the operation of the side control menu bar which is at the right hand side of live view The control bar cannot...

Страница 59: ...will appear The administrator can distribute the authority and the permission settings for the new user F 2 Permission Clicking on the Permission button alongside any particular user will also direct...

Страница 60: ...60 DISK MANAGEMENT Click to enter the administration page Click to exit return to live video page Click to enter the system setup page...

Страница 61: ...written For example On 2014 10 19 17 40 The auto deletion is set to ON The reserve day is set to 3 If the recording data is older than 2014 10 16 17 40 it will not be available on the playback menu D...

Страница 62: ...62 Your Hard Disk Device needs to be replaced if its health condition is displayed in yellow or red G Format HDD Enter the administrator name and password to proceed formatting the HDD...

Страница 63: ...63 SYSTEM SETUP Click to enter the administration page Click to exit return to live video page Click to enter the system setup page...

Страница 64: ...des DD MM YYYY YYYY MM DD and MM DD YYYY E Analog Video System There are two types of analog signal settings to be adapted for your analog aHD camera device If your analog aHD cameras are connected to...

Страница 65: ...be setup by the user The user can also load settings to factory default or load and back up the configuration from USB I Time Setup Click the SYNC button within the Time block for adjusting and synch...

Страница 66: ...omplete the setting please click Save button to save the settings K Status Display Setup Use the mouse to click the options which include Date and Time Display Record Information Display Camera Title...

Страница 67: ...m Start is ticked the DVR will activate the PLUG PLAY function to ask for your permission locating any network device within its LAN When Detect IPcam is ticked every time there is someone executing I...

Страница 68: ...enter Playback mode There will be a window popping up at the center screen Click on icon to enter Time Search page where you can see the time frame of your recorded video Place your mouse cursor on th...

Страница 69: ...ng da0 video to the USB disk Press this button again to finish the backup To perform a single image backup jpg single image backup press or first and then click the Record Backup button to back up any...

Страница 70: ...rent speeds pause and play Or click on stop sign to go back to the previous page F Lock Control Please refer back to the Lock Control guide on Live Video chapter G Smart Search First pick a channel fr...

Страница 71: ...er that the system is now ready to launch an area of smart search defined by the square which the user draws with the mouse Click anywhere on the replay screen to start dragging the area of Motion Det...

Страница 72: ...shold Meter By adjusting the pointer in the middle of the bar you are able to adjust the detection level of the smart search When a motion is detected the area on the left bar will turn red depending...

Страница 73: ...TIME SEARCH Select the start of the playback time and then click the button to playback the recorded data If a period of time contains the recorded data the time point within this page will become red...

Страница 74: ...could click the Event Condition button to enter a list of events and select specific types to be included for being recorded on the video 5 BACKUP Note You must insert a storage device to enable this...

Страница 75: ...gs click Backup button to proceed 6 SYSTEM LOG The system log holds all of the system records The maximum quantity of records is 2000 Click the Log Filter button to perform further data filter actions...

Страница 76: ...UTION 1024 x 768 OS Windows XP 2000 OS Windows XP 2000 NETWORK BANDWIDTH Upload Speed is 256kbps or above 1 IP ADDRESS SETUP ON PC SITE When installing cameras inside the LAN or using a network cable...

Страница 77: ...ngs will be show on the right side After editing the parameters and clicking on Submit the following dialogue box will popup Then it will reboot the device with the new parameters 2 INTERNET SETTINGS...

Страница 78: ...vel Security Settings Download unsigned ActiveX controls Enable or Prompt recommended B Security Custom Level Security Settings Initialize and script ActiveX controls not marked as safe Enable or Prom...

Страница 79: ...79 5 Please click YES to proceed OPTION 2 ADD TO TRUSTED SITES Control Panel Internet Options Security Trusted sites Sites 3 LOGIN A INSTALL ACTIVEX Choose Allow Then choose Install...

Страница 80: ...NT PASSWORD LOGIN After the IP setup and connecting to the network or LAN type directly the IP address on the IE Browser directly The following User name Password Login window will popup Default user...

Страница 81: ...files or you can simply obtain it by performing USB backup and DVD RW backup operation because the software will be created within the USB device right away A MAIN SCREEN Open the D6Viewer Using Overl...

Страница 82: ...ve letter to the HD You can find it in the attached CD or download it from Internet Start the Ext2Fsd and it will detects all the disks connected with your PC Right click on the DVR HDD and choose Cha...

Страница 83: ...83 2 Under HDD Play mode select the DVR HDD to load the video files inside C File Play 1 You can open a single video backup file select File File Play Then Open...

Страница 84: ...84 2 Choose the path the haX file reserved and pick the file to playback 3 Press the play icon to play the video or pause picture...

Страница 85: ...RCH Select the Date and Time and then click to play the video B EVENT SEARCH After pressing the button it will display all the events which are saved within the DVR HDD Shown in the following image C...

Страница 86: ...86 D ZOOM Tick the Zoom box and drag an area on the screen then click the area to zoom in...

Страница 87: ...you can choose to either include Time Stamp and Audio or not MKV AVI 2 After double clicking on one specific channel display image the File Convert button will be available Select the type of video fo...

Страница 88: ...88 4 A window will pop up Enter a file name and edit the file path directory 5 While the converting is in process you may press the button to pause at any time before it is completed...

Страница 89: ...click on the DVR name The remote control brower will soon appear on your PC screen and gain access to your camera live view through the DVR 1 Live Viewing PTZ Control System Time Playback Control Time...

Страница 90: ...viewing mode The current live viewing time D SCREEN FORMAT Switch screen format and click twice to switch different channels with full screen E REC Click to start recording live video to PC or storage...

Страница 91: ...he button for the Playback Window to appear G1 HDD Select The user can select whichever HDD for playback G2 Time Time Search The user can select the time of any choice by clicking Time Search to view...

Страница 92: ...o cameras assigned yet Next select ROI Setting A window will pop up on the live screen now you can assign a channel from the Attached Channel drop down list and adjust the display image size ratio by...

Страница 93: ...uld like to zoom in with your mouse A icon will show up when placing your mouse cursor within the green frame indicating it is ready to zoom in Click the left mouse button to specify the zoom in area...

Страница 94: ...ied on local DVR NTP Server The NTP Server IP address can only be modified on local DVR A2 Software update System Update Click on the Browse button to select the firmware file and then press Upgrade b...

Страница 95: ...ase follow the steps to uninstall ActiveX control manually 1 Look for the files KConfig ocx and WATCH_16R ocx in one of the possible paths C WINDOWS Downloaded Program Files C WINDOWS W16R C WINDOWS s...

Страница 96: ...ked Download and saved the settings before Backup Setup Click Download to save a current setting file to PC You can apply this file to other DVR so that the setting will be copied to other DVR A 3 Day...

Страница 97: ...rmat of date display A 6 Monitor Adjust Monitor Resolution Check the frame rate which your LCD monitor supports before the adjustment Be sure to select a resolution compatible with the LCD monitor oth...

Страница 98: ...le the option so the user has to log in to operate the local DVR B 2 User Setup Add User Set up username and password for the new user in the pop up window The administrator can authorize new users to...

Страница 99: ...er Normal mode Http protocol is used to access camera You can key in IP address port username and password manually You can click IP Installer button to scan the LAN and find cameras being connected C...

Страница 100: ...y refer the rest of the settings to chapter CAMERA SETUP C 3 Image Setup Adjust image contrast brightness hue saturation and sharpness here Dwell Time means the swap interval when performing swap on s...

Страница 101: ...reen the motion area When motion is detected in the area the alarm will be triggered and action will be executed Relay Dwell The value determines the relay triggering time when motion detection happen...

Страница 102: ...HD analog camera except that you can setup three areas for motion detection C 5 Mask FHD Analog Camera Enable mask function and drag areas to mask on the screen Decide the mask color which the area wi...

Страница 103: ...s which will be displayed in black on live screen and playback video C 6 Audio Select the channel and enable or disable the audio recording No sound will be recorded in the playback video of the chann...

Страница 104: ...chedule recording D 2 Schedule Record Select tags at the bottom of the interface to click on the calendar with Red stands for full recording Yellow stands for recording triggered by alarm Green stands...

Страница 105: ...Digital Input IPCam Enable it to make DVR alarm when digital input for IP camera is triggered Ext Alarm Detection Enable it to make DVR alarm when external alarm is triggered Ext Alarm Mode Normally o...

Страница 106: ...t forwarding to allow the WAN connection Fill in the http port and RTSP port and check your router setting E 2 PPPoE To use PPPoE fill in the username and password of your ADSL account The IP address...

Страница 107: ...DDNS successfully The DDNS address should be displayed in state column Some DDNS providers do not require users to apply for an account before using their DDNS service for example ddns camddns com If...

Страница 108: ...hen fill in the sender and receiver s mail address and mail subject E 5 FTP Tick Alarm to upload video to FTP when external alarm is triggered Tick Motion to upload the video to FTP when motion detect...

Страница 109: ...nd the data will be overwritten after the HDD is full Hard Disk Full Warning When the HDD space is smaller the setting the buzzer will buzz to remind users Auto Deletion Select ON then on the playback...

Страница 110: ...Information The information of the storage device will be displayed G Player Click the button to download D6Viewer the DVR recording file player Please refer to REMOTE PLAYBACK for more information r...

Страница 111: ...111 The CD includes user manual and software tools 16CH aHD Hybrid DVR Power cord Quick Installation Guide Adapter Mouse CD Screw Package viii PACKAGE CONTENTS...

Страница 112: ...25M MEDIUM 0 5M STANDARD 1M HIGH 1 5M AVERAGE AVERAGE AVERAGE AVERAGE 16CH 1920 960 480 320 6TB UNIT Hours IMAGE QUALITY Mbps LOW 0 25M MEDIUM 0 5M STANDARD 1M HIGH 1 5M AVERAGE AVERAGE AVERAGE AVERAG...

Страница 113: ...1TB SV35 5 ST31000524AS 1TB S3 7200 12 ST1000DM003 1TB S3 Barracuda ST1000VX000 1TB S3 SV35 ST1500DL003 1 5TB S3 Barracuda LP ST31500341AS 1 5TB 7200 11 ST2000DL003 2TB S3 Barracuda LP ST3000DM001 3T...

Страница 114: ...WD10EVVS 1TB 7200 GP WD15EADS 1 5TB 7200 GP WD15EARS 1 5TB 7200 GP WD15EURS 1 5TB 7200 GP WD5000AVDS 63U7B0 1 5TB 7200 GP WD15EVDS 1 5TB 7200 GP WD20EADS 2 0TB 7200 GP WD20EVDS 63T3B0 2 0TB 7200 GP WD...

Страница 115: ...A362 1TB HDS721010DLE630 1TB S3 7200 HDS722020ALA330 2TB 7200 HDS723020BLA642 2TB S3 7200 TOSHIBA DS7SAE202 2TB DT01ACA050 500GB DT01ACA100 1TB DT01ACA200 2TB DT01ABA050V 500GB DT01ABA100V 1TB DT01ABA...

Страница 116: ...is set up to ONLY READ mode when saving the data by using Pen Drive Please change the ONLY READ mode The data cannot be burn into the CD DVD disc Please change for another CD DVD disc and backup the f...

Страница 117: ...g to stop recording when performing the schedule record Please setup the record to manual mode and then stop the recording PLEASE SELECT ONE CAMERA The message will be shown while using the ZOOM funct...

Отзывы: