background image

11

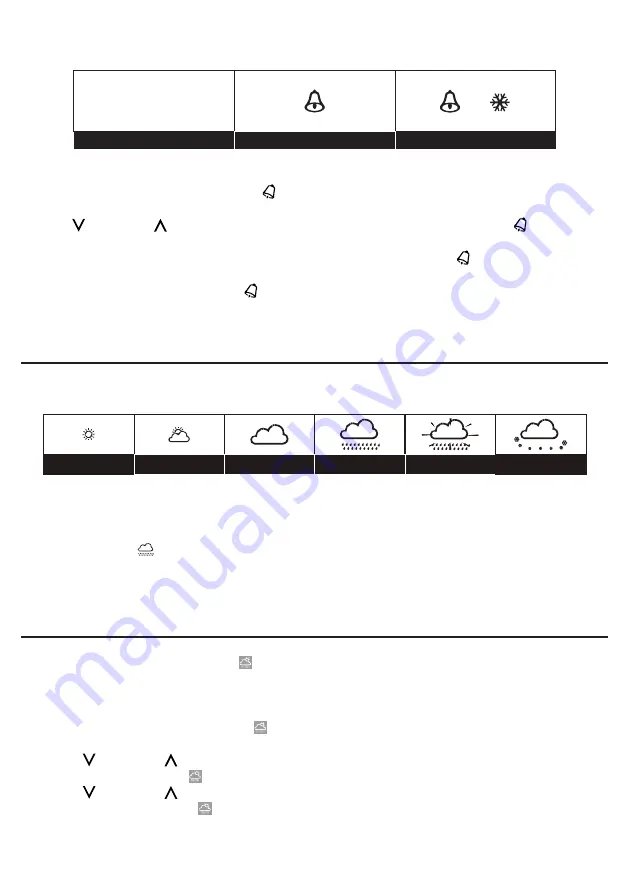
3. Press again to activate alarm with ice-alert function.

4. To disable the alarm, press until the alarm icon disappears.

RC on 

ALARM off 


ALARM with ice-alert


ALARM on  

TO SET THE ALARM TIME

1. Press and hold the 

[ ALARM ] 

button   for 2 seconds to enter alarm setting mode 

HOUR

 will 

    begin to flash.

2. Use 

[   ] 

button / 

[   ] 

button to adjust

 HOUR

, and press the

[ ALARM ] 

button   to proceed 

    to set 

MINUTE

.

3. Repeat 2 above to set 

MINUTE

, and then press the 

[ ALARM ] 

button   to exit.

Note: 

Pressing the

[ ALARM ] 

button    twice when alarm time is being displayed will activate the 

          temperature-adjusted pre-alarm.

          The alarm will sound 30 minutes earlier if it detects outside temperature is below -3°C.

WEATHER FORECAST                                                                                                                      

The device contains sensitive pressure sensor built-in with sophisticated and proven software that 

predicts weather for the next 12 ~ 24 hours within a 30 to 50 km (19-31 miles) radius.

 Sunny/Clear

Cloudy

Rainy

Rainy/Stormy

Snowy

Slightly Cloudy

Note:

 1. The accuracy of a general pressure-based weather forecast is about 70% to 75%.

          2. The weather forecast is meant for the next 12 hours, it may not necessarily reflect the 

              current situation.

          3. The icon " 

 "  will flash on display when the rainstorm comes.

          4. The 

SNOWY

 weather forecast is not based on the atmospheric pressure, but based on 

               the outdoor temperature. When the outdoor temperature is below -3°C (26°F), the

               SNOWY

 weather indicator will be displayed on the LCD.

BAROMETRIC/ATMOSPHERIC PRESSURE                                                                                        

TO SELECT THE DISPLAY MODE

Press and hold the 

[ BARO ] 

button 

 for 2 seconds to toggle between:

• 

ABSOLUTE

   the absolute atmospheric pressure of your location

• 

RELATIVE    

 the relative atmospheric pressure based on the sea

TO SET RELATIVE ATMOSPHERIC PRESSURE VALUE

1. Press and hold the 

[ BARO ] 

button    for 2 seconds until 

ABSOLUTE

 or 

RELATIVE

 icon 

    flashes.

2. Press 

[   ] 

button / 

[   ] 

button to switch to 

RELATIVE

 mode.

3. Press the 

[ BARO ] 

button    once again until the 

RELATIVE

 atmospheric pressure digit  flashes.

4. Press 

[   ] 

button / 

[   ] 

button to change the value.

5. Press the 

[ BARO ] 

button    to save and exit the setting mode.

Note:

 1. The default relative atmospheric pressure value is 1013 hPa (29.91 inHg), which 

Содержание YC9386

Страница 1: ...1 PROFESSIONAL WEATHER STATION WITH WIRELESS 5 IN 1 SENSOR Model YC9386 USER MANUAL...

Страница 2: ...WIND CHILL HEAT INDEX DEW POINT 13 HISTORY DATA ALL RECORDS IN THE PAST 24 HOURS 13 MAX MIN MEMORY FUNCTION 13 HI LO ALERT 14 WIRELESS SIGNAL RECEPTION 14 TEMPERATURE HUMIDITY 15 DATA CLEARING 15 POI...

Страница 3: ...en the set high or low weather criteria are met The barometric pressure records are computed to give users forthcoming weather forecast and stormy warning Day and date stamps are also provided to the...

Страница 4: ...6 button 4 LOOP button 17 button 5 RAINBOW button 18 power jack temperature humidity sensor 6 OUTDOOR TEMP button 19 HISTORY button 7 Alert LED indicator 20 C F slide switch 8 RAINFALL button 21 MAX M...

Страница 5: ...vane 8 Mounting base 9 Mounting claim 10 Red LED indicator 11 RESET button 12 Battery door 13 Screws 1 2 3 5 8 9 4 7 6 12 10 11 13 RAIN GAUGE 1 Rain collector 2 Tipping bucket 3 Rain sensor 4 Drain ho...

Страница 6: ...ce pre alert on 9 Date 1 2 3 4 5 6 9 8 7 INDOOR TEMPERATURE AND HUMIDITY 1 INDOOR 2 Comfort Zone 3 HI LO Alert and Alarm 4 Indoor humidity 5 Indoor temperature 1 2 3 4 5 OUTDOOR TEMPERATURE AND HUMIDI...

Страница 7: ...dicator during the last hour 3 Current wind direction indicator 4 WIND SPEED indicator 5 Wind levels 6 Current wind direction reading 7 AVERAGE GUST wind indicator 8 Wind speed unit mph m s km h knot...

Страница 8: ...ecure the mounting stand and bracket included to a post or pole and allow minimum 1 5m off the ground Points to NORTH 1 5 meter off the ground MOUNTING GUIDELINES 1 Install the wireless 5 IN 1 sensor...

Страница 9: ...ing for the radio controlled time signal in 8 seconds INSTALLATION THE BACKUP BATTERY 1 Remove the battery door of the main unit 2 Insert a new button cell battery 3 Replace the battery door Note 1 If...

Страница 10: ...isable the reception by holding the RCC button for 8 seconds TO MANUALLY SET THE CLOCK TIME ZONE SELECTION 1 Press and hold CLOCK button 2 seconds until 12 or 24 Hr flashes 2 Use button button to adju...

Страница 11: ...of a general pressure based weather forecast is about 70 to 75 2 The weather forecast is meant for the next 12 hours it may not necessarily reflect the current situation 3 The icon will flash on displ...

Страница 12: ...night WEEKLY The WEEKLY display indicate the total rainfall from the current week MONTHLY The MONTHLY display indicate the total rainfall from the current calendar month Rainfall rate Daily rainfall W...

Страница 13: ...1 sensor TO VIEW HEAT INDEX Press the INDEX button repeatedly until HEAT INDEX displays 27 C to 32 C 80 F to 90 F 33 C to 40 C 91 F to 105 F 41 C to 54 C 106 F to 129 F 55 C 130 F Caution Extreme Caut...

Страница 14: ...Max gust Max rainfall 2 Press and hold the MAX MIN button for 2 seconds to reset the maximum and minimum records Note When maximum or minimum reading is displayed the corresponding timestamp will be s...

Страница 15: ...PERATURE HUMIDITY COMFORT INDICATION The comfort indication is a pictorial indication based on indoor air temperature and humidity in an attempt to determine comfort level Too cold too dry Comfortable...

Страница 16: ...MO mode and the backlight changes the colour automatically 3 Press RAINBOW key and the backlight will change its colour in this sequence white red orange yellow green cyan blue purple 4 Press OUTDOOR...

Страница 17: ...to each other 2 Make sure the main unit is placed away from other electronic appliances that may interfere with the wireless communication TVs computers microwaves 3 If problem continues reset both ma...

Страница 18: ...y 540 699hPa 8hPa 0 50 C 700 1100hPa 4hPa 0 50 C 405 524 mmHg 6mmHg 0 50 C 525 825 mmHg 3mmHg 0 50 C 15 95 20 66inHg 0 24inHg 32 122 F 20 67 32 48inHg 0 12inHg 32 122 F Resolution 1hPa 0 01inHg 0 1mmH...

Страница 19: ...Rainfall Alert WIND SPEED Displayed range 1 to 99 1 LO 99 HI Operating range 1 to 99 Resolution 1 Accuracy 3 typical 25 C 77 F Display modes Display modes Current Min and Max Historical data for past...

Страница 20: ...hexagon hole on the sensor then insert the screw in other side and tighten it by the screw driver Step 3 Insert the other side of the pole to the square hole of the plastic stand NOTE Ensure the pole...

Страница 21: ...21...

Страница 22: ...22 Inner Tray C8429 PE bag C8440Base Pearl wool Battery C8440 Bubble bag THE PACKING...

Страница 23: ......

Отзывы: