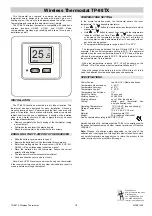
Part C-Structure
C1: Hanging Hole
C2: Battery Cover
C3: Stand
3. Getting Started:
Open battery Cover (C2)
Insert 2 x AAA size batteries observing polarity [“ +” and “ –“ marks]
Replace battery compartment cover
Wall mounted by the hanging hole (C1), OR place the unit onto flat surface, the
unit is ready for use now.
4. Start-Up
4.1 Comfort Indicator
After start-up the clock will measure the current temperature and humidity
automatically
Comfort indicator is for the display of pleasant/unpleasant climate. Comfort
Indicator is divided into 3 different zones: Cold, Comfort, Hot.
4.2 Temperature &Humidity Record
Press “°C/°F” button to select Temperature in Celsius mode or Fahrenheit mode.
The temperature measurement range is -9.9°C to +50°C. If the temperature is out
of the measurable range, LL.L (beyond the minimum temperature) or HH.H
(beyond the maximum temperature) will be shown on the LCD.
The humidity measurable range is 20% ~ 99%. If the current humidity
measurement is lower than 20%, the LCD would display
. If the past 24
hours max/min humidity record is lower than 20%, the LCD would display
REMARK:
If the unit shows values that are obviously incorrect, you can reset it the unit.
Take a pointed object, and insert it into the RESET (B1) opening. The unit is reset and
all record including past 24 hours max/min temperature and humidity would be clear.
5. Precautions
The unit loses its information when the battery is removed.
Do not expose it to direct sunlight, heavy heat, cold, high humidity or wet areas
2


