


JOHNSON CONTROLS
93
SECTION 3 - HANDLING, STORAGE, AND INSTALLATION
FORM 102.20-N1
ISSUE DATE: 7/06/2016
3
•
Seal all penetrations into the ducts until water-
tight. Use a minimum of duct penetration when
attaching the supports.
•
Provide adequate clearances between the ducts
and roof penetration openings.
•
Duct systems should not be pressurized without
sufficient time for curing the sealant systems. Fol
-
low the sealant manufacturer's recommendations
for applying the sealant.
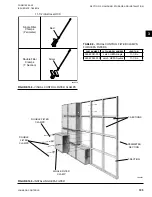
•
Support the ducts to avoid the transfer of duct
weight across flexible connections as shown in
.
•
Horizontal ducts should be pitched and provided
with drainage outlets.
• Install the ducts at a height sufficient to install
roofing and flashing. Refer to the
tion.
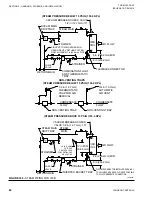
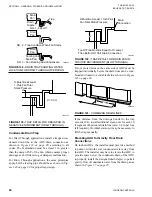
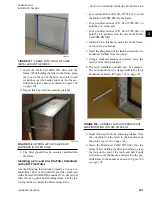
FIGURE 144 -
DUCT PENETRATION OF ROOF
LD06494a
Upper Duct Section Not
Continuous Through Roof
Sealant
Wood Nailer Norminal 2 X 4
Flashing Receiver
Lower Duct Section
Counterflashing
Curb
Base Flashing
Roofing Plies
Deck
Cant Strip
Upper
Section
FIGURE 145 -
ROOF TO DUCT INSTALLATION
(HORIZONTAL DISCHARGE)
LD06337b
Duct
Seams And
Joint In Ducts
Roof
Curb
Front Or Rear
Discharge Unit
Duct Wall Penetrations
Roof Support
Elevate Bottom Of Duct


