background image

21

AUTOMATION

Automation allows you to set up IFTTT style rules and triggers allowing YoLink 
connected devices to work together. YoLink M1 Door lock can only be set as 
a trigger.

•  Open YoLink App
•  

T

ap on 

Smart


icon “      ”  located at the bottom right.

•  Tap 

Automation


followed by the  “  

+

  ” icon.

•  Fill in user details including:
    

Name: 

Enter a unique automation name.


If:


Add a trigger that includes:

          -  Schedule: Trigger based on date and time.
          -  Device Actions: Trigger based on another device.
          -  Weather Condition: Trigger based on weather and temperature.
    

Then:


Add YoLink connected device reactions to set triggers.


 When:


Add a schedule in which automation string is active/on. 

Содержание Smart Lock M1

Страница 1: ...YoLink Smart Lock M1 Deadbolt User Guide YS7606 UC ...

Страница 2: ...US Live Tech Support 1 800 355 0157 Monday Friday 9 00am 5 00pm PST Fullerton CA 92831 ...

Страница 3: ... Passcode 13 Smart Home Setup 14 YoLink App Guide 16 Details 19 Manage User or Visitor Passcode 20 Automation 21 Basic Lock Functions 22 Maintenance 24 Factory Reset 25 Specification 26 In App Alexa Google Assist Guide 27 Troubleshooting 28 Technical Support Warranty 30 FCC Statement 31 CONTENTS ...

Страница 4: ...olt replace ment with smart phone remote features when paired with a YoLink Smart HUB sold separately using the YoLink smart phone app YoLink uses the newest in communication network technology connecting YoLink compatible smart devices over longer distances while using less power ...

Страница 5: ...rand new popular brand alkaline non rechargeable AA batteries Remove batteries from product when storing for extended periods of time Do NOT use rechargeable batteries Li On nickel blends rechargeable alkaline or other Do NOT use non rechargeable zinc blend batteries Do NOT mix old and new batteries Do NOT puncture or damage batteries Leakage can cause harm on skin contact toxic if ingested Do not...

Страница 6: ...A B D G C E F F1 F2 F3 REQUIRED TOOLS FOR INSTALL Phillips screwdriver x4 AA Batteries Please read Warnings pg 2 PARTS LIST A Front Module B Back Module C Strike Plate D Mounting Plate E Extendable Latch F Screws G Keys ...

Страница 7: ... notification to YoLink App 2 0 9 Keypad Enter passcode 3 Unlock Button Press after entring passcode 4 Lock Button Locks door 5 1 2 Switch Set for left right handed installation 6 Set Button Use to set local passcode 7 Factory Reset Press and hold for 20 sec to factory reset lock ...

Страница 8: ...icate basic information regarding lock status Refer to diagram below Keypad Blue Backlight Low light visibility Lock Button Red Single Blink Door Locked Red Multi Blink Factory Reset Unlock Button Green Single Blink Door Unlocked Green Multi Blink Connecting to cloud ...

Страница 9: ... HUB needed sold separately Scramble PIN code Enter random digits BEFORE AFTER or IN THE MIDDLE of correct PIN code Security Keypad Freeze If PIN code is incorrectly entered more than 5 times keypad will freeze for 5 minutes and lock with begin beeping continuously Low Battery Indicator When batteries are low the lock will beep multiple times when a function is executed ...

Страница 10: ...7 Step 1 Adjust Latch Backset INSTALLATION 60mm 23 8 70mm 23 4 E Latch adjustable depending on door backset Twist buckle extend retract twist back ...

Страница 11: ...8 Step 2 Install Latch Strike Plate F3 ...

Страница 12: ...9 Step 3 Mount Front Module ...

Страница 13: ...10 Step 4 Fasten Back Mounting Plate D F1 Do not use power screwdriver ...

Страница 14: ...11 Step 5 Mount Back Module Do not use power screwdriver F2 1 2 C S 1 2 C S 1 2 S C B Be sure thumbturn oriented as shown when installing LEFT HANDED RIGHT HANDED ...

Страница 15: ...g battery cover Set your lock to Left or Right handed Locate 1 2 switch on the back module just below the battery tray Set to 1 if hinges are on the LEFT of the door when ENTERING through the front Set to 2 if hinges are on the RIGHT of the door when ENTERING through the front 1 2 Switch ...

Страница 16: ...e owner passcode Default Passcode Changing Local Passcode Remove battery cover from back module Press and release the S button found just below battery tray Enter a 4 8 digit code using the keypad Then press and release the button 2 beeps Successfully saved 3 beeps Error Try again 0 beeps Refer to troubleshooting C S 1 2 S Button 12345678 ...

Страница 17: ...der to remotely access your YoLink M1 door knob with your Smart Phone Other YoLink Devices Available on Amazon Door sensors water leak sensor motion detector Wall plugs wall switch temp and humidity sensor garage door opener and more in development YoLink Smart HUB Required ...

Страница 18: ...Home ecosystem that uses LoRa a communication technology that s better than the rest The YoLink Smart HUB can connect with YoLink compatible smart devices up to a quarter mile away and its lower bandwidth use extends battery life of YoLink devices Cloud Internet LoRa Network ...

Страница 19: ...Phone App The YoLink app can be found for both iOS or Android through the Apple App Store or the Google play Store iOS 9 or higher is required for Apple iPhones or tablets Android 4 4 or higher is required for Android phones or tablets ...

Страница 20: ...17 Log in or Create a YoLink Account After downloading the YoLink app onto your smart phone open the app and log in If you don t have a YoLink account tap Sign up for an account and follow the steps ...

Страница 21: ...e found on the inside of the battery cover Customize Name Room and decide to add to Favorites by clicking the icon Tap Bind Device to add your lock to your YoLink account Power up your lock by installing batteries or if already installed press the S Button to initialize network connection request ...

Страница 22: ...ls screen You can then customize certain details such as a Name Specify a unique name for your lock b Room Specify a unique location for your lock c Favorites Add to your favorite list of YoLink devices for easier access d History A log of when your lock has been locked unlocked e Delete Device Unpair and delete lock from your device list a b c d e ...

Страница 23: ...digit unique user code Name Enter a unique user name Time Select a time frame at which the passcode is valid Generate 1 Use Only Visitor Passcode Account Admin and Members Open YoLink App Tap on Lock in Device List Tap Visitor Password icon and confirm when prompted The app will auto generate a unique 4 digit passcode that you can share Max Passcode Storage User Passcodes 30 1 Use Visitor Passcode...

Страница 24: ... at the bottom right Tap Automation followed by the icon Fill in user details including Name Enter a unique automation name If Add a trigger that includes Schedule Trigger based on date and time Device Actions Trigger based on another device Weather Condition Trigger based on weather and temperature Then Add YoLink connected device reactions to set triggers When Add a schedule in which automation ...

Страница 25: ...ck button Scramble Security Feature You can enter a valid passcode before after or in between a series of random numbers up to a total of 16 digits followed by the unlock button YoLink App Open YoLink App on your Smart Phone Tap on your paired YoLink Smart Lock M1 Tap Unlock BASIC LOCK FUNCTIONS UNLOCK 22 12345678 123456780987 098712345678 091234567887 ...

Страница 26: ...Key Use 1 of the 2 included keys to lock your YoLink Smart Lock M1 Keypad Press the Lock button YoLink App Open YoLink App on your Smart Phone Tap on your paired YoLink Smart Lock M1 Tap Lock BASIC LOCK FUNCTIONS LOCK ...

Страница 27: ...date our newest version firmware Tap the YoLink Smart Lock M1 in App to go to its controls Tap the icon at the top right corner to go to details Tap Firmware Firmware will then begin updating Note Only the YoLink Smart Lock M1 that is currently reachable and has an available update will be shown on the Details screen ...

Страница 28: ...S or C button for 20 25 seconds until there is 2 beeps then release Factory reset complete when keypad no longer blinks Deletes all password Removes access network information Local password resets to 12345678 C S Button Location Press Hold 20 25 sec ...

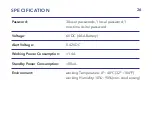
Страница 29: ...tage Working Power Consumption Standby Power Consumption Environment 30 user passwords 1 local password 1 one time visitor password 6V DC 4 AA Battery 5 42V DC 1 4A 80uA working Temperature 0º 40ºC 32º 104ºF working Humidity 10 90 non condensing ...

Страница 30: ...or Google Assistant to control your YoLink devices Open YoLink App on your smart phone Log in if not already Tap the Main Menu icon at the top left Go to Settings Voice Settings Alexa or Google Assistant Follow the integrated guide for your preferred voice control platform ...

Страница 31: ...r knob as it extends into the door Drive Bar Position Drive bar is in the vertical orientation when front module was installed Refer to page 9 When installing Back Module be sure the thumbturn is in the unlocked positions Please refer to page 11 Keypad Press all buttons on Keypad and confirm they work Should all beep If still some all unresponsive remove back module and inspect wire for any pinche...

Страница 32: ... Replace the batteries with a set of 4 premium AA alkaline batteries If the lock beeps 2 times and locks successfully it has at least 1 password stored in its memory and is operating correctly 3 It shows the lock is offline on YoLink App If hub is offline Reconnect your hub to the Internet and press the S button of smart lock once If hub is powered off Power on the hub again and press the S button...

Страница 33: ...inish of the exterior of this lock carries a limited warranty of the lifetime of the unit against deterioration due to normal weather conditions This warranty does not apply to locks that have been improperly installed modified put to a use other than designed or subjected to acts of God such as floods lightning earthquakes etc This warranty is limited to repairing or replacing of this lock only a...

Страница 34: ...terference by one or more of the following measures Reorient or relocate the receiving antenna Increase the separation between the equipment and receiver Connect the equipment into an outlet on a circuit different from that to which the receiver is connected Consult the dealer or an experienced radio TV technician for help This device complies with part 15 of the FCC Rules Operation is subject to ...

Страница 35: ...ntenna or transmitter To comply with FCC RF exposure compliance requirements this grant is applicable to only Mobile Configurations The antennas used for this transmitter must be installed to provide a separation distance of at least 20 cm from all persons and must not be co located or operating in conjunction with any other antenna or transmitter US Live Tech Support 1 800 355 0157 Monday Friday ...

Отзывы: