background image

Schedule

9

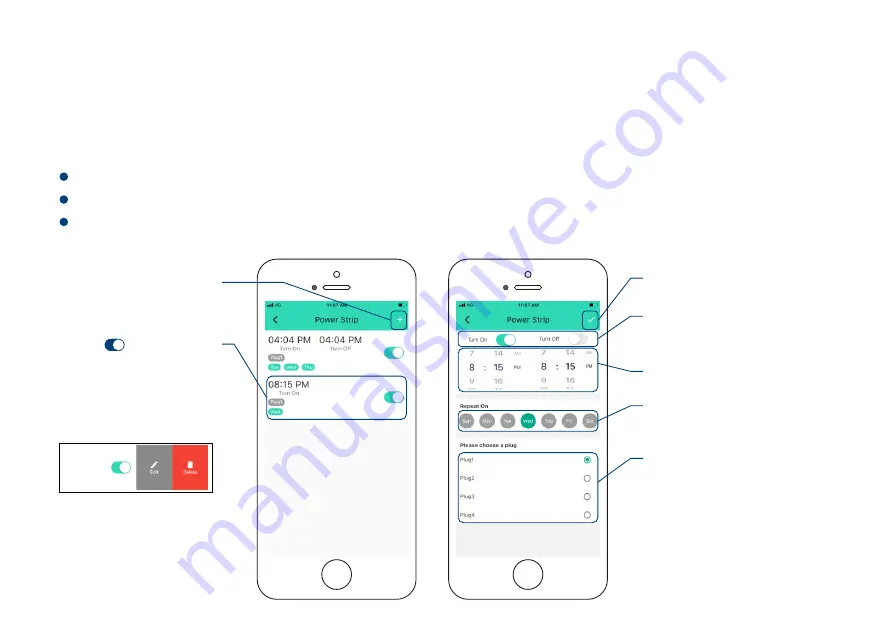
Create on/off schedules to automate your plugged-in devices to work around your home and work 
schedules

Note

You can have a maximum 10 schedules at one  me

You may add as many schedules as you want in Automa on se ngs. Automa on se ngs are saved 
in the cloud

Tap to save the se ngs

Tap “        ” bu on

to enable or disable 
the schedule

* Click to edit the schedule.
Swipe le  to edit or delete the 
schedule

Tap to add a 
schedule

Set repea ng frequency

* Pick at least one day

Set the plug

for running the schedule

* Each schedule can be running 
with one plug

Set the preferred state

“on”,”off” or “on then off”

Set the schedule  me

A er se ng up, the schedule is running at device without internet

Содержание SM - SO301

Страница 1: ...Smart Power Strip YS6801 UC SM SO301 User Guide Rev 1 1...

Страница 2: ...Contents In the box 1 Introduc on 2 Set up 4 Using the YoLink app 6 About YoLink Control 13 Maintenance 18 Speci ca ons 20 Troubleshoo ng 21 Warning 22 Customer Service Warranty 23...

Страница 3: ...In the box Quick Start Guide Smart Power Strip 1...

Страница 4: ...party automa on apps such as IFTTT Introduc on Plug 1 4 Plug in your device and control it independently from your smartphone Plug 1 USB Port Charge your smartphone tablet or other USB powered device...

Страница 5: ...or USB is on Red All plugs and USB are o Blinking Blue Connec ng to cloud Fast Blinking Blue Establishing Connec on with YoLink System Fast Blinking Red Removing Connec on to YoLink System Blinking Re...

Страница 6: ...Google Play Store Log in or create a new account if required Download and log in to YoLink app 1 Make sure your hub is connected to the internet green LED indicator is blinking blue LED indicator is a...

Страница 7: ...ED indicates the device is online and ready to use Tap bu on then scan QR Code on the device Tap bu on to add devices 1 Plug into an outlet 2 Status LED will blink red once then blue several mes If de...

Страница 8: ...age refer to page 7 Tap to turn on o all plugs and USB ports Device name Edit name on Details page Real me status Turned on or turned o Turned on At least one plug or the USB ports is on Turned o All...

Страница 9: ...s available refer to page 18 Device status Turned on or turned o Tap to delete the device from your YoLink account Add remove from favorites Device type Choose a room for device Device model Device hi...

Страница 10: ...he mer Choose ac on from on o or on then o Tap to save the se ngs Tap to select the plug in rela on with the mer Set the mer dura on in Hours and Minutes Note One mer will run only once You can set a...

Страница 11: ...e ngs are saved in the cloud Tap to save the se ngs Tap bu on to enable or disable the schedule Click to edit the schedule Swipe le to edit or delete the schedule Tap to add a schedule Set repea ng fr...

Страница 12: ...our scenes You can choose to either edit or delete each of them Tap bu on to enable or disable the scene Click to edit the scene Swipe le to edit or delete the scene Add remove from favorites Edit beh...

Страница 13: ...p trigger or ac on device Edit behavior You must have at least one ac on device or you cannot set a behavior Edit when Set a me range for the automa on always or during speci c days mes Tap to add an...

Страница 14: ...he upper le corner to go to My Pro le Connect YoLink with third party voice assistants service to control or monitor the status of your devices through voice commands Smart Power Strip is integrated w...

Страница 15: ...Examples of a controller are a Door Sensor or Smart Power Strip while examples of a responder are another Smart Power Strip or a YoLink Plug Mini 13 To con gure your as a controller turn the power str...

Страница 16: ...he YoLink Plug when the power strip is all on Mini If you want to turn on or o the Mini when the YoLink Plug power strip is all o turn the power strip into all o status verify the power status LED of...

Страница 17: ...nks quickly POWER Bu on Turn on the plug verify the Status LED of YoLink Plug Mini Refer to the YoLink displays blue Plug Mini manual for more informa on YS6604 UC_YoLink Plug Mini Hold the POWER butt...

Страница 18: ...remain turned on un l turned o using the POWER bu on or via the app More advanced sequences controlling mul ple outputs e g turn o plug are available via the YoLink app Opera on 16 When the power str...

Страница 19: ...ED quickly blinks blue then red The YoLink Plug Mini will no longer respond when the Smart Power Strip is all on Note If you want to unpair t h e S m a r t P o w e r Strip all o status with the YoLink...

Страница 20: ...an update is available In Firmware if a new version is listed as available ready now click it to start the rmware update process You may use your device during the update as it is performed in the ba...

Страница 21: ...re it to factory defaults A er the factory reset your device will remain in your Yolink account Hold the POWER bu on for 20 25 seconds un l the power status indicator plugs USB blinks red and blue alt...

Страница 22: ...20V AC 10A MAX Resis ve 5V DC 2 1A Input 100 120V AC 60Hz USB Power Output 20 7 88 x 3 94 x 1 14 inches L x W x D Dimensions 5 feet Environment Temperature F 22 158 F 30 C 70 C Humidity 95 non condens...

Страница 23: ...trip is out of range with Hub reloca ng the power strip or Hub may be required If power strip is not plugged into an outlet plug it into an outlet 2 Timer does not run Power outages before or during c...

Страница 24: ...e the power strip to avoid dust and other foreign elements entering the power strip and a ec ng the opera on of the power strip Avoid allowing the to be exposed to strong impacts or vibra on which may...

Страница 25: ...commercial applica ons This warranty does not apply to smart power strips that have been improperly installed modi ed put to a use other than designed or subjected to acts of God such as oods lightnin...

Страница 26: ...can be determined by turning the equipment o and on the user is encouraged to try to correct the interference by one or more of the following measures Reorient or relocate the receiving antenna Connec...

Страница 27: ...pplicable to only Mobile Con gura ons The antennas used for this transmi er must be installed to provide a separa on distance of at least 20 cm from all persons and must not be co located or opera ng...

Отзывы: