YOKOGAWA FLXA21-P1 Скачать руководство пользователя страница 9


Tech 

Note: 

TNA1403 

       Date: 

February 

5, 

2014 

Appendix: If at any point you would like to reset your analyzer back to factory 
default buffer tables, you can do so by following the steps below. 
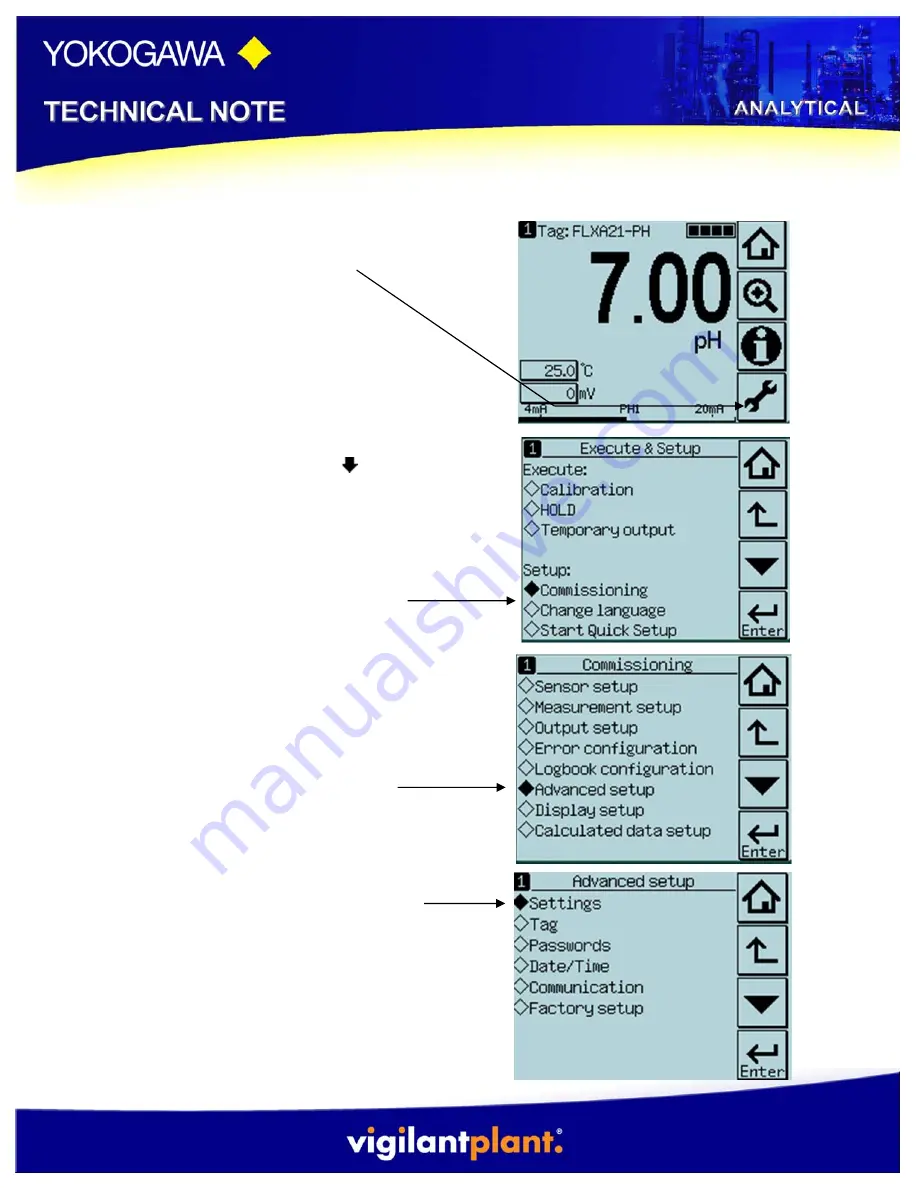
 

1.)


Click on the settings icon (wrench) 


2.)


 Using either the the   scroll key or by 
clicking directly on the diamond next to 
Commissioning, select it.  


3.)


Select Advanced Set up 


4.)


Select the diamond next to Settings 


Содержание FLXA21-P1

Страница 1: ...rs to change buffer table data information There are three sets of NIST buffer tables pH 4 01 pH 6 98 and pH9 18 by using the free program options you can choose to change whichever table and however many tables you need to change This document is intended to assist customers with the steps that need to be taken inorder to to change the Buffer Tables 1 Click on the settings icon wrench 2 Using eit...

Страница 2: ... up to measure the Measurement screen will look differently If your anlyzer is set up to measure pH only continue to Setp 5 If your analyzer is set up to measure pH ORP Proceed to Step 5a 5 Select the diamond next to Calibration Settings and Proceed to Step 7 a pH ORP Select the diamond next to Calibration Settings Proceed to Step 6 ...

Страница 3: ...ond next to pH settings proceed to Step 7 7 Select the diamond next to Buffers 8 Next choose the text NIST DIN19266 and a drop down menu should appear 9 Next ssing either the the scroll key and enter or by clicking directly on the choose the Free Programable ...

Страница 4: ...er defined Buffer 1 is the buffer table for pH 4 01 b user defined Buffer 2 is the the buffer table for pH 6 87 c and user defined Buffer3 is the buffer table for pH 9 18 For this example we will choose to change the values within the User Deinfed Buffer 2 pH 6 87 because this is the most commonly choosen table to change values to reflect pH 7 0 11 Select the diamond next to Enter Values ...

Страница 5: ...perature in order to enter customer pH value for the particular given temperature value In order to use this feature the customer must have a pH for each given temperature value in 5 degree increments from 0ºC 80ºC Click enter when finished to return to original Buffer Table screen ...

Страница 6: ...5ºC do so in the same manner as described above in step 11 Once the pH values for the temperatures 35ºC 65ºC that you wish to change have been changed click on the diamond next the the Next to precede to the next page of the table 15 If you choose to fill out the pH values for 70ºC 80ºC do so in the same manner as described above in step 11 Once the pH values for the temperatures 70ºC 80ºC that yo...

Страница 7: ...ure that the mandatory values are completed If NO Errors are found the screen should reveal results However if a mandatory field was missed the screen would show the error With that being siad pay extra attention to make sure that all values entered are entered in correctly Since this is a free programable option the system will take any data that is entered ...

Страница 8: ... another buffer table click the Back Arrow to return to the User Defined Screen and follow steps 10 16 Otherwise click on the home icon the house to remain to the main page 18 Now when you choose to automatic calibrate the unit will be using user defined pH Buffer ...

Страница 9: ... analyzer back to factory default buffer tables you can do so by following the steps below 1 Click on the settings icon wrench 2 Using either the the scroll key or by clicking directly on the diamond next to Commissioning select it 3 Select Advanced Set up 4 Select the diamond next to Settings ...

Страница 10: ...5 2014 5 Choose to Load Factory Factory Settings 6 A warning screen will appear Select Yes On loading will appear and the unit will restart 7 Once the system has been restored the unit will automatticaly go back to the main home page ...

Отзывы: