YitaHome FTPLCG-0214 Скачать руководство пользователя страница 16

ASSEMBLY INSTRUCTIONS

14

4pcs

E1

4pcs

E2

16pcs

1

E1

E1

E2

E2

E2

E2

E1

E1

E2

E2

L

E1

E1

9

E

E

E

E

E

E

1

1

Содержание FTPLCG-0214

Страница 1: ...ASSEMBLY INSTRUCTIONS 12X16 FT HARDTOP GAZEBO FTPLCG 0234 FTPLCG 0235 FTPLCG 0236 FTPLCG 0237 FTPLCG 0238 FTPLCG 0214 FTPLCG 0215 FTPLCG 0216 FTPLCG 0217 FTPLCG 0218 TZBTCS V1...

Страница 2: ...trong gusts of wind heavy snow accumulation or other inclement weather Must take precautions when the wind speed exceeds 25Mph and clear snow when it accumulates more than 2 inches 3 Before use thorou...

Страница 3: ...t weather 4 Do not leave up this unit for extended periods of time as it is not a permanent structure or designed to withstand sustained wind or rain It is a temporary portable shelter that shields yo...

Страница 4: ...ASSEMBLY INSTRUCTIONS 2 F2 X2 F3 X2 F1 X2 F X4 F4 X2 G2 X2 G3 X2 G1 X2 G4 X2 G6 X2 H1 X4 G5 X2 Item no Reference Image Qty H2 X4 H X4...

Страница 5: ...Q3 X2 Q4 X2 R1 X2 K1 X4 L X1 K X4 M X1 N1 X4 N X12 Q1 X2 Q2 X2 P X4 Pa X4 Item no Reference Image Qty ASSEMBLY INSTRUCTIONS 3 J X4...

Страница 6: ...R2 X2 R3 X2 R4 X2 R5 X2 R6 X2 Sa X2 S1 X2 X2 S X2 S2 X2 S3 T1 U X128 T X4 Item no Reference Image Qty ASSEMBLY INSTRUCTIONS 4 X4 X1...

Страница 7: ...ST4 8X12mm M6X42mm V X4 Y X128 Z1 X12 Item no Reference Image Qty ASSEMBLY INSTRUCTIONS 5 4 5 6 10 X24 X3 X36 X12 X1 M6X15mm M6X23mm M5X12mm 1 2 3 X184 X8 X84 X36 11 X12 Z X72...

Страница 8: ...ASSEMBLY INSTRUCTIONS 6 4pcs A 4pcs J 12pcs 1 1 X4 1 1 1 A A J J...

Страница 9: ...CTIONS 7 2pcs B 2pcs B1 2pcs P 20pcs 1 2 X2 B B B B1 B1 B1 P P 1 1 1 When connecting B and B1 via P make sure that 3 holes on part P as shown in the picture should be facing upwards Do not install it...

Страница 10: ...CTIONS 8 2pcs C 2pcs C1 2pcs P 20pcs 1 3 X2 C C C C1 C1 C1 P 1 1 1 When connecting C and C1 via P make sure that 3 holes on part P as shown in the picture should be facing upwards Do not install it up...

Страница 11: ...ASSEMBLY INSTRUCTIONS 9 4 32pcs 1 C B C C B C1 B1 C1 B1 B1 A A A A 1 1...

Страница 12: ...ASSEMBLY INSTRUCTIONS 10 4pcs H1 32pcs 3 4pcs H2 H2 H2 H2 C B C B C1 B1 C1 B1 A A A A A 5 H1 H1 H1 3 3 H1 H1 H2 H2...

Страница 13: ...ASSEMBLY INSTRUCTIONS 11 4pcs H 8pcs 1 C B C B C1 B1 C1 B1 A A A A A 6 H H H H 1 1 H...

Страница 14: ...ASSEMBLY INSTRUCTIONS 12 4pcs K 128pcs U 4pcs V 4pcs K1 24pcs 4 4pcs 3 3 4 4 4 1 2 7 B1 B1 X7 X7 X7 X7 U K K1 V B B 3 3 C1 X9 X9 X9 X9 U V C C B C B C1 B1 C1 B1 A A A A...

Страница 15: ...ASSEMBLY INSTRUCTIONS 13 4pcs E 1pc L 4pcs Ea 28pcs 1 4pcs Pa 8 E E Ea Ea Pa E E E E E E E L L E E 1 1 1 1 2 1 3 A Ea Ea Ea...

Страница 16: ...ASSEMBLY INSTRUCTIONS 14 4pcs E1 4pcs E2 16pcs 1 E1 E1 E2 E2 E2 E2 E1 E1 E2 E2 L E1 E1 9 E E E E E E 1 1...

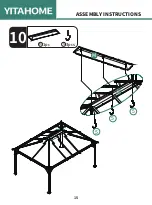
Страница 17: ...ASSEMBLY INSTRUCTIONS 15 1pc M 3pcs 5 M 10 5 5 5 L...

Страница 18: ...ASSEMBLY INSTRUCTIONS 16 11 4pcs N 2pcs G5 2pcs G6 12pcs 1 G6 G5 G5 G6 G6 E N G5 G5 G6 1 1 1...

Страница 19: ...SEMBLY INSTRUCTIONS 17 36pcs Z 8pcs Z1 2pcs Q1 2pcs Q2 2pcs Q3 2pcs Q4 2pcs S 2pcs Sa Attach Z and Z1 by lightly tapping with a screwdriver Z Z 12 X2 or or Z1 Z1 Z1 Z1 Z1 Z1 S Sa Z Z Z Z Z Z Q1 Q2 Q3...

Страница 20: ...IONS 18 Z1 Z1 Z Z Z Z Z Z R5 R6 R1 R2 S1 S3 S2 R3 R4 36pcs Z 4pcs Z1 2pcs R1 2pcs R2 2pcs R3 2pcs R4 2pcs R5 2pcs R6 2pcs S1 2pcs S2 2pcs S3 13 X2 Attach Z and Z1 by lightly tapping with a screwdriver...

Страница 21: ...ASSEMBLY INSTRUCTIONS 19 S1 S3 S3 S S S1 S S2 Sa Sa S2 Sa S1 S2 S3 14 E S1 Sa S3...

Страница 22: ...ASSEMBLY INSTRUCTIONS 20 15 2pcs D1 2pcs D2 4pcs N 12pcs 1 D2 D1 D1 N E D2 D2 D2 D1 D2 D1 1 1 E1 E2 E1 E2...

Страница 23: ...ASSEMBLY INSTRUCTIONS 21 16 2pcs F1 4pcs F 2pcs F2 2pcs F3 2pcs F4 12pcs 1 F3 F F F F F1 F F F1 F2 F3 F4 E1 E F1 F3 F3 F1 F4 F2 F2 F2 F4 F2 1 1...

Страница 24: ...ASSEMBLY INSTRUCTIONS 22 17 R2 R3 R4 R5 R6 R6 R5 R4 R3 R2 R1 R1 Q1 Q1 Q2 Q2 Q3 Q3 Q4 Q4 R1 R1 Q1 Q1 Q2 Q2 Q3 Q3 Q4 Q4 R2 R2 R3 R3 R4 R4 R5 R5 R6 R6...

Страница 25: ...ASSEMBLY INSTRUCTIONS 23 B Y Y Y B1 F2 F1 E1 18 Q1 Q2 Q3 Q4...

Страница 26: ...ASSEMBLY INSTRUCTIONS 24 C Y Y Y C1 F4 F3 F F E1 E2 E2 19 R1 R2 R3 R4 R5 R6...

Страница 27: ...al beam rst to prevent the iron sheet from falling and causing injury 2 Do not fully secure the screw until all screws are properly in position 3 Two persons are needed when installing Part Y One shou...

Страница 28: ...ASSEMBLY INSTRUCTIONS 26 2pcs G1 12pcs 1 21 2pcs G2 2pcs G3 2pcs G4 4pcs N 4pcs N1 1 1 1 G2 G1 G3 G4 G2 G4 G4 G4 G2 G2 N1 N1 E1 N N N N N N1 N1 N1 G3 G3 G3 G3 G1 G1 G3 G4 or...

Страница 29: ...n Part C1 The other part has 9 holes hanging on Part C The other part has 9 holes hanging on Part C One part of the curtain has 7 holes hanging on Part B1 One part of the curtain has 7 holes hanging o...

Страница 30: ...ASSEMBLY INSTRUCTIONS 28 T T T T T 23 Pay attention to the sidewall curtain s installation position T U U 6 5 43 21 9 10 11 12 13 14 15 16 8 7...

Страница 31: ...on Part C1 The other part has 9 holes hanging on Part C The other part has 9 holes hanging on Part C One part of the netting has 7 holes hanging on Part B1 One part of the netting has 7 holes hanging...

Страница 32: ...nstallation position Hang the hook attached to the netting on Part A 2 1 3 25 T1 T1 T1 T1 8 7 6 5 43 21 9 10 11 12 13 14 15 16 Note Attach 1 to 2 to secure parts T1 and T curtains together Attach 1 to...

Страница 33: ...o improve wind resistance be sure to complete this installation step If expansion screws or ground nails are not installed strong winds may topple the gazebo Expansion screws are essential for stabili...

Страница 34: ...ASSEMBLY INSTRUCTIONS 32 Installation Completed 27...

Страница 35: ...n of YITAHOME products just contact us at from Mon Fri AM PM PST Sat AM PM PST or e mail us at after sale cs hotmail com Alternative method to contact us amazon com orders only Log into your Amazon ac...

Отзывы: