


1
setuP Overview
The setup instructions below are only valid for a MRP chaniguide and Racface Evolve
DH cranks, for all other setups see the manufactures installation instructions. The MRP chainguide and
Raceface Evolve DH cranks are included in the DJ parts kit.
Chainguide Setup
setuP
CHAINGUIDE
sPaCer setuP
On the drive side sandwich one bottom bracket
spacer between the frame and the threaded cup.
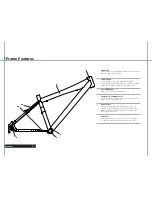
Guide POsitiOn
Attach the boomerang to the ICMS mounts using the
flat head socket cap screws. The boomerang should be rotated so the
top arm of the boomerang is in line with the DJ seatube. You do not need
any washers between the frame and the boomerang for spacing.
Guide POsitiOn
Slide both the top guides and the bottom guides to
the outer most position on the boomerang, and sung the bolts. The
lock ring washers go between the head of the bolt and the boomerang
and the thin flat washers are sandwiched between the guides and the
boomerang.
2
We strive to make the best bikes in the world, because of this
dedication to be the best, we continually make changes to our
bikes as needed. As the bikes are improved, assembly and
setup instructions may be affected. Any amendments to the
existing Owners Manual can be found on our website.
www.yeticycles.com
1
3
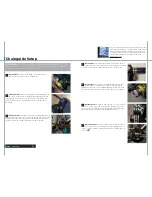
sPaCer setuP
On non drive side install the threaded cup. On the
crank arm with the attached spindle install two white spacers and one
black spacer. Then lube the spindle and tap it into the threaded cups.
sPaCinG CheCk
Once the drive side crank arm is securely fastened,
check the spacing. The boomerang rollers should be centered over
the chain and there should be the same pacing between the boomerang
guides and chain as there between the bashguard and chain.
sPaCer setuP
Once you have the spindle through both cups place
one black spacer, two white spacers, and one red spacer on the
spindle. Then attach the chainring and bashguard to the drive side crank
arm. Lube the splines and install the drive side crank arm to the spindle.
5
4
6
funCtiOn CheCk
Now that the setup is complete spin the cranks to
check the function of the chainguide. The rollers should move freely
and the chainline should be straight when shifted to the middle cog on the
cassette.
7