Page 11 of 47
25.12.2018
DIS-14-ek
Rev Nr: 2
2.3 Hose Connection
For an accurate connection, clean all threads and use a liquid sealant (liquid washer).
Make sure that all connections are tight and leak-proof when making pipe connections.
Use a liquid sealant compound, such as Loxeal 58.11 or other similar liquid compounds
(liquid sealant) that is used for LPG applications on male threads only. Be careful not to
let compound to leak into the fittings.
Connect hose assembly to the dispenser outlet and hose hooks to the side doors. If the dispenser has
a pipe retraction system, refer to the instructions for the connection as well.
Connect the steel rope of the safety cable of the break-away coupling to
the dispenser frame. It is designed so that LPG is present on both sides of
the point, where break-away is located and it should be connected to each
hose. Only a couple cubic centimeters of LPG escape during removal.
Check the electrical continuity on the hose/nozzle connection. There
should be no continuity between the dispenser outlet and the nozzle to
prevent static discharge during filling. In order to make sure that the
nozzle is grounded, each hose assembly should be checked.
Connect crocodile clips to the dispenser chassis.
2.4 Dispenser Sealing Test
After completing the steps in the sections 2.2 and 2.3, the dispenser
connections should be checked for leakages.
Slowly open the valves on the tank section.
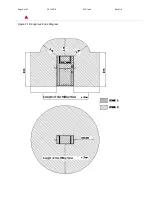
Slowly open steam return line and liquid line (V1) valves (See. Figure
2.2.)
Open the valve between the filter and gas separator (V2) (See. Figure
2.2)
Check all connections with lather for leakages.
In case of a leakage, close all valves, repair the leakage and check
again.
When all connections are tightened, close all valves and continue with
electrical connection. (Section 2.5).
The above steps are just guidelines. Consider standards and
regulations for legal tests.
Figure 2.2


