3
To operate the 68860 as a basic weigh scale, place the weighing platform on a firm,
level surface and then perform the following steps:
1. If using a container to hold the objects being measured, place it empty on the
center of the platform.
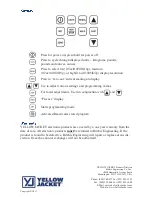
2. Press the “ZERO” key to “zero-out” the scale. The display will read zero.
3. Place the material to measure in the container or on the center of the platform.
4. Read the weight on the display.
5. A positive number indicates the applied weight is greater than the zero value. A
negative number indicates the applied weight is less than the zero value.
6. Repeat steps 1 through 5 as necessary.
7. Turn the 68860 off by pressing and holding the “ON/OFF” key down until the
scale turns off.
8. To conserve battery life, the 68860 will turn itself off after 30 minutes of inactiv-
ity, unless it is currently running a program (see programming section below).
The last state of the 68860 will be restored upon power-up.
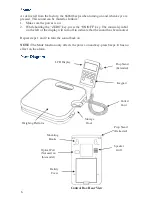
NOTE: When using the 68860, ensure the coiled cord does not touch the top of the
weighing platform, or inaccuracies may result.
A special feature of the 68860 allows the emptying or replacing bins or containers
used for weighing without affecting the weight shown on the display. This Hold
Mode may be used as follows:
1. Allow load to settle until display is steady.
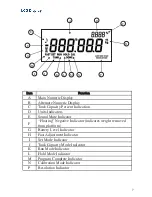
2. Press the “HOLD” key. The
HOLD
indicator will turn on and the current weight
is now locked on the display.
3. Remove, empty, or replace objects, bins, or containers on the platform.
4. Wait 5 seconds for the new load to stabilize.
5. Press the “HOLD” key. The
HOLD
indicator will turn off. Measurements will
continue from where they left off prior to initiating Hold Mode.
With the 68860, a programmable threshold weight will sound an alarm. The alarm
will sound when the displayed weight (either positive for increasing weight, or nega-
tive for decreasing weight) equals the programmed weight. To program the alarm,
perform the following steps:
1. If measuring decreasing weight, place the objects or container with the objects or
material that will be removed on the weighing platform.
2. Press the “SET” key to start the SET Mode, indicated by the
SET
annunciator on
the LCD display.
3. Press and/or hold the “UP” or “DOWN” keys to set the desired alarm set point.
To change the set point faster, press the “FAST” key. This will activate the
FAST SET
mode which will change the set point 10x faster than normal. Press
the “FAST” key again to return to the normal speed
SET
mode.
4. Press the “RUN/STOP” key. The display will automatically change to zero and
the
RUN
indicator will show to indicate that the program is running.
Содержание 68860
Страница 1: ...Economy Charging Scale...


