background image

Startup

After the IP phone is connected to the network and 
supplied with power, it automatically begins the 
initialization process. After startup, the phone is ready 
for use. You can configure the phone via phone user 
interface or web user interface.

Welcome

Initializing...  Please wait

E

N

G

L

I

S

H

2

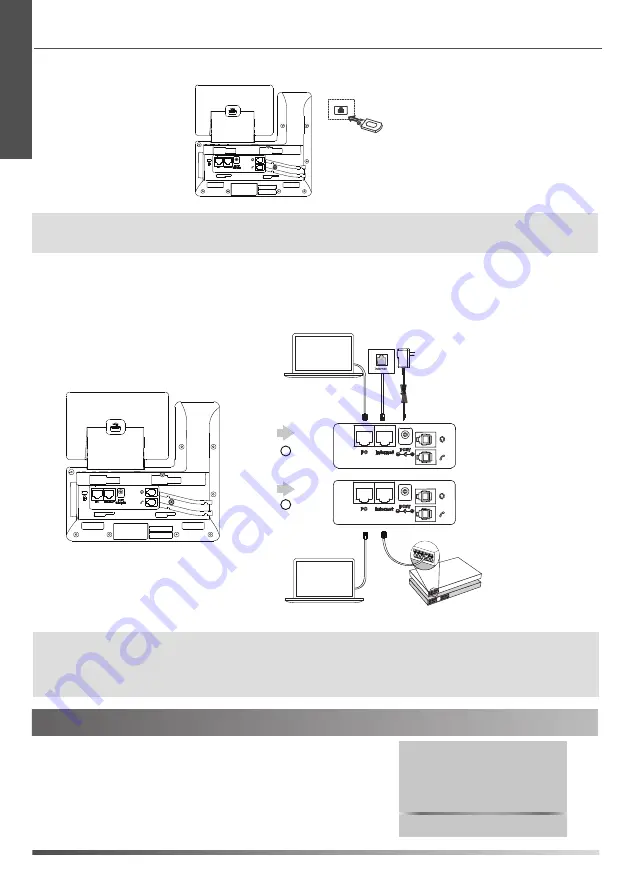
3. Connect the USB flash drive, as shown below:

4. Connect the network and power, as shown below:

You have two options for network and power connections. Your system administrator will advise you which one to use.

Note:

 The IP phone should be used with Yealink original power adapter (5V/2A) only. The use of the third-party power adapter may

          cause the damage to the phone. If you are connecting a PC to your phone, we recommend that you use the Ethernet cable 
          provided by Yealink.
          If inline power (PoE) is provided, you don’t need to connect the power adaper. Make sure the hub/switch is PoE-compliant.


 PoE Hub/Switch

A

AC Power Option

PC Connection
   (Optional)

Power Adapter


(DC 5V)

B

PoE ( Power over 
Ethernet ) Option

PC Connection
   (Optional)

IEEE 802.3af compliant

PC

PC

Note: 

The USB port can also be used to connect the color-screen expansion module EXP50 or USB headset. The color-screen expansion 
module EXP50 should be purchased separately. For more information on how to use the  EXP50, refer to Yealink EXP50 User 
Guide. For more information on how to use USB headset, refer to the documentation from the manufacturer.

Содержание SIP-T54W

Страница 1: ... SIP T54W Quick Start Guide V86 20 www yealink com English Deutsch Applies to firmware version 96 84 0 10 or later For the phone with a V1 logo on the label of the machine it applies to firmware version 96 86 0 20 or later ...

Страница 2: ...Table of Contents English 1 Deutsch 11 ...

Страница 3: ... by Yealink The use of unapproved third party accessories may result in reduced performance Assembling the Phone 1 Attach the stand and adjust the angle of the screen as shown below Desk Mount Method Note You can also mount the phone to a wall For more information on how to attach the wall mount bracket refer toYealink Wall Mount Quick Installation Guide forYealink IP Phones 2 Connect the handset ...

Страница 4: ...the third party power adapter may cause the damage to the phone If you are connecting a PC to your phone we recommend that you use the Ethernet cable provided byYealink If inline power PoE is provided you don t need to connect the power adaper Make sure the hub switch is PoE compliant PoE Hub Switch A AC Power Option PC Connection Optional Power Adapter DC 5V B PoE Power over Ethernet Option PC Co...

Страница 5: ...re various commissioning procedures You can find out how to connect the telephone to the corresponding Telekom service under https www telekom de yealink hilfe Should there be any further questions please contact the various support contacts via telephone e mail Internet or on site ...

Страница 6: ...e call on hold press or the Resume soft key Answering a Call Using the handset Pick up the handset Using the speakerphone Press Using the headset Press Placing a Call Using the handset 1 Pick up the handset 2 Enter the number and then press the Send soft key Using the speakerphone 1 With the handset on hook press 2 Enter the number and then press the Send soft key Using the headset 1 With the head...

Страница 7: ...forwarded when the phone is busy No Answer Forward Incoming calls are forwarded if not answered after a period of time 3 Enter the number you want to forward to For No Answer Forward press or to select the desired ring time to wait before forwarding from the After RingTime field 4 Press the Save soft key to accept the change Call Conference 1 Press the Conference soft key during an active call The...

Страница 8: ...e phone is idle and then select All Contacts 2 Press or to select the desired contact press the Option soft key and then select Detail from the prompt list 3 Edit the contact information 4 Press the Save soft key to accept the change To delete a contact 1 Press the Directory soft key when the phone is idle and then select All Contacts 2 Press or to select the desired contact press the Option soft ...

Страница 9: ...sent no organization or individual is permitted to make any change to the structure or the safety design of the device Yealink is under no circumstance liable to consequences or legal issues caused by such changes lease refer to the relevant laws and statutes while using the device Legal rights of others should be respected as well Environmental Requirements Place the device at a well ventilated p...

Страница 10: ...e specified maintenance center for repair Do not insert any object into equipment slots that is not part of the product or auxiliary product Before connecting a cable connect the grounding cable of the device first Do not disconnect the grounding cable until you disconnect all other cables Cleaning Requirements Before cleaning the device stop using it and disconnect it from the power supply Use a ...

Страница 11: ...3 Radio ETSI EN 301 489 1 V2 2 0 ETSI EN 301 489 3 V2 1 1 ETSI EN 301 489 17 V3 2 0 ETSI EN 300 328 V2 1 1 ETSI EN 301 893 V2 1 1 EN 300 440 V2 1 1 Health EN 62311 2008 EN62479 2010 Directive 2011 65 EU and EU 2015 863 of the European Parliament and of the Council of 8 June 2011 and 4 June 2015 on the restriction of the use of certain hazardous substances in electrical and electronic equipment RoH...

Страница 12: ... For better service we sincerely recommend you to use Yealink Ticketing system https ticket yealink com to submit all your technical issues YEALINK XIAMEN NETWORK TECHNOLOGY CO LTD Web www yealink com Addr No 1 Ling Xia North Road High Tech Park Huli District Xiamen Fujian P R C Copyright 2021Yealink Inc All rights reserved ...

Страница 13: ...ellten Zubehörs das von Yealink nicht freigegeben wurde kann zu einer verminderten Leistungsfähigkeit führen Installation desTelefons 1 Fügen Sie die Stütze an und stellen Sie den Neigungswinkel des Displays ein wie nachfolgend Tischinstallation Hinweis Sie können das Telefon auch an einer Wand befestigen Weitere Informationen zur Installation der Wandhalterung finden Sie in der Installationsanlei...

Страница 14: ...nitialisierungsvorgang Nach der Initialisierung ist das Telefon betriebsbereit Sie können das Telefon via Weboberfläche oder Benutzeroberfläche des Telefons konfigurieren Welcome Initializing Please wait 12 PoE Power over Ethernet Netzgerät DC 5V 4 Verbinden Sie das Netzwerk und die Stromversorgung wie nachfolgend dargestellt Es gibt zwei Möglichkeiten für die Verbindung des Netzwerks und der Stro...

Страница 15: ...ne Inbetriebnahme Vorgänge Wie Sie das Telefon mit dem entsprechenden Dienst der Telekom verbinden erfahren Sie unter https www telekom de yealink hilfe Sollten darüber hinaus noch weitere Fragen bestehen so wenden Sie sich bitte an die verschiedenen Supportkontakte via Telefon EMail Internet oder vor Ort ...

Страница 16: ...ruf in Wartestellung befindet drücken Sie oder die Bildschirmtaste Resume Anruf entgegennehmen Mit dem Hörer Nehmen Sie den Hörer ab Mit Freisprecheinrichtung Drücken Sie auf die Taste Mit Headset Drücken Sie auf die Taste Anruf tätigen Mit dem Hörer 1 Nehmen Sie den Hörer ab 2 Geben Sie die Nummer ein und drücken Sie dann im Bildschirm auf Send Mit Freisprecheinrichtung 1 Drücken Sie bei aufgeleg...

Страница 17: ...nde Anrufe werden umgeleitet wenn die Leitung besetzt ist No Answer Forward Eingehende Anrufe werden umgeleitet falls sie innerhalb einer bestimmten Zeit nicht entgegengenommen werden 3 Geben Sie die Nummer ein an die Anrufe umgeleitet werden sollen Wählen Sie für die Option No Answer Forward mit den Tasten oder den Zeitraum aus nach Ablauf dessen der Anruf umgeleitet werden soll 4 Drücken Sie die...

Страница 18: ...ngen Kontakt bearbeiten 1 Drücken Sie im Ruhezustand des Telefons die Bildschirmtaste Directory und wählen Sie dann die gewünschte Gruppe aus 2 Wählen Sie mit oder den gewünschten Eintrag Drücken Sie die Bildschirmtaste Option und wählen Sie dann in der geöffneten Liste die Option Detail 3 Bearbeiten Sie die Kontaktinformationen 4 Drücken Sie die Bildschirmtaste Save zur Übernahme der Änderungen K...

Страница 19: ...Sicherheitskonzept des Geräts vornehmen Yealink übernimmt unter keinen Umständen die Haftung für Folgen oder Rechtsansprüche die auf solche Änderungen zurückzuführen sind Beachten Sie bitte die entsprechenden Gesetze und Vorschriften bei der Verwendung des Geräts Die gesetzlichen Rechte Dritter müssen ebenfalls beachtet werden Umweltvorschriften Stellen Sie das Gerät an einem gut belüfteten Ort au...

Страница 20: ...Produktes oder ein Zubehörteil sind Schließen Sie zuerst das Erdungskabel des Geräts an bevor Sie ein Kabel anschließen Trennen Sie das Erdungskabel nicht bis nicht alle anderen Kabel entfernt wurden Reinigungsvorschriften Bevor Sie das Gerät reinigen schalten Sie es aus und trennen Sie es von der Stromversorgung Verwenden Sie ein Stück trockenes weiches und antistatisches Tuch zum Reinigen des Ge...

Страница 21: ...SI EN 300 328 V2 1 1 ETSI EN 301 893 V2 1 1 EN 300 440 V2 1 1 Gesundheit EN 62311 2008 EN62479 2010 Richtlinie 2011 65 EU des Europäischen Parlaments und des Rates vom 8 Juni 2011 zur Beschränkung der Verwendung bestimmter gefährlicher Stoffe in Elektro und Elektronikgeräten und Delegierte Richtlinie EU 2015 863 der Kommission vom 4 Juni 2015 zur Änderung von Anhang II der Richtlinie 2011 65 EU de...

Страница 22: ...en Service von uns erhalten können empfehlen wir Ihnen all Ihre technischen Probleme über unser Ticketsystem https ticket yealink com an uns heranzutragen YEALINK XIAMEN NETWORK TECHNOLOGY CO LTD Web www yealink com Adresse No 1 Ling Xia North Road High Tech Park Huli District Xiamen Fujian P R C Copyright 2021 YEALINK XIAMEN NETWORK TECHNOLOGY CO LTD Alle Rechte vorbehlten ...

Отзывы: