background image

Configuring Your Phone

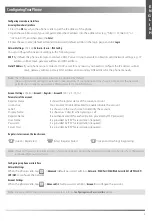
Configuring via web user interface
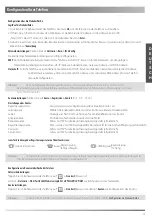
Accessing the web user interface

:

1. Press the 

OK

 key when the phone is idle to get the IP address of the phone. 

2. Open the web browser of your computer, enter the IP address into the address bar (e.g., "http://192.168.0.10" or 

"192.168.0.10"), and then press the 

Enter

.

3. Enter the user name (default: admin) and password (default: admin) in the login page and click 

Login

.

Network Settings

: Click on 

Network

->

Basic

->

IPv4 Config

You can configure the network settings in the following ways:

DHCP

: By default, the phone attempts to contact a DHCP server in your network to obtain its valid network settings, e.g., IP 

address, subnet mask, gateway address and DNS address.

Static IP Address

: If your phone cannot contact a DHCP server for any reason, you need to configure the IP address, subnet 

mask, gateway address, primary DNS address and secondary DNS address for the phone manually.

Note: 

The IP phone also supports IPv6, but IPv6 is disabled by default.

The wrong network settings may result in inaccessibility of your phone and may have an impact on the network 
performance. Contact your system administrator for more information.

Account Settings

: Click on 

Account

->

Register

->

Account


X

 (X=1,2,3...15,16)

Parameters of the account: 

Register Status:  

It shows the register status of the current account.

Line Active: 

You can select Enabled/Disabled to enable/disable the account. 

Label:  

It is shown on the touch screen to identify the account. 

Display Name: 

It is shown as Caller ID when placing a call.

Register Name: 

It is authenticated ID for authentication provided by ITSP (required).

User Name: 

It is provided by ITSP for registration (required).

Password: 

It is provided by ITSP for registration (required).

Server Host: 

It is provided by ITSP for registration (required).

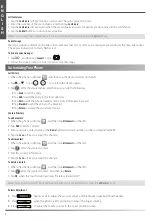
Register status icons on the touch screen

:

(Green)  Registered

(Gray)  Register Failed

(Green and Flashing)  Registering

Note: 

Check with your system administrator if any error appears during the registration process or if a specific configuration 
is required for your registration.

Configuring via phone user interface
Network Settings

:

When the phone is idle, tap           ->

Advanced 

(default password: admin)->

Network

->

WAN Port/VLAN/Web Server/802.1x/VPN/ LLDP/ 

CDP/ NAT 

to configure the network.

Account Settings

:

When the phone is idle, tap          ->

Advanced (

default


password: admin)->

Account

 to configure the account.

Note: 

For more information on account parameters, refer to 

Configuring via web user interface 

above.

E

N

G

L

I

S

H

3

Содержание SIP-T48U

Страница 1: ...Ultra elegant Gigabit IP Phone SIP T48U www yealink com Quick Start Guide V86 36 English Deutsch Espa ol Fran ais...

Страница 2: ......

Страница 3: ...Table of Contents English 1 Deutsch 11 Espa ol 21 Fran ais 31...

Страница 4: ......

Страница 5: ...mend that you use the accessories provided or approved by Yealink The use of unapproved third party accessories may result in reduced performance Assembling the Phone Desk Mount Method The two wall mo...

Страница 6: ...he hub switch is PoE compliant PoE Hub Switch A AC Power Option PC Connection Optional Power Adapter DC 5V B PoE Power over Ethernet Option PC Connection Optional IEEE 802 3af compliant PC PC Welcome...

Страница 7: ...for more information Account Settings Click on Account Register Account X X 1 2 3 15 16 Parameters of the account Register Status It shows the register status of the current account Line Active You ca...

Страница 8: ...ing and Updating Data To enter data 1 Tap the field you want to edit 2 Tap the IME soft key to switch input modes 3 Enter data using the keypad 4 Tap the Save soft key To select a field option Tap the...

Страница 9: ...want to transfer to 3 Press or tap Transfer Semi AttendedTransfer 1 Press or tap the Transfer soft key during an active call The call is placed on hold 2 Enter the number you want to transfer to and...

Страница 10: ...h screen prompts Delete selected item Note You can add contacts from call history easily For more information refer to Call History above Volume Adjustment Press during a call to adjust the receiver v...

Страница 11: ...yourself In case of any discrepancy please contact the appointed maintenance center for repair Without prior written consent no organization or individual is permitted to make any change to the struc...

Страница 12: ...specified maintenance center for repair Do not insert any object into equipment slots that is not part of the product or auxiliary product Before connecting a cable connect the grounding cable of the...

Страница 13: ...65 EU and EU 2015 863 of the European Parliament and of the Council of 8 June 2011 and 4 June 2015 on the restriction of the use of certain hazardous substances in electrical and electronic equipment...

Страница 14: ...R C Copyright 2021YEALINK XIAMEN NETWORK TECHNOLOGY CO LTD All rights reserved Technical Support Visit Yealink WIKI http support yealink com for the latest firmware guides FAQ Product documents and mo...

Страница 15: ...ntweder geliefert oder empfohlen wird Der Gebrauch von Drittanbietern bereitgestellten Zubeh rs das vonYealink nicht freigegeben wurde kann zu einer verminderten Leistungsf higkeit f hren Installation...

Страница 16: ...das Netzwerk und die Stromversorgung wie nachfolgend dargestellt Es gibt zwei M glichkeiten f r die Verbindung des Netzwerks und der Stromversorgung Ihr Systemadministrator wird Sie ber die entsprech...

Страница 17: ...ay Adresse prim re DNS Adresse und sekund re DNS Adresse f r das Telefon manuell konfigurieren Hinweis Falsche Netzwerkeinstellungen k nnen zur Unzug nglichkeit Ihres Telefons und zu einer Beeintr cht...

Страница 18: ...uf das entsprechende Element Tippen Sie im Touchscreen auf oder um Seiten umzubl ttern Dr cken Sie oder um Werte in Auf klappmen s auszuw hlen Gebrauch IhresTelefons Touchscreen Navigation Daten einge...

Страница 19: ...irm auf BT Send Weiterleitung mit Rufzeichen 1 Dr cken Sie w hrend eines aktiven Anrufs dieTaste oder tippen Sie im Bildschirm auf bergeben Der Anruf wird in Wartestellung versetzt 2 Geben Sie die Num...

Страница 20: ...onnummern ein 4 Tippen Sie im Bildschirm auf Speichern um die nderungen zu bernehmen Kontakt bearbeiten 1 Tippen Sie im Ruhezustand des Telefons auf und anschlie end links auf die gew nschte Gruppe 2...

Страница 21: ...nden die Haftung f r Folgen oder Rechtsanspr che die auf solche nderungen zur ckzuf hren sind Beachten Sie bitte die entsprechenden Gesetze und Vorschriften bei der Verwendung des Ger ts Die gesetzlic...

Страница 22: ...duktes oder ein Zubeh rteil sind Schlie en Sie zuerst das Erdungskabel des Ger ts an bevor Sie ein Kabel anschlie en Trennen Sie das Erdungskabel nicht bis nicht alle anderen Kabel entfernt wurden Rei...

Страница 23: ...erwendung bestimmter gef hrlicher Stoffe in Elektro und Elektronikger ten und Delegierte Richtlinie EU 2015 863 der Kommis sion vom 4 Juni 2015 zur nderung von Anhang II der Richtlinie 2011 65 EU des...

Страница 24: ...NETWORK TECHNOLOGY CO LTD Alle Rechte vorbehalten Technischer Support Bitte besuchen Sie f r Firmware Downloads Produktdokumentationen Probleml sungen u v m das Yealink WIKI http support yea link com...

Страница 25: ...rios proporcionados o aprobados por Yealink El uso de accesorios no homologados puede causar un mal funcionamiento del equipo Montaje del tel fono M todo de montaje de sobremesa Los dos huecos de mont...

Страница 26: ...ador Opci n PoE Power over Ethernet 4 Conecte la red y la alimentaci n como se muestra a continuaci n Tiene dos opciones para las conexiones de red y de alimentaci n El administrador de su sistema le...

Страница 27: ...o est en reposo toque Avanzado contrase a por defecto admin Red para configurar la cuenta Nota Para m s informaci n sobre los par metros de cuenta consulte Configuraci n a trav s de la interfaz de usu...

Страница 28: ...a t ctil Introducir y subir datos Introducir datos 1 Toque el campo que desea editar 2 Toque la tecla de funci n IME para cambiar el modo de entrada 3 Introduzca los datos usando el teclado 4 Toque la...

Страница 29: ...lse o toque la tecla de funci n Tran B Transferencia semi atendida 1 Durante una llamada activa pulse o la tecla de funci n Transferir La llamada se pone en espera 2 Marque el n mero al que quiere tra...

Страница 30: ...o el tel fono est en reposo toque y a continuaci n toque el grupo deseado a la izquierda 2 Toque despu s del contacto deseado 3 Edite la informaci n de contacto 4 Pulse la tecla de funci n Guardar par...

Страница 31: ...paraci n No se permite hacer modificaciones en la estructura ni el dise o de seguridad del dispositivo sin previo consentimiento por escrito Yealink no ser responsable bajo ninguna circunstancia de la...

Страница 32: ...entro de mantenimiento designado para su reparaci n No introduzca ning n objeto que no forme parte del producto o de los accesorios en las ranuras del equipo Antes de conectar un cable conecte el cabl...

Страница 33: ...o Europeo y del Consejo de 8 de junio de 2011 y de 4 de junio de 2015 sobre restricciones a la utilizaci n de determinadas sustancias peligrosas en aparatos el ctricos y electr nicos RoHs 2 0 Directiv...

Страница 34: ...MEN NETWORK TECHNOLOGY CO LTD Todos los derechos reservados Asistencia t cnica Visite el Wiki de Yealink http support yealink com para la descarga de firmware documentaci n de productos preguntas frec...

Страница 35: ...et approuv s parYealink L utilisation d accessoires tiers non approuv s peut engendrer une perte de capacit des produits Montage du t l phone Solution de montage sur une table Les deux fentes des supp...

Страница 36: ...phone Si vous connectez un ordinateur votre t l phone nous vous recommandons d utiliser le c ble Ethernet fourni par Yealink Si une alimentation en ligne PoE est fournie vous n avez pas besoin de rac...

Страница 37: ...ue motif que ce soit vous devez configurer manuellement l adresse IP le masque de sous r seau la passerelle les adresses DNS primaire et secondaire pour le t l phone Remarque Des param tres de r seau...

Страница 38: ...rs dans une liste d roulante appuyez sur ou sur Utiliser votre t l phone Aper u des fonctions de l cran tactile Introduction et mise jour des donn es Pour introduire des donn es 1 Appuyez bri vement s...

Страница 39: ...l 3 Appuyez sur ou appuyez bri vement sur la touche BT Send Transfert semi priv 1 Appuyez sur ou sur la touche de fonction bergeben pendant un appel actif L appel est mis en attente 2 Saisissez le num...

Страница 40: ...he de fonction Speichern pour accepter la modification Pour modifier un contact 1 Quand le t l phone est inactif appuyez bri vement sur puis sur le groupe souhait sur la gauche 2 Appuyez bri vement su...

Страница 41: ...entement crit pr alable aucune organisation ou individu n est autoris apporter des changements la structure ou au dispositif de s curit de l appareil Yealink n est en aucun cas responsable des cons qu...

Страница 42: ...hez l appareil de son alimentation et d branchez imm diatement le cordon d alimentation Pour toute r paration contactez le centre de service sp cifi N ins rez aucun objet dans les fentes de l appareil...

Страница 43: ...Parlement europ en et du Conseil du 8 Juin 2011 et 4 Juin 2015 sur la restriction restriction de l utilisation de certaines substances dangereuses dans les quipements lectriques et lectroniques RoHS...

Страница 44: ...Xiamen City Fujian P R C Assistance technique Consultez Yealink WIKI http support yealink com pour t l charger les derniers micrologiciels lire la documentation les questions fr quemment pos es et pl...

Отзывы: