background image

转移当前来电:

1. 在来电界面,按       。

2. 

输入你希望转移到的号码。

    你也可以从

通讯录

历史记录

中选择一个联系人。来电将直接转移到该联系人。

3.按

转移

转移所有来电:

1. 

按主屏幕上的

设置

2. 在功能区域中选择

呼叫转移

3. 

选择呼叫转移的类型:


无条件转移

----话机的所有来电,将被无条件自动转移到预先指定的号码。


遇忙转移

----当话机忙时,来电将被转移到预先指定的号码。


无应答转移

----当话机在指定的响铃时间内无应答时,来电将被转移到预先指定的号码。


4. 打开相应的开关。
5. 输入你希望转移到的号码。

6. 

如果选择

无应答转移

,在

响铃时长

区域选择转移前等待的响铃时间。


7. 按     保存操作。

通话转接

你可以使用下述三种方式将通话转接到另一方:

盲转

1. 

在通话中,按

更多

->

通话转接

。当前的通话被保持。

2. 

输入你要转接到的号码。你也可以从

通讯录

/

历史记录

中选择要转接到的联系人。

3. 按

通话转接

4. 在提示框中,按

通话转接

半咨询转

1. 

在通话中,按

更多

->

通话转接

。当前的通话被保持。

2. 

输入你要转接到的号码。    

3. 按

通话转接

4. 在提示框中,按

发送

5. 

在听到回铃音后,按

通话转接

咨询转

1. 

在通话中,按

更多

->

通话转接

。当前的通话被保持。

2. 

输入你要转接到的号码。  

3. 

通话转接

4. 

在提示框中,按

发送

5. 

在对方接听来电并进行咨询后,按

通话转接

联系人

添加联系人:

1. 

按主屏幕上的

通讯录

2. 

按      。

3. 

在姓名区域输入联系人姓名,在相应的区域输入联系人号码。

4. 按    保存操作。

编辑联系人:

1. 

按主屏幕上的

通讯录

2. 按联系人后的     。
3. 编辑联系人信息。
4. 按    保存操作。

删除联系人:

1. 

按主屏幕上的

通讯录

2. 

按联系人后的    ,然后按

删除

3. 

触摸屏弹出“

删除选中条目?

”,按

确定

删除联系人。

自定义话机

15

说明:

你可以从历史记录中添加联系人。了解更多信息,请参考

历史记录

章节。


Содержание One Talk CP960

Страница 1: ...CP960 Quick Start Guide V80 10 www yealink com Applies to firmware version 73 80 0 10 or later HD IP Conference Phone English...

Страница 2: ......

Страница 3: ...Table of Contents English 1 9...

Страница 4: ...ork after startup Refer to Wireless Network Connection mentioned below in Configuring Your Phone for more information Note The IP phone should be used with Yealink original PoE adapter 54V 0 56A only...

Страница 5: ...2 Connect the optional CP Wired Expansion Mic CPE90 3 Connect the optional PC 4 Connect the optional external speaker PC 5 Connect the optional USB flash drive 2 Micro USB Port E N G L I S H...

Страница 6: ...nfigure the phone via web user interface or phone user interface Startup Hardware Component Instructions Microphone Mute Indicator LED Mute Indicator LED Speaker Touch Screen Volume Touch Key Home Tou...

Страница 7: ...Display notifications Drag the slider to adjust the screen brightness Tap the icon to turn the function on or off quickly Entering and Updating Data To use onscreen keyboard 1 Tap the input field the...

Страница 8: ...ork from the list of networks 5 If the network is secure enter its password in the Password field 6 Tap Connect to connect to the wireless network Account Settings 1 Tap Settings Advanced default pass...

Страница 9: ...dded to the conference after answering To join two calls into conference Tap Merge calls on the Calls screen To manage the individual participant Tap the avatar of desired participant do the following...

Страница 10: ...transfer to You can also select a contact you want to transfer to from Directory or History 3 Tap Transfer 4 Tap Transfer from the prompt box Semi Attended Transfer 1 Tap More Transfer during a call T...

Страница 11: ...ntry before placing a call Tap Blacklist to add the entry to the blacklist Tap Delete to delete the entry from the list Volume Adjustment Tap or on the IP phone during a call to adjust the receiver vo...

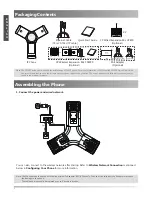
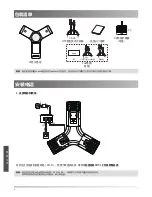
Страница 12: ...PoE IP Yealink Yealink 1 Wi Fi 9 7 5 UTP CP Yealink PoE 54V 0 56A 2 FTP PSE 7 5 2 X 2...

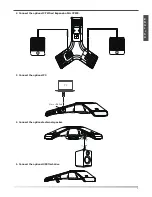
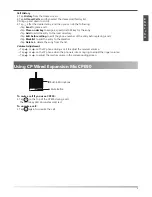
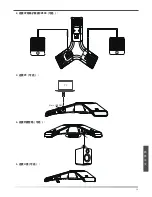
Страница 13: ...2 CP CPE90 3 PC 4 PC 5 U 10 Micro USB...

Страница 14: ...Web USB USB Micro USB 3 5mm 11...

Страница 15: ...1 Next Done Go 12...

Страница 16: ...WAN VLAN 802 1x VPN LLDP CDP NAT 1 2 3 Wi Fi Wi Fi 4 Wi Fi 5 6 admin Web Web 1 IP 2 IP http 192 168 0 10 192 168 0 10 Enter 3 admin admin IPv4 DHCP DHCP IP DNS IP DHCP IP DNS DNS PPPoE xDSL PPPoE 13...

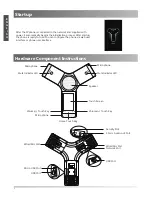
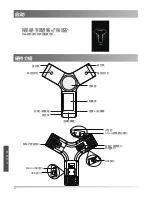
Страница 17: ...LED LED 1 2 3 4 3 5 U 1 2 U 3 1 4 14...

Страница 18: ...1 2 3 1 2 3 4 5 6 7 1 2 3 4 1 2 3 4 5 1 2 3 4 5 1 2 3 4 1 2 3 4 1 2 3 15...

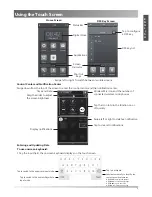
Страница 19: ...1 2 3 4 1 LED 1 16 CP CPE90 1 2...

Страница 20: ...munication solutions Founded in 2001 Yealink leverages its independent research and development and innovation to pursue its core mission Easy collaboration high productivity The company s high qualit...

Отзывы: