background image

 | Deployment and Connection | 

16

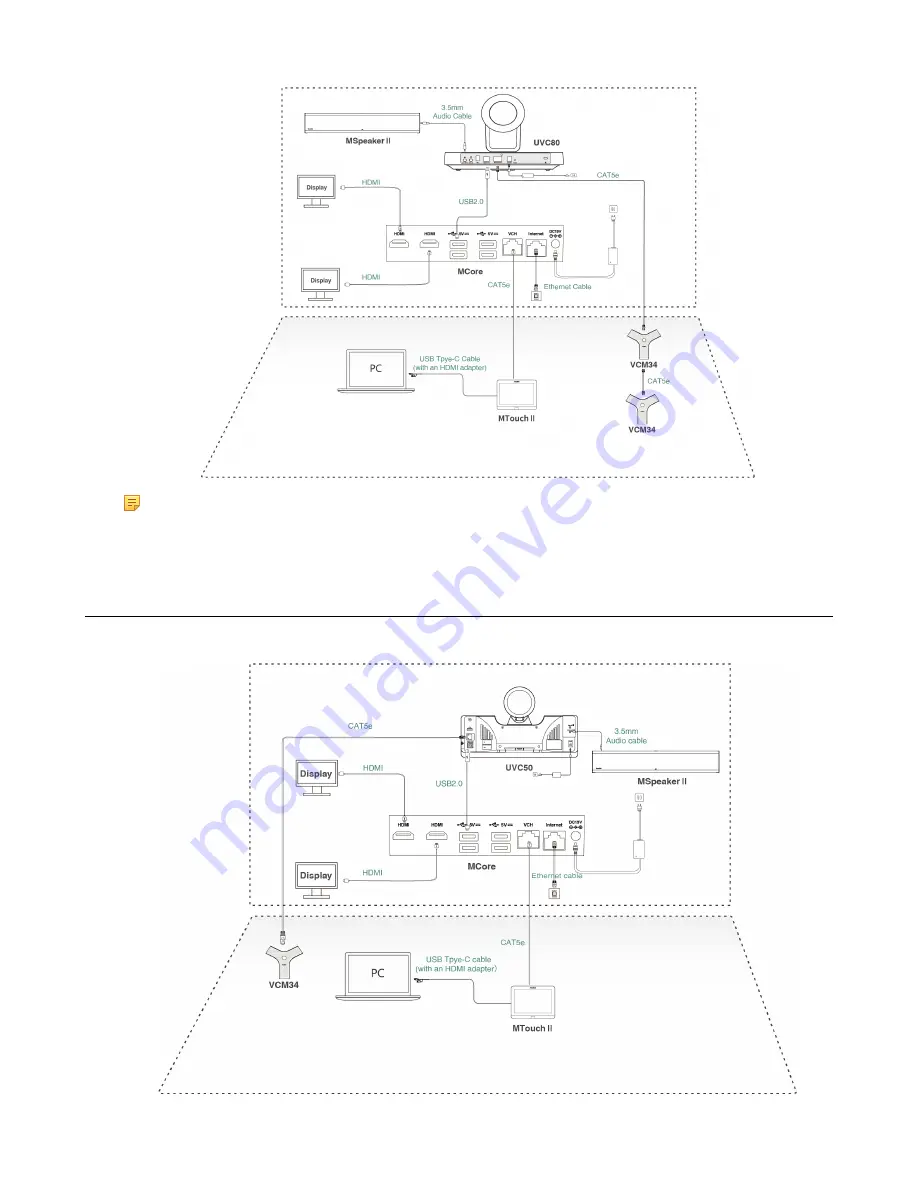
Note: 

 For more information about the installation and deployment of accessories (for example,

the installation of MCore or UVC80 camera), refer to the Quick Start Guide of the corresponding
accessory.

MVC500 

The following is the deployment and connection of MVC500 

Ⅱ.

Содержание MVC Series

Страница 1: ......

Страница 2: ...17 Camera Installation 21 Initial Setup 24 Skype User Account 24 Administrator User Account 25 Setting up Yealink MVC900 Ⅱ MVC800 Ⅱ MVC500 Ⅱ MVC300 Ⅱ 25 Basic Settings of Teams Room Systems 26 Controlling UVC80 UVC50 UVC30 Room Camera 26 Enabling Disabling Auto framing 27 Controlling Room Camera Position 27 Resetting Room Camera to Home Position 27 Creating the Preset Position on the Yealink RoomC...

Страница 3: ... Cloud Service Yealink Device Management Platform 36 Troubleshooting 37 Upgrading System Software 37 Enabling Automatically Windows Update 37 Manually Windows Update 38 Firmware for Each Device 39 General Issues 40 Does the MVC900 Ⅱ MVC800 Ⅱ MVC500 Ⅱ MVC300 Ⅱ Come with All the Necessary Software Pre installed 40 The Room Is Not Enabled for Teams Meetings 40 There Is No Content Displayed on the Sec...

Страница 4: ...camera hub and 2 powerful pan tilt zoom cameras with 12x optical zoom to cover up an extra large conference room The Yealink MVC800 Ⅱ includes 3 VCM34 and a powerful pan tilt zoom camera with 12x optical zoom to cover up a large conference room The Yealink MVC500 Ⅱ include 2 CPW90 and a powerful pan tilt zoom camera with 5x optical zoom to cover up a small to medium conference room The Yealink MVC...

Страница 5: ...faults HDMI Connects to a display USB 3 0 Port Connects to the UVC80 UVC50 UVC30 Room Connects to a wireless USB dongle to use the wireless keyboard or the mouse Connects to other USB devices VCH port Connects to MTouch Ⅱ Internet Connects to the network device DC19V Connects to the power adapter Camera Hub ...

Страница 6: ...RCA cable 6 RCA Out Connect to the MSpeaker Ⅱ via a RCA cable 7 VC Hub Camera Connect to the VCM34 8 Internet Connect to the switch to connect UVC80s 9 DC48V Connect to the power source via a power adapter 10 Security Slot Allow you to connect a universal security cable to the codec so you can lock the codec down The system cannot be removed when locked UVC80 The following describes the correspond...

Страница 7: ...mm audio cable USB Inserts the DD10 to connect to the CPW90 Video Out Connects to a PC as a video output Microphone Connects to the VCM34 DC48V Connects to the power adapter Reset Resets the UVC80 to factory defaults Security Slot Creates a secure connection to the UVC80 with a universal security cable to lock UVC80 down UVC50 The following describes the corresponding ports of UVC50 ...

Страница 8: ...udio cable Line Out Connects to an audio output device using a 3 5mm audio cable DC48V Connects to the power adapter Reset Resets the UVC50 to factory defaults Security slot Creates a secure connection to the UVC50 with a universal security cable to lock UVC50 down UVC30 Room The UVC30 Room is directly connected to the MCore via USB cable MTouch Ⅱ The following describes the corresponding ports of...

Страница 9: ...pair with WPP20 for wireless sharing USB C port Connects to PC for wired content sharing USB A port Connects to a USB audio devices for example CP900 VCH port Connects to MCore and MTouch Ⅱ is powered by MCore CPW90 The CPW90 supports 360 degree audio pickup at a radius of up to 3 meters Name Description Built in Microphones Supports 360 degree audio pickup at a radius of up to 3 meters Mute Butto...

Страница 10: ...ton Tap the power button for 3 seconds to power on or power off the CP900 Volume Up Down Button Adjusts the volume of the CP900 Mute Button During a call tap the mute button to mute or unmute Hang up Button End or reject a call Answer Button Answer a call VCR20 Remote Control The VCR20 remote control enables you to operate a MVC Ⅱ system This includes receiving meeting calls controlling the camera...

Страница 11: ...e the auto framing feature Press to turn on turn off auto framing Mute Key Mute or unmute the microphone Navigation Key Pan and tilt the camera to adjust the viewing angle Scroll Wheel OK Key Scroll up to zoom camera in Scroll down to zoom camera out On hook Key End a conference call ...

Страница 12: ...alink MCore Quick Start Guide EN CN Yealink VCM34 Quick Start Guide EN CN Yealink CP900 Quick Start Guide EN CN Yealink Room Connect User Guide Technical Specifications Operating System Windows 10 IoT Enterprise 64 bit Software Microsoft Teams Rooms Processor SSD RAM 8th Gen Intel Core i5 128GB 8GB 2 x 4GB Ports 2 x HDMI video output Bluetooth and Wi Fi 4 x USB3 0 Type A 1 x 10 100 1000M Ethernet ...

Страница 13: ...Tilt range 40 UVC30 Room 4K video resolution Maximum 60FPS 3x digital zoom Field of view diagonal 120 Facial detection and Auto framing 1 x 3m USB 2 0 cable MSpeaker Ⅱ RMS 10W Frequent response 100 Hz 20K Hz S N 70 dB 1x Yealink VCH port 1 x Line out 3 5mm CPW90 Built in 3 microphone array 20ft 6m and 360 voice pickup range Yealink Noise Proof Technology Power over Ethernet PoE Up to 4 units can b...

Страница 14: ...s Online Here s what you need to buy You have Skype for Business Server 2015 on premises or hybrid Join a scheduled meeting Meeting Room SKU Skype for Business Server Standard CAL Initiate an ad hoc meeting Meeting Room SKU Skype for Business Server Standard CAL Skype for Business Server Enterprise CAL Initiate an ad hoc meeting and dial out from a meeting to phone numbers Meeting Room SKU Skype f...

Страница 15: ...ollowing is the deployment and connection of MVC900 Ⅱ Note For more information about the installation and deployment of accessories for example the installation of MCore or Camera Hub refer to the Quick Start Guide of the corresponding accessory MVC800 Ⅱ The following is the deployment and connection of MVC800 Ⅱ ...

Страница 16: ...nformation about the installation and deployment of accessories for example the installation of MCore or UVC80 camera refer to the Quick Start Guide of the corresponding accessory MVC500 Ⅱ The following is the deployment and connection of MVC500 Ⅱ ...

Страница 17: ...ssories for example the installation of MCore or UVC30 Room camera refer to the Quick Start Guide of the corresponding accessory Recommended Deployment Solution Deployment Solutions of Different Meeting Rooms Camera Installation Deployment Solutions of Different Meeting Rooms Yealink MVC900 Ⅱ MVC800 Ⅱ MVC500 Ⅱ MVC300 Ⅱ system supports different camera devices Camera Hub UVC50 UVC80 UVC30 Room and ...

Страница 18: ...System Devices Included Extra large room 18 30 People MVC900 Ⅱ Medium to large room 13 20People MVC800 Ⅱ Small meeting room 4 12People MVC500 Ⅱ Focus and small room 2 7 People MVC300 Ⅱ For Focus and small room 2 7 People For Small meeting room 4 12 people ...

Страница 19: ...phones support 360 degree audio pickup at a radius of up to 3 meters Place the CPW90 wireless microphones on a stable surface and keep them away from obstacles so that they can pick up sounds effectively For Medium to large conference room 13 20 people ...

Страница 20: ... Connection 20 The distance between the two VCM34s is 3 meters VCM34 supports 360 degree audio pickup at a radius of up to 6 meters and you can cascade up to 4 VCM34 units For extra large conference room 18 30 people ...

Страница 21: ...M34 units Note The MTouch Ⅱ needs to be placed in a position facing the door Related concepts Recommended Deployment Solution Camera Installation You can mount the UVC80 UVC50 on the top of the TV on the wall on the ceiling or onto a TV Stand or a Tripod You can mount the UVC30 on the top of the TV on the wall or onto a TV Stand or a Tripod The installation methods are as follows For UVC80 ...

Страница 22: ... For UVC30 Recommendations of Camera Installation Recommendations of MSpeaker Ⅱ Installation Recommendations of MCore Installation Conference Room Wiring Recommendations of Camera Installation The following is an example of installing UVC80 ...

Страница 23: ...stall the LCD TV below the camera The camera should not face the light source directly to prevent bad experience caused by dazzling light Recommendations of MSpeaker Ⅱ Installation Mount MSpeaker Ⅱon the wall as below For more information about the installation of MSpeaker Ⅱ refer to Yealink MSpeaker Ⅱ Quick Start Guide EN CN Recommendations of MCore Installation You can mount the MCore on the wal...

Страница 24: ... user account and administrator user account built into the MVC Ⅱ system out of the factory Note Before setting up the MVC Ⅱ system you need to connect a mouse to MCore to complete the initial configuration We recommend using the wireless mouse kit Skype User Account Administrator User Account Skype User Account Skype user account is the default account from which the Microsoft Teams Rooms app run...

Страница 25: ...nly used for device management Related tasks Administrator Sign in Setting up Yealink MVC900 Ⅱ MVC800 Ⅱ MVC500 Ⅱ MVC300 Ⅱ When the system is powered on the device will automatically launch the Microsoft Teams Rooms app and enter the sign in screen To use the device and basic features on the Teams Room Systems you should finish the setup wizard first Before you begin Make sure all components are co...

Страница 26: ...Dual External Display Content Sharing Adjusting the MTouch Ⅱ Lightness Changing Sign in Account Controlling UVC80 UVC50 UVC30 Room Camera Microsoft Teams Rooms supports basic PTZ control for your UVC80 UVC50 UVC30 Room camera In addition you can use the preset position feature if you set up preset positions for your camera connected to the MVC Ⅱ system on the Yealink RoomConnect plug in Note The Y...

Страница 27: ...tion After the UVC80 UVC50 is manually adjusted the auto framing feature is temporarily turned off If you want to use it again you need to press the auto framing key on the remote control to turn it on Auto framing is not applicable to MVC900 Ⅱ system Procedure 1 Tap to enter the Camera Control page If you are in a meeting tap 2 Select 3 Enable Disable the Auto framing Related concepts VCR20 Remot...

Страница 28: ...ices on the Yealink Device Management Platform or Yealink Management Cloud Service after signing into the remote management account For more information on how to use the Yealink RoomConnect plug in please refer to Yealink RoomConnect User Guide Related tasks Administrator Sign in Setting Camera to Preset Position Before you begin Preset positions have been added in the Yealink RoomConnect plug in...

Страница 29: ...rom the camera list into the left picture to switch the camera displayed in full screen Division Drag the camera in the division mode to swap the camera display positions Surround Select the desired mode from the drop down menu to the right of the surround mode Drag the camera in surround mode to the specified position 4 Tap Apply Single and Dual External Display To fully enjoy video and content s...

Страница 30: ...red content in full screen Dual Screen Layouts The following introduces the default layout when you connect two displays One external display displays the remote video feeds and the other display will be reserved for content sharing Related tasks Enabling Dual Monitor Mode Enabling Dual Monitor Mode Before using two external display devices you should enable dual monitor mode first Procedure 1 Nav...

Страница 31: ...efault sfb to access the Setup screen 3 In theDevice page enable Dual Monitor Mode 4 Tap Save and exit Content Sharing After the MTouch Ⅱ and PC are connected you can present the content while the device is idle or during a meeting Wired Content Sharing Wireless Content Sharing ...

Страница 32: ... of the MTouch Ⅱ 2 Wait for about 3 seconds and the WPP20 LED indicator glows green The WPP20 is paired with the MTouch Ⅱ successfully Sharing Content via WPP20 Before you begin Make sure the WPP20 has been paired with the MShare Procedure 1 Connect the WPP20 wireless presentation pod to your computer 2 If the WPP20 is first connected to the computer you need to manually start the Yealink Wireless...

Страница 33: ...opping Sharing Content via WPP20 Procedure Do one of the following On your computer remove the WPP20 On the WPP20 press the presentation button On the Yealink Wireless Presentation Pod software click Stop Sharing Tip You can tap Stop Present to stop sharing content when the device is idle During a meeting tap Stop Presenting to stop sharing content with the participants Adjusting the MTouch Ⅱ Ligh...

Страница 34: ... the corresponding field 4 Tap Save and exit The new account will sign in automatically Basic Features for Microsoft Teams Rooms App After you set up your device the touch screen console is displayed on the screen The touch screen console is the heart of every meeting in the meeting room On the screen you can do the following Join a scheduled meeting by selecting the meeting ...

Страница 35: ...e room console Select More for instructions on how to add the room to a meeting give feedback on the device or change settings For more information on how to use the specific features please refer to Microsoft Teams Rooms Help Switching Between Skype User Account And Administrator Account Skype User Account Sign in Administrator Sign in Skype User Account Sign in Procedure 1 Tap the button and the...

Страница 36: ...you can manage all devices in the MVC Ⅱ system including the unified upgrade as well as diagnosis and alarm About this task Note For more information on how to manage the devices on Yealink Management Cloud Service Yealink Device Management Platform please refer to Yealink Management Cloud Service for Enterprise Administrator Guide Yealink Device Management Platform Administrator Guide Procedure 1...

Страница 37: ... its installed components The system software including Windows the Camera Hub UVC80 UVC50 UVC30 Room and the MVC300 Ⅱ can be automatically upgraded via windows update by default Otherwise you should enable automatically windows update or upgrade the devices manually Note You can also upgrade the devices on the Yealink RoomConnect plug in under Windows or on the Yealink Management Cloud Service Ye...

Страница 38: ...r from the bottom left corner 5 Enter the administrator password default sfb and then sign in 6 Tap the button and then go to Settings Upgrade Security Windows Update and select Advanced options 7 Enable Automatically download updates even over metered data connections charge may apply Manually Windows Update Procedure 1 Navigate to More Settings ...

Страница 39: ... Upgrade Security Windows Update and select Check for updates Select the desired device and then complete the installation Firmware for Each Device The firmware versions of the devices in the MVC Ⅱ system need to match each other The following table lists the associated and latest firmware name for each device Device Model Firmware Name Camera Hub 84 421 0 5 rom or later UVC30 105 420 0 10 rom or ...

Страница 40: ...VC Ⅱ system For more information refer to Microsoft Teams Rooms The Room Is Not Enabled for Teams Meetings You should enable Teams meeting mode on your system before using the Teams meetings Procedure 1 Navigate to More Settings 2 Enter the administrator password default sfb to access the Setup screen 3 In the Account page select Skype for Business default and Microsoft Teams or Skype for Business...

Страница 41: ...gitimate antivirus protection plan already built into Windows 10 But not all antivirus software is the same and you can choose antivirus software based on its ability to defend against threats Restarting the Device After you restart the device it will automatically launch the Teams Room Systems app and sign in the account Procedure Navigate to More Restart Device ...

Страница 42: ...elivering operating Microsoft Teams Rooms the deployment of Microsoft Teams Rooms and how to configure a Microsoft Teams Rooms console see the following links For more information on how to plan Microsoft Teams Rooms please visit Plan Microsoft Teams Rooms For more information on the deployment of Microsoft Teams Rooms please visit Deployment Overview For more information on how to configure a Mic...

Отзывы: