background image

Yealink CP965 User Guide

Screen Saver

The screen saver starts automatically when your phone has been idle for the preset waiting time. You can stop the
screen saver by touching the screen or tapping any key.

Topics

Changing the Waiting Time for Screen Saver
Setting the Screen Saver Type

Changing the Waiting Time for Screen Saver

You can set the waiting time after no activity before displaying the screen saver.

Procedure

1.

Go to

More

>

Settings

>

Basic

>

Display

>

Screen Saver

.

2.

Select the desired waiting time from the

Screensaver Waiting Time

field.

3.

Select

.

Setting the Screen Saver Type

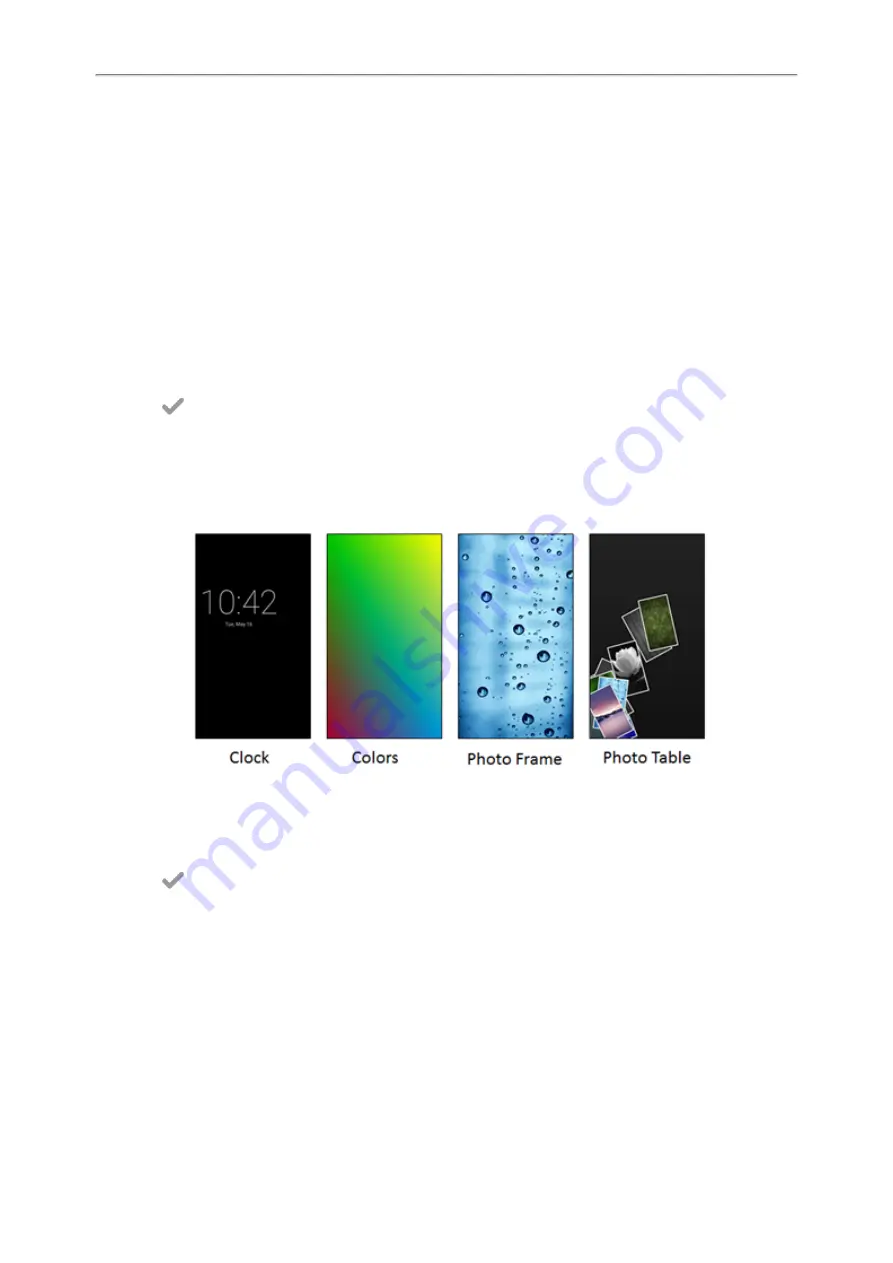
The screen saver can start with different types and you can set it manually.

Your phone supports four screen saver types:

Clock

,

Colours

,

Photo Frame

and

Photo Table

.

Procedure

1.

Go to

More

>

Settings

>

Basic

>

Display

>

Screen Saver

.

2.

Select the desired screen saver type.

3.

Select

.

Changing the Screen Backlight and Time

You can change the brightness of the phone screen during phone activity and inactivity.

Active Level

: The intensity of the phone screen when the phone is active.

Backlight Time

: The delay time to change the brightness of the phone screen when the phone is inactive. Backlight

time includes the following settings:

l

Always On

: Backlight is on permanently.

l

30min

,

1h

,

2h,4h

,

6h

,

8h

or

12h

: Backlight is changed when the phone is inactive after the designated time.

78

Содержание CP935W

Страница 1: ...CP965 Phones User Guide Version 86 6 I Date December 2022...

Страница 2: ...Google Pinyin Input Method 21 Using the Dial Pad 22 Call Features 23 Placing Calls 23 Placing a Call from the Dialer 23 Placing Multiple Calls 23 Placing a Call with a Speed Dial Key 24 Placing a Cal...

Страница 3: ...Local Conference 36 Initiating a Conference by Dialing Multiple Numbers 36 Initiating a Conference by Inviting Participants 36 Merging Multiple Calls into a Conference Call 37 Creating a Hybrid UC Con...

Страница 4: ...Key 50 Performing a Blind Transfer 50 Performing a Semi attended Attended Transfer 50 BLF List 50 State Indicator of Remote Line by BLF List Key 51 Audio Alert for BLF Pickup 51 Visual Alert for BLF...

Страница 5: ...ts 62 Moving a Local Directory Contact to Blocklist 62 Searching for Contacts 62 Blocklist 63 Adding a Blocklist Contact 63 Viewing Blocklist Contacts 63 Editing a Blocklist Contact 64 Deleting Blockl...

Страница 6: ...anaging Bookmarks 73 Adding a Web Page to the Bookmarks Library 73 Accessing a Web Page from the Bookmarks Library 74 Editing a Bookmark 74 Deleting a Bookmark 75 Setting a Home Page 75 Clearing the N...

Страница 7: ...the PC to the Phone 87 Setting the Phone as PC Audio Device 88 Setting the Phone as PC Audio Device via Softphone 88 Setting the Phone as PC Audio Device via PC 89 Holding Resuming the PC Audio 89 Mu...

Страница 8: ...Phone 101 Disabling Bluetooth Device Discovery 101 Changing Your Phone s Bluetooth Name 101 Unpairing the Mobile Phone 102 Disconnecting the Bluetooth enabled Mobile Phone 102 Deactivating the Bluetoo...

Страница 9: ...r Guide Diagnosing the Network 109 Rebooting Your Phone 110 Resetting to Factory Settings 110 Updating the Phone Configuration 110 Clearing User s Personalized Configuration Settings 110 Appendix Menu...

Страница 10: ...our phone Additionally the examples and graphics in this guide may not directly reflect what is displayed or is available on your phone screen Related Documentation You can view more types of document...

Страница 11: ...o get familiar with its features and user interface Topics Hardware Overview Screen and Icons Navigating Menus and Fields Entering Information Hardware Overview Understanding the phone hardware helps...

Страница 12: ...Returns to the idle screen 6 USB Type A Port Allows you to connect a USB flash drive optional to your phone so you can record calls conferences and play back recorded files Allows you to connect expa...

Страница 13: ...he phone is ringing Solid green The phone is placing a call There is an active call on the phone Off The phone is powered off The phone is idle Screen and Icons The user screens and icon indicators ca...

Страница 14: ...tooth setting screen Mute Tap to turn mute on or off quickly DND Tap to turn DND on or off quickly Auto Answer Tap to turn auto answer on or off quickly Silent Tap to turn silent mode on or off quickl...

Страница 15: ...the left of the status bar 3 Current Account Displays the current registered account If there is no account registered on the phone No Service appears 4 Digital Clock Widget Displays the phone s time...

Страница 16: ...ne Key List Shows the line key labels You can customize the line keys 3 Page Keys Tap to turn to the corresponding page Calls Screen All of your active and held calls are displayed on the calls screen...

Страница 17: ...e Lock Do Not Disturb DND Ringer volume is 0 Always Forward Busy Forward No Answer Forward Missed Calls USB flash drive is detected PSTN box is detected Wi Fi enabled Wi Fi connection is unreachable B...

Страница 18: ...enabled mobile phone fails to con nect Flashing Mobile Account Bluetooth enabled mobile phone is connecting Icon indicator associated with Intercom Icons Description Icons Description Intercom idle s...

Страница 19: ...cs Using the Onscreen Keyboard Using the Dial Pad Using the Onscreen Keyboard The phone supports two kinds of input methods English UK and Google Pinyin for the onscreen keyboard You can enter informa...

Страница 20: ...e entered characters one by one Long tap to delete two or more characters 3 Label automatically to identify the context sensitive features Next Key Tap to go to the next field Done Key Tap to confirm...

Страница 21: ...Delete Key Tap to delete the entered characters one by one Long tap to delete two or more characters 4 Label automatically to identify the con text sensitive features Next Key Tap to go to the next f...

Страница 22: ...the next field Done Key Tap to confirm the settings Send Key Tap to dial out the number Go Key Tap to browse the web page 4 Space Key Tap to enter spaces Long tap to change the input method 5 Tap to s...

Страница 23: ...22 Changing the Input Method Using the Dial Pad You can use the dial pad to enter data The dial pad only provides digit keys key and key You can tap to switch to the onscreen keyboard Related Topic Us...

Страница 24: ...y Placing a Call Back to the Last Incoming Number Redialing a Number Dialing a Hotline Number Placing a Call from the Call History Placing a Call from the Directory Placing an Anonymous Call Placing a...

Страница 25: ...e field The contact number and DTMF sequence are separated by commas One comma stands for 500 milliseconds For example 1234 123 means the phone dials out the number 1234 first then after the call is s...

Страница 26: ...Calls and select the desired history list 3 Tap the desired entry Placing a Call from the Directory You can place a call to a contact directly from your directory Procedure 1 Tap 2 If the contact was...

Страница 27: ...ace a call The callee is prompted with an incoming call from anonymity If the callee enables anonymous rejection feature you may be prompted that the callee does not accept calls from an anonymous num...

Страница 28: ...all information is displayed Procedure 1 Select Answer The active call is placed on hold and the incoming call becomes active Note You can disable the call waiting feature to reject the incoming call...

Страница 29: ...all Waiting 2 Turn off Call Waiting 3 Optional Enter the call waiting off code in the Off Code field 4 Select Silencing or Rejecting Incoming Calls When you receive an incoming call you can choose to...

Страница 30: ...ction Code 5 Enter the anonymous call rejection on code and off code respectively in the On Code and Off Code field beneath the Send Anonymous Rejection Code field 6 Select Related Topic Placing an An...

Страница 31: ...ct Exit DND mode from the idle screen l Swipe down from the top of the screen to enter the control center and toggle DND off l Go to More Settings Features DND turn off DND Status and then select Endi...

Страница 32: ...1 During a call tap the Mute touch key or select Mute 2 Tap the Mute touch key or select Mute again to unmute the microphone Note Contact your system administrator if you can only mute the microphone...

Страница 33: ...D glows red and the mute icon appears on the idle screen 2 Tap the Mute touch key again to deactivate the mute state Holding and Resuming Calls You can place an active call on hold and resume the call...

Страница 34: ...ng Incoming Calls When you are not available to answer calls on your phone you can forward the calls to another phone Topics Forwarding All Incoming Calls to a Contact Deactivating Call Forward Forwar...

Страница 35: ...e incoming call to 3 Select Forward The phone prompts a call forward message Forwarding Incoming Calls with a Forward Key When the phone receives an incoming call you can easily tap the Forward key to...

Страница 36: ...of the following l Enter the number you want to transfer the call to and select Transfer Select Transfer to complete the transfer The call will automatically dial out in about 5 seconds if you do not...

Страница 37: ...Conference Holding Resuming a Conference Call Muting Unmuting a Conference Call Splitting a Conference Call Managing the Conference Participants Enabling Disabling the DND Mode for a Conference Call...

Страница 38: ...nto a hybrid UC conference There are many ways to create a hybrid UC conference the following shows an example Before You Begin Make sure you have an active PC audio and connected a mobile phone to yo...

Страница 39: ...wing l Select Far Mute to mute the participant The muted participant can hear everyone but no one can hear the muted participant l Select Remove to remove the participant from the conference l Select...

Страница 40: ...parts during an active call Important Before call recording especially those involving PSTN it is necessary to know about the rules and restrictions of call recording in the country where you are It...

Страница 41: ...rs and the phone returns to the idle screen The screen prompts a message that the call is recorded successfully Checking Storage Space You can check the total space or available space of the phone or...

Страница 42: ...the phones with pre configured multicast address es on specific channel s Note Multicast RTP is one way only from the sender to the multicast address es receiver For outgoing RTP multicasts all other...

Страница 43: ...List key to easily access the paging groups on the idle screen Procedure 1 1 Tap Dsskey 2 Drag the desired line key to the Edit field 3 Select Key Event from the Type field 4 Select Paging List from...

Страница 44: ...aging group list Procedure 1 Tap the Paging List key when the phone is idle Go to More Settings Features Paging List If the Paging List key is not configured you can also go to Settings Features Pagin...

Страница 45: ...Guide The multicast RTP session is re established l Select DND to enable or disable DND mode l Select Mute to mute the multicast RTP session l Select Record to record a call l Select End Call to end...

Страница 46: ...ect When you place a call and the callee is temporarily unavailable to answer the call the phone prompts whether to wait for the callee select OK to activate the call completion feature When the calle...

Страница 47: ...your phone If there are multiple incoming calls on the group at the same time you can only pick up the first incoming call Before You Begin Your system administrator has enabled the group call pickup...

Страница 48: ...ID field 6 Do one of the following l Optional Enter the string that will appear on the phone screen in the Label field Enter group call pickup code in the Value field l Select and select the desired...

Страница 49: ...t to retrieve the parked call dial the call park retrieve code If the parked call is not retrieved within a period of time assigned by the system the phone performing call park will receive a call bac...

Страница 50: ...key to the Edit field 3 Select BLF from the Type field 4 Select the desired line from the Account ID field 5 Do one of the following l Optional Enter the string that will appear on the phone screen in...

Страница 51: ...Dsskey is set to Blind Transfer Procedure 1 During a call select Dsskey 2 Tap the BLF key of the monitored user which you want to transfer this call to Performing a Semi attended Attended Transfer Du...

Страница 52: ...or in a call The monitored line places a call on hold A call is parked to the monitored line The monitored line fails to register or does not exist Audio Alert for BLF Pickup The Audio Alert for BLF P...

Страница 53: ...lind Transfer During a call you can use the BLF List key to perform a blind transfer to the monitored line Before You Begin Check with your system administrator to make sure that the Transfer Mode via...

Страница 54: ...two parties Shared Line Yealink phone supports using Shared Call Appearance SCA to share a line So that this line can be registered on more than one phone at the same time Your system administrator c...

Страница 55: ...ming calls will be distributed evenly among the available shared line keys Note If the number of incoming calls is greater than the configured line keys the line keys will be used by sequence cir cula...

Страница 56: ...n an Active Call on a Shared Line In the SCA scenario you can barge into an active call on the shared line After you barge into a call the call turns into a three party conference Note Only one user c...

Страница 57: ...the Account ID field 5 Do one of the following l Optional Enter the string that will appear on the phone screen in the Label field Enter the target extension number in the Value field l Select and sel...

Страница 58: ...lls Intercom Mute Intercom Mute feature allows the phone to mute the microphone when incoming intercom calls are answered auto matically Intercom Tone Intercom Tone feature allows the phone to play a...

Страница 59: ...ation sent by a contact Before You Begin You need to set the voice mail code in advance Procedure 1 Go to More Message 2 Select View Voice Mail The phone screen displays the amount of new and old voic...

Страница 60: ...rom the Dsskey screen The phone prompts you to clear the account configuration or not 2 Select OK Registration configurations of all accounts on the phone will be cleared immediately The login wizard...

Страница 61: ...t to Blocklist Searching for Contacts Managing the Local Directory Groups You can manage the Local Directory groups when the phone is idle Topics Adding Contact Groups Editing Contact Groups Deleting...

Страница 62: ...irectory you can choose how much information you want to enter for your contact You are required to enter a contact name at least for each new contact Procedure 1 Select 2 If you want to add a contact...

Страница 63: ...ou can delete all contacts from the Local Directory Procedure 1 Select 2 Long tap a contact 3 Tap the radio box in the top right of the screen 4 Select Delete The phone prompts you to delete all conta...

Страница 64: ...n the blocklist to block unwanted callers Topics Adding a Blocklist Contact Viewing Blocklist Contacts Editing a Blocklist Contact Deleting a Blocklist Contact Moving a Blocklist Contact to the Local...

Страница 65: ...ant to answer a call from a specific contact you need to remove it from the Blocklist Procedure 1 Go to Local Directory Blocklist 2 Tap the desired blocklist contact 3 Select Delete The phone prompts...

Страница 66: ...Procedure 1 Select Local Directory Remote Phone Book 2 Select the desired remote phone book 3 Do one of the following l Select Enter your search criteria in the search field l Select the desired lett...

Страница 67: ...any remote phone book contact to the Blocklist on the phone to prevent this contact from calling you Procedure 1 Select Local Directory Remote Phone Book 2 Select the desired remote phone book 3 Tap...

Страница 68: ...Call Placed Call Forwarded Call Viewing History Records The history record saves the call information such as the caller s name and number local line and call duration Procedure 1 Tap 2 Tap Local Call...

Страница 69: ...esired entry and then tap Delete The phone prompts you to delete the record or not 4 Select OK Deleting All Call Records You can delete all call records from the call history list Procedure 1 Select 2...

Страница 70: ...to Server Deleting a Recording Deleting All Recordings Checking Storage Space Recording Audio By default the recorded audio is saved in the internal SD card You can connect a USB flash drive to your p...

Страница 71: ...ing the call You can also pause the recording manually at any time Procedure 1 Tap to pause playing the recording The icon appears on the phone screen 2 Tap to resume the playback Fast Forwarding Rewi...

Страница 72: ...Recording You can rename the recording for better recognition Procedure 1 Go to More Recorder 2 If you want to rename the recorded audio saved in USB flash drive tap USB 3 Tap after the desired recor...

Страница 73: ...3 Tap Edit 4 Check the radio box on the top left of the screen to select all recordings 5 Tap The phone prompts you whether to delete all the audio files 6 Tap OK Checking Storage Space You can check...

Страница 74: ...ebsite you want to visit or enter the full URL then tap Go on the onscreen keyboard to browse the web page Managing Bookmarks You can bookmark the web pages that you frequently visit Topics Adding a W...

Страница 75: ...s the BOOKMARKS list A list of web pages that you ve bookmarked will appear 3 Tap the web page you want to visit Editing a Bookmark You can edit the details of your bookmark for better recognition Pro...

Страница 76: ...ome page This web page opens automatically each time you open the browser Procedure 1 Go to More Browser 2 Tap Settings General Set homepage 3 Tap the web page you want to set as the home page in the...

Страница 77: ...omize the browser style you prefer Clock You can use the Clock to check the time of other cities in the world Procedure 1 Tap the digital clock from the Home screen 2 Tap 3 Drag up and down to scroll...

Страница 78: ...do not change the default password the phone displays a warning icon in the status bar Procedure 1 Go to More Settings Advanced Set Password 2 Enter your old and new password information 3 Select Rela...

Страница 79: ...aver Type The screen saver can start with different types and you can set it manually Your phone supports four screen saver types Clock Colours Photo Frame and Photo Table Procedure 1 Go to More Setti...

Страница 80: ...s Basic Display Backlight Changing the Language Your phone supports several languages that you can choose to use on the phone Contact your system administrator to find out exactly which languages are...

Страница 81: ...on the phone will be changed accordingly Note After the phone reboots it will be forcibly switched to obtain the time and date from the NTP server Changing the Time and Date Format You can set the ph...

Страница 82: ...0 3600 seconds in the Auto Lock field 6 Select Note Ask your system administrator for the password if you cannot access Advanced Advanced Settings menu Setting a Phone Lock Key You have to set a phone...

Страница 83: ...ore Settings Basic Change PIN 2 Enter your old and new unlock PIN respectively The unlock PIN length must be within 15 digits 3 Select Line Keys Line keys allow you to quickly access features such as...

Страница 84: ...order in which your line keys display on the phone screen Procedure 1 Tap the desired page key if required 2 Drag a line key to the desired location at which another line key locates For example exch...

Страница 85: ...tones are used according to this priority Contact ring tone Group ring tone Account ring tone Phone ring tone Topics Setting a Ring Tone for the Phone Setting a Ring Tone for an Account Setting a Ring...

Страница 86: ...you quickly identify callers according to the ring tones Procedure 1 Select 2 Select Local Directory to select the desired contact group 3 Tap the desired contact and select 4 Select the desired ring...

Страница 87: ...ce a ring tone key tone touch sound notification sound from phone s speaker Procedure 1 Do one of the following l Go to More Settings Basic Sound Turn on Silent Mode and then select l Long tap the lef...

Страница 88: ...information refer to Creating a Hybrid UC Conference l Answer calls from the softphone Topics Connecting the PC to the Phone Setting the Phone as PC Audio Device Holding Resuming the PC Audio Muting...

Страница 89: ...selects the connected phone as the audio device If not you may have to set the phone as PC audio device via softphone or PC Topics Setting the Phone as PC Audio Device via Softphone Setting the Phone...

Страница 90: ...Control Panel Sound 2 Click Echo Cancelling Speakerphone and click Set as Default Device 3 Click Microphone and click Set as Default Device 4 Click OK Holding Resuming the PC Audio When you place the...

Страница 91: ...and unmuted Fast flashing red The phone is receiving an incoming call Solid red The phone is muted Fast flashing yellow The CPW65 is in the registration mode Slowly flashing yellow The CPW65 has regis...

Страница 92: ...ng cable the CPW65 starts up automatically l If you do not charge the CPW65 long tap on the CPW65 for 3 seconds The battery LED indicator glows green for one second and then goes out 2 To turn off the...

Страница 93: ...he charging cable and make sure it is charging 5 Long tap the on the CPW65 for 5 seconds The CPW65 enters the registration mode And the mute LED indicator on the CPW65 fast flashes yellow The CPW65 re...

Страница 94: ...on the phone Available information of CPW65 includes l Register status l MIC Model l MICPOD MAC l Battery l Standby Time l Work Time Procedure 1 Go to More MIC 2 Select Detail from the desired microp...

Страница 95: ...ary phones in the star connection group n The number of the subsidiary phones connected successfully is less than the maximum number of subsidiary phones in a star connection group n indic ates the nu...

Страница 96: ...subsidiary phone is removed from the star connection group successfully Dissolving a Star Connection Group You can dissolve a star connection group when the phone no longer needs the connection Proce...

Страница 97: ...You Begin The primary phone has set up a star connection group and is in broadcast status Procedure 1 Go to More Settings Advanced default password admin CP Star Connection Search Group The phone will...

Страница 98: ...y phone in your area The primary phone will play the ring tone and the mute key LED indicators on the phone flash green and red alternately Related Topics Joining a Star Connection Group Stop Finding...

Страница 99: ...Mobile Phone Call on the Phone Configuring the Phone Audio Feature Configuring the Media Audio Feature Renaming the Paired Bluetooth enabled Mobile Phone Disabling Bluetooth Device Discovery Changing...

Страница 100: ...ile Contacts Sync Feature Viewing Your Mobile Contacts Enabling the Mobile Contacts Sync Feature You can choose to enable the phone to sync the mobile contacts Before You Begin Make sure that the Blue...

Страница 101: ...he phones you can answer the call on the phone The phone will firstly match the contacts in the mobile contacts directory to present the caller identity l During the call you can hold resume mute unmu...

Страница 102: ...Topic Pairing and Connecting the Bluetooth enabled Mobile Phone Disabling Bluetooth Device Discovery After the Bluetooth is activated the phone is automatically placed in Open Discover mode to make it...

Страница 103: ...obile phone name 3 Select Unpair Disconnecting the Bluetooth enabled Mobile Phone You can disconnect your Bluetooth enabled mobile Phone from your phone and still keep it paired When you disconnect a...

Страница 104: ...sic Wi Fi 2 Turn on the Wi Fi The phone automatically scans the available wireless networks in your area The Wi Fi icon appears in the status bar Connecting to the Wireless Network After you have acti...

Страница 105: ...SSID field 4 Tap the desired value from the Security field l If you select WEP or WPA WPA2 PSK enter the password l If you select 802 1x EAP tap the desired value from the EAP method field and enter a...

Страница 106: ...ode You should deactivate the Wi Fi mode when you need to connect your phone to the wired network Procedure 1 Do one of the following l Swipe down from the top of the screen l From the home screen go...

Страница 107: ...or the information on how to connect expansion PSTN box CPN10 refer to PSTN Box CPN10 quick start guide on Yealink Technical Support page Configuring the PSTN Account If you have connected an expansio...

Страница 108: ...nd out which flash time you need to configure Procedure 1 Go to More Settings Advanced default password admin Flash Time 2 Select the desired value 3 Select Related Topic Selecting the Country for PST...

Страница 109: ...st party answers the call select Flash to activate a hook flash 3 Enter the number of the second party 4 When the second party answers the call select Flash again to join two parties in the conference...

Страница 110: ...till is displayed on the General screen until the issue is fixed The warning icon appears in the status bar again after reboot if the issue is not fixed Procedure 1 Go to More Settings Status General...

Страница 111: ...n Reset Config 2 Select Reset to Factory Settings The phone prompts you to reset the setting or not 3 Select OK The phone begins resetting Tip You can also long tap the left Mute key when the phone is...

Страница 112: ...Yealink CP935W User Guide 111 Procedure 1 Go to More Settings Basic Reset Local Config Reset local settings The phone prompts you to reset the local settings or not 2 Select OK...

Страница 113: ...Yealink CP935W User Guide 112 Appendix Menu Structure...

Отзывы: