


7
ASSEMBLY - SETUP
UNPACKING:
Carefully remove the mower from its packaging and check that
you have all the following items:
Upper Handle complete
(2) Lower Handle tubes
Mower Bag and Mulch Plug (installed on the mower)
Tool kit
Engine Owner’s Manual and Warranty Statement
Bravo 21 Operator’s Manual.
NOTICE:
If you are missing any of these items or if you are unsure of
how to properly assemble this mower please contact
Ybravo.
com
by e-mail or by phone:
888.ybravo1
(888.927.2861)
Tools needed for assembly:
2 pcs 10mm wrenches
1 pcs 13mm wrench
1 pcs Needle nose pliers
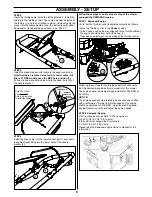
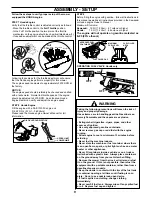
STEP 1
Install the black handle tubes to the mower with the M8
carriage bolts. Do not tighten the nuts. Please note that there
are three holes for the upper clamp. We suggest to install the
bolt in the center hole as a start.
STEP 3
To simplify the alignment of the handle, install the grass
catcher.
Tighten the bolts in the following order:
1. Tighten the two bolts on the right side tube clamps.
2. Align the left tube with the catcher (same as the right side)
and tighten the two clamps.
3. Tighten the upper bolts that attaches the handle
assembly to the tubes.
I
nstall the right side front
bolt and insert the mulch
plug to hold the bolt
during installation.
I
nstall the nuts
fi
nger tight.
Tighten completely
in step 3.
1
2
Needle Nose
Pliers
10 mm
13 mm
10 mm
Install the bolt in
center hole
3
1
STEP 2
Slide the upper handle assembly into the two lower tubes.
Insert the two carriage bolts and use one square washer (1) on
each side of the handle tube.


