Yazoo/Kees ZVKH61273 Скачать руководство пользователя страница 46

English-

44

MAINTENANCE

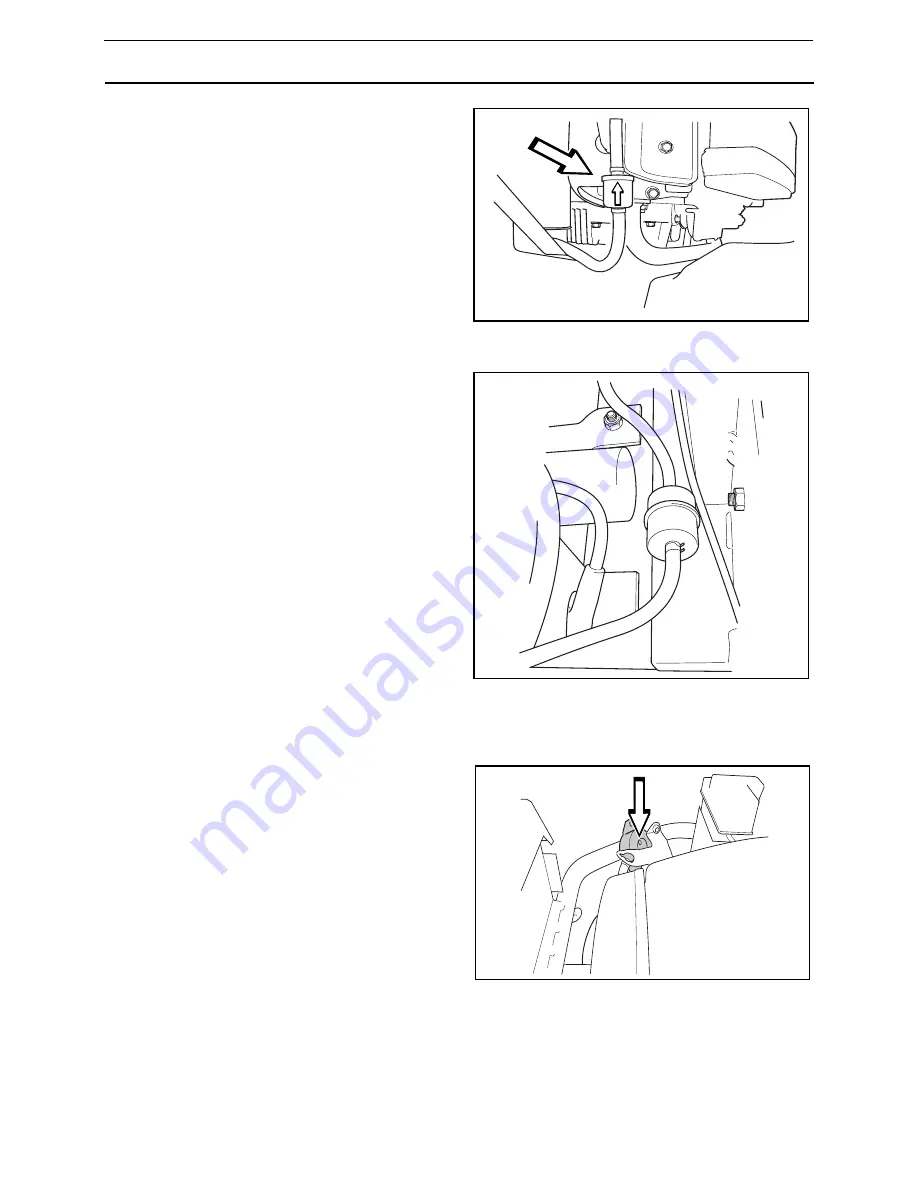
Replacing the Fuel Filter   

Replace the line-mounted fuel filter every 
100 hours (once per season) or more often if 
it becomes clogged.

Replace the filter as follows:

1. Move the hose clamps away from the 

filter. Use flat-nosed pliers.

2. Pull the filter loose from the hose ends.
3. Push the new filter into the hose ends. 

Position the filter with the “FLOW” arrow 
pointing up toward the fuel pump. If 
necessary, a soap solution can be 
applied to the filter ends to ease 
mounting.

4. Move the hose clamps back toward the 

filter. 

Checking the Fuel Pump’s Air Filter

Regularly check that the fuel pump’s air filter 
is free from dirt. 

On Kohler engine, removal of the pump 
screws is not needed, due to the filter facing 
outwards.

Remove the screws and open the pump, no 
hoses need be removed.

The filter can be cleaned with a brush if 
necessary.

Replace the filter on the console.

8009-146

Fuel filter Kawasaki

8011-468

Fuel filter Kohler

8009-147

The fuel pump’s air filter

Содержание ZVKH61273

Страница 1: ...English Operator Manual Please read the operator s manual carefully and make sure you understand the instructions before using the machine...

Страница 2: ......

Страница 3: ...unning 30 Operating on hills 31 Mowing Tips 32 Stopping Engine 33 Moving by Hand 34 Maintenance 35 Maintenance Schedule 35 Battery 37 Ignition System 38 Checking Safety System 39 Checking Engine s Coo...

Страница 4: ...sound mind and body and must not be under the influence of any mind altering substance WARNING Engine exhaust some of its constituents and certain vehicle components contain or emit chemicals known t...

Страница 5: ...on public roads If the machine is transported you must always use approved fastening equipment and ensure that the machine is well anchored DO NOT operate this machine on public roadways Towing Do not...

Страница 6: ...he manufacturer s type number Model The machine s serial number Serial no Please state the type designation and serial number when ordering spare parts The engine s manufacturing number is stated on a...

Страница 7: ...so when there is a potential for misuse or misassembly WARNING Xxxxxxx xxxx xxxxxxxx xxx x Xxxxx xxxxxx xx xx xxxxxxxx xxxxx xxx xx IMPORTANT INFORMATION Xxxxxxx xxxx xxxxxxxx xxx xxx xxxx xxxxxx xx P...

Страница 8: ...toes Do not open or remove safety shields while engine is running Careful backing up watch for other people Careful going forward watch for other people Read Operator s Manual Shut off engine remove...

Страница 9: ...s before operating Stop machine if anyone enters the area Never carry passengers The machine is only intended for use by one person Do not mow in reverse unless absolutely necessary Always look down a...

Страница 10: ...y to operate the riding mower safely enough to protect themselves and others from serious injury Follow the manufacturer s recommendation for wheel weights or counterweights Anyone who operates this m...

Страница 11: ...s bumps rocks or other hidden objects Uneven terrain could overturn the machine Tall grass can hide obstacles Choose a low ground speed so that you will not have to stop while on the slope Do not mow...

Страница 12: ...ep children out of the mowing area and in the watchful care of a responsible adult other than the operator Be alert and turn machine off if a child enters the area Before and while backing look behind...

Страница 13: ...vehicle when filling Remove gas powered equipment from the truck or tailer and refuel it on the ground If this is not possible then refuel such equipment with a portable container rather than from a g...

Страница 14: ...wer blades are sharp Wrap the blade or wear gloves and use extra caution when servicing them Check brake operation frequently Adjust and service as required Maintain or replace safety and instruction...

Страница 15: ...machine components Sparking can occur when working with the battery and the heavy cables of the starter circuit This can cause battery explosion fire or eye injury Sparking in this circuit can not oc...

Страница 16: ...loaded on or unloaded from a vehicle or trailer Use an approved trailer to transport the machine Activate the parking brake turn off the fuel supply and fasten the machine with approved fastening dev...

Страница 17: ...OPS is damaged the entire ROPS must be replaced Check all bolts including seat belt for correct torque before each use Check ROPS structure for damage before each use ROPS bar is NOT intended for use...

Страница 18: ...rn drive a hydraulic motor for each drive wheel Using the left and right steering controls the flow is regulated and thereby the direction and speed Control Locations 1 Motion control levers 8 Seat lo...

Страница 19: ...the machine turns to the right Zero turn can be achieved by moving one control backward behind the neutral position and carefully moving the other steering control forward from its neutral position T...

Страница 20: ...s so that the machine tracks straight with the drive levers in the full forward position Rotate the knob clockwise as viewed from the operating position to increase the speed or counter clockwise to d...

Страница 21: ...to the left of the hydraulic tank They are flat pin fuses of the same type used in automobiles There are three fuses as well as socket for one spare fuse Fuse ratings and functions 20 A Primary fuse...

Страница 22: ...The seat s locking device 8011 524 Fuel tanks IMPORTANT INFORMATION Experience indicates that alcohol blended fuels called gasohol ethanol or methanol can attract moisture which leads to separation a...

Страница 23: ...d lengthways When making adjustments the lever under the front edge of the seat is moved to the left as seen by the driver in the seat after which the seat can be moved backward or forward 12 Choke Co...

Страница 24: ...different cutting height positions The cutting height is set by placing a peg in the hole for the desired cutting height and the peg is then locked on the inside hidden in the illustration with the s...

Страница 25: ...at forward to gain access to the pumps Use a 5 8 wrench to open valve Accessories For mulching there is a BioClip attachment available This is mounted underneath the mower deck and consists of control...

Страница 26: ...e unit under its own power the operator must be in the seat start engine see Before Starting in the Operation section adjust engine speed to idle disengage park brake do not engage blades at this time...

Страница 27: ...that there is sufficient fuel in the fuel tanks Adjust the seat to the desired position The following conditions must be fulfilled before the engine can be started the driver must be seated on the se...

Страница 28: ...witch 5 Move the steering controls outward to the locked outer neutral position 6 Move the throttle to the middle position 8011 510 Depress the control for disengaging the mower deck 8011 526 Steering...

Страница 29: ...oke control should be pulled out to its extents 8 Open the fuel valve for the selected fuel tank 9 Press in and turn the ignition key to the start position 8011 508 Set the choke control 8011 506 Open...

Страница 30: ...EN MOWING 8011 743 Return to run position IMPORTANT INFORMATION Do not run the starter for more than 5 seconds each time If the engine does not start wait about 10 seconds before re trying 8011 508 Gr...

Страница 31: ...other end of the BLACK cable to a good CHASSIS GROUND on the mower with the discharged battery away from the fuel tank and battery To remove cables reverse order Remove BLACK cable first from chassis...

Страница 32: ...er forward from the transport position toward the peg 5 Engage the mower deck by pulling out the blade switch 6 Move the throttle control to full throttle 7 The machine s speed and direction are conti...

Страница 33: ...e should be used before starting up or down hills Avoid stopping or changing speed on hills If stopping is absolutely necessary pull drive levers into the neutral position and push to the outside of t...

Страница 34: ...ng often The lawn becomes more even and the grass clippings more evenly distributed over the mown area The total time taken is not increased as a higher operating speed can be used without poor mowing...

Страница 35: ...the transport position 3 When the machine is standing still activate the parking brake by pulling the lever backward 4 Move the throttle to the minimum position tortoise symbol Turn the ignition key...

Страница 36: ...th the engine turned off the vent screws on both hydraulic pumps must be opened 1 4 1 2 turn 8011 507 Vent screw on the hydraulic pump WARNING No adjustments or maintenance to be carried out unless th...

Страница 37: ...ck the parking brake 45 z Check the engine s oil level every refueling 56 z Check the hydraulic system s oil level 52 z Check the safety system 39 z Check for fuel and oil leakages Check rubber valve...

Страница 38: ...c 45 z z Change the engine oil 1 56 z z Replace the engine oil filter every 200 hours 61 z z Clean replace the spark plugs 38 z z Replace the fuel filter 44 z z Replace the air filter main cartridge 2...

Страница 39: ...attery 1 Lift seat and rotate forward 2 Remove the red terminal guard 3 Using two 1 2 wrenches disconnect BLACK battery cable then RED battery cable 4 Remove the knobs and remove battery hold downs 5...

Страница 40: ...with a steel brush if it is to be reused 4 Measure the electrode gap with a gapping tool The gap should be 030 0 75 mm Adjust as necessary by bending the side electrode 5 Reinsert the spark plug turn...

Страница 41: ...n one of the conditions is not met Change the conditions and try again If the machine starts when one of these conditions is not met turn the machine off and repair the safety system before using the...

Страница 42: ...English 40 MAINTENANCE 8011 553 Safety system Start motor Works Does not work Ignition system...

Страница 43: ...er casing and move the throttle to the full throttle position 2 Check that the throttle cable is mounted in the correct hole in the lower lever see illustration 3 Push the throttle cable s outer casin...

Страница 44: ...valve with two fingers to let out the dirt Clean the dust cap by removing the end cover of the the air cleaner and clean inside WARNING The engine and the exhaust system become very hot during operati...

Страница 45: ...the end of the housing and push it in to the end 7 Turn the end cover with the rubber valve pointing downwards and install it Air filter indicator optional Change the main filter when the yellow pisto...

Страница 46: ...p toward the fuel pump If necessary a soap solution can be applied to the filter ends to ease mounting 4 Move the hose clamps back toward the filter Checking the Fuel Pump s Air Filter Regularly check...

Страница 47: ...nd large nicks NOTE The belt will show some small cracks in normal operation To replace belt lower the deck to its lowest position Remove the foot plate and belt shields Use a ratchet with a 9 16 sock...

Страница 48: ...o rotate idler so the belt may be installed all the way around the last pulley Checking the Blades In order to attain the best mowing performance it is important that the blades are well sharpened and...

Страница 49: ...olt to 90 ft lbs 122 Nm WARNING Blades are sharp Protect your hands with gloves and or wrap blades with a heavy cloth when handling IMPORTANT INFORMATION To ensure proper assembly center hole in blade...

Страница 50: ...tip so it is straight forward 3 Measure from the cutting edge of the blades to a flat level surface The distance should be 6 150 mm 4 Drop and secure the lever at for example the 2 cutting height Mea...

Страница 51: ...5 to 6 114 to 152 mm grass The rollers should be approximately 1 4 6 5 mm from ground Do not adjust the rollers to support the deck Engine oil cooler Kohler engine only 1 Clean the outside of fins wi...

Страница 52: ...urs Lift front of unit off of ground so caster wheels can rotate freely Tighten caster bolt 34 then back off 1 2 turn Check that wheel rotates freely If wheel does not rotate freely back the caster bo...

Страница 53: ...e should be lubricated twice weekly Wipe away excess grease after lubrication It is important to avoid getting lubricant on the belts or the drive surfaces on the belt pulleys Should this happen attem...

Страница 54: ...filter must be replaced every 300 hours and at least once a year Contact an authorized service workshop Check the oil level in the hydraulic tank daily The level shall be about 3 4 1 19 25 mm below th...

Страница 55: ...plete drainage 3 Reinstall the drain plug Make sure it is tightened to 10 ft lb 13 6 Nm torque 4 Fill the crankcase with new oil of the proper type to the FULL mark on the dipstick Refer to Oil Type p...

Страница 56: ...ipstick into the tube and rest the cap on the tube Do not thread the cap onto the tube 4 Pull the dipstick out and check the oil level The oil level should be up to but not over the FULL mark on the d...

Страница 57: ...60 40 100 20 30 C 40 30 20 10 0 10 10W 30 Kohler Command 5W 20 5W 30 Temperature range expected before next oil change Use of synthetic oil having 5W 20 or 5W 30 rating is acceptable up to 40 oF 4 oC...

Страница 58: ...ew seconds Stop and re check the oil level Checking the Oil Level Check the oil level in the engine when the machine is standing level and the engine is stopped Remove the dipstick wipe it clean and t...

Страница 59: ...s 4 Throttle and Choke Cables Lever Bearings Lubricate the cable ends by the carburetor with the oil can Move the controls to the end points and lubricate again The throttle cable is also lubricated b...

Страница 60: ...etc usually maintains a good quality 7 Deck belt pulleys Lubricate with a grease gun two strokes 8 Mower Deck Height Adjuster Lubricate using a grease gun one zerk until the grease squeezes out Use o...

Страница 61: ...rease from well known brand names petrochemical companies etc usually maintains a good quality 10 Mower Deck Struts Lubricate with a grease gun one zerk for each strut until the grease is forced out U...

Страница 62: ...ry use a filter remover 3 Wipe new clean engine oil onto the seal for the new filter 4 Mount the filter by hand with 3 4 turn 5 Run the engine warm then check that there are no leaks around the oil fi...

Страница 63: ...engine over Dead battery Poor contacts on the battery terminal cable connections Fuse blown Ignition system faulty Fault in the starter safety circuit See checking the Safety system in the Maintenance...

Страница 64: ...o little or no oil in the engine Defective spark plugs Pre ignition incorrect Battery not charging Poor contact with battery terminal cable connectors The machine moves slowly unevenly Parking brake o...

Страница 65: ...ight sides Bent blades The chains for suspending the mower deck are uneven The chain fixture has come loose The blades are blunt Driving speed too high The grass is too long Grass collected under the...

Страница 66: ...ks or add a fuel stabilizer Start the engine and allow it to run until the carburetor is drained of fuel or the stabilizer has reached the carburetor 5 Remove the spark plugs and pour about a tablespo...

Страница 67: ...43 liters Spark plugs gap NGK BPR5FS 030 0 75 mm Champion RC12YC 030 0 75 mm Cooling Liquid cooled Air cooled Air filter Heavy Duty Heavy duty canister Alternator 12 V 15 A 12 V 15 A Starter Electric...

Страница 68: ...at Standard Standard Hinged armrests Yes Yes Hour meter Digital with service intervals Blade engagement 200 ft lb Warner Mag stop Electromagnetic clutch Deck construction 7 Gauge baffles and sides 10...

Страница 69: ...liters 11 4 gallons 43 liters Spark plugs gap Champion RC12YC 030 0 75 mm Champion RC12YC 030 0 75 mm Cooling Air cooled Air cooled Air filter Heavy duty canister Heavy duty canister Alternator 12 V...

Страница 70: ...rung standard seat Standard Standard Hinged armrests Yes Yes Hour meter Yes Yes Blade engagement 200 ft lb Warner Mag stop Electromagnetic clutch Deck construction 7 Gauge baffles and sides 10 Gauge t...

Страница 71: ...t lb 25 Nm Standard 3 8 fasteners 33 ft lb 44 Nm Standard 7 16 fasteners 52 ft lb 70 Nm Standard 1 2 fasteners 80 ft lb 110 Nm When this product is worn out and no longer used it shall be returned to...

Страница 72: ...tment stating that the machine will fulfill the requirements This is also applicable to special requirements for any of the states California emission rules etc Do not remove any of these labels Certi...

Страница 73: ...of oil is in the hydraulic tank 10 Adjust the position of the steering controls 11 Fill with fuel and open the fuel valve 12 Check that the machine has no transport damage 13 Start the engine 14 Chec...

Страница 74: ...es of leaving the machine for service every 300 hours The effects of service and maintaining a service journal on the machine s resale value Application areas for BioClip 21 Fill in the sales papers e...

Страница 75: ...ervice 1 Check the fuel pump s air filter 2 Check the hydraulic system s oil level 3 Check the tire pressures 4 Lubricate the belt adjuster mower deck 5 Lubricate the belt adjuster hydraulic pumps 6 C...

Страница 76: ...ding stamp sign 50 Hour Service 1 Perform the 25 hour service 2 Lubricate the front wheel bearings 3 Lubricate the steering control shafts 4 Lubricate the mower deck struts 5 Lubricate the cutting hei...

Страница 77: ...ours 5 Check whether the engine oil filter needs changing every 200 hours 6 Clean replace the spark plugs 7 Replace the fuel filter 8 Clean the cooling fins on the engine and transmission 9 Check V be...

Страница 78: ...er as to which additional work is to be carried out 2 Perform the 25 hour service 3 Perform the 50 hour service 4 Perform the 100 hour service 5 Change the oil and filter in the hydraulic system 6 Cle...

Страница 79: ...ine oil 100 hours 5 Replace the engine oil filter 200 hours 6 Change the oil and filter in the hydraulic system 300 hours 7 Check adjust the cutting height 8 Check adjust the parking brake 50 hours 9...

Страница 80: ...English 78 SERVICE JOURNAL Action Date mtr reading stamp sign...

Страница 81: ...SERVICE JOURNAL Action Date mtr reading stamp sign...

Страница 82: ...SERVICE JOURNAL Action Date mtr reading stamp sign...

Страница 83: ......

Страница 84: ...539 131260 IR 07 07...

Отзывы: