background image

43

EN

SAFETY INSTRUCTIONS

•  If the carbon brushes need to 

be replaced, have this done by a 

qualified repair person (always 

replace the two carbon brushes at 

the same time).

ASSEMBLY

Starting to use the lawnmower

Power connection

Do not switch on the unit until it has 

been completely assembled. Before 

switching on the tool, always check the 

connection cable for signs of damage; 

only an undamaged connection cable 

may be used. Damaged connection 

cables are highly dangerous!

The electrical data of the electrical 

supply must be the same as that 

indicated in the rating plate of this 

tool. Please do not use the tool if the 

electrical data is different.

• Insert the main plug of the 

unit connection cable into the 

combined switch/plug

•  Secure with the cable grip. The 

loop of the mains cable must be 

long enough for the cable grip to 

slide from one side to the other.

Switching ON and OFF

•  Switching on: press the button on 

the combined switch/plug. Hold 

down the ON button and pull the 

switch bar towards the handle and 

hold in position

•  Switching off: release the switch 

bar

WARNING:

 When the motor has been 

switched off, the cutter continues to 

run for several seconds. Therefore, 

do not touch the underside of the 

mower until the cutter has come to a 

standstill.

Preparation

• While mowing, always wear 

suitable footwear and long 

trousers.

•  Do not operate the appliance when 

barefoot or wearing open sandals.

•  Thoroughly inspect the area where 

the appliance is to be used and 

remove all stones, sticks, wires, 

bones, and other foreign objects.

•  Before use, always inspect visually 

to see if the blades, blade bolts, 

and cutter assembly are not worn 

or damaged. Replace worn or 

damaged blades and bolts in sets 

to preserve balance.

•  On multi-bladed appliances, take 

care as rotating one blade can 

cause other blades to rotate.

•  The appliance should by supplied 

via a residual current device (RCD) 

with a tripping current of not more 

than 30 mA

Содержание YT5139

Страница 1: ...TEL 0573 83225888 503 Http www yattool com CH138 8458 513900X013 071 A5 148 5x210mm 70g 13 A4 QQ 99739279 2021 11 25 Adobe Acrobat 7 Pro...

Страница 2: ...aduzionedelleistruzionioriginali Tosaerbaelettrico OriginalInstruction ElectricLawnmower YT5139 1000W Tosaerba Elettrico 1000W 1000W Electric Lawnmower EN Assembly Use MaintenanceManual EL IT Istruzio...

Страница 3: ......

Страница 4: ...3 A x1 B x1 C x1 D x1 E x2 F x2 G x2 H x2 I x1 30 PH 3 EN Assembly IT Montaggio EL...

Страница 5: ...icolo Caution danger Osservare Observe Connesso Connected Fuori tensione Power off Messo sotto tensione Power up Pulizia Cleaning Manutenzione Maintenance Corretto Correct Errato Incorrect Istruzioni...

Страница 6: ...5 E x2 G x2 I 1 2 5 EN Assembly IT Montaggio EL...

Страница 7: ...6 F 3 4 6 EN Assembly IT Montaggio EL...

Страница 8: ...7 H x2 PH 1 2 Click Click B C 5 6 7 EN Assembly IT Montaggio EL...

Страница 9: ...8 2 3 1 Click Click D 1 2 3 7 8 8 EN Assembly IT Montaggio EL...

Страница 10: ...9 3 2 1 20mm 40mm 60mm A 1 B 1 A 2 B 2 A 3 B 3 A B 1 2 3 1 2 3 1 2 9 IT EL EN Uso Use...

Страница 11: ...10 3 1 2 2 1 3 4 10 IT EL EN Uso Use...

Страница 12: ...11 1 2 3 1 2 5 6 11 IT EL EN Uso Use...

Страница 13: ...12 1 2 7 8 12 IT EL EN Uso Use...

Страница 14: ...13 1 3 2 1 2 13 IT EL EN Manutenzione Maintenance...

Страница 15: ...14 3 4 14 IT EL EN Manutenzione Maintenance...

Страница 16: ...15 BYT5139 8231 513901 25 30N m 5 6 15 IT EL EN Manutenzione Maintenance...

Страница 17: ...16 1 2 16 IT Rimessaggio EL EN Winter storage...

Страница 18: ...apparecchio tenerelealtre persone a distanza Attenzione alle lame affilate Le lame continuano a ruotare dopo lo spegnimento del motore Rimuovere la spina dalla presa prima di eseguire la manutenzione...

Страница 19: ...l dispositivo e in uso non devono essere presenti nelle vicinanze persone bambini e animali Le pietre o altri oggetti che Destinazione d uso 1 Il tosaerba elettrico YT5139 progettato per una potenza i...

Страница 20: ...nocorrispondereaquelli indicati sulla targhetta dei parametri di funzionamento del dispositivo Non utilizzare il dispositivo in caso di mancata corrispondenza Inserire la spina dell unita nella presa...

Страница 21: ...Camminare non correre mai Per i tosaerba rotanti dotati di ruote falciare l erba percorrendo i pendiiinorizzontaleemaidall alto in basso Prestare la massima attenzione quando si cambia direzione sui...

Страница 22: ...rioramento Per sicurezza sostituire i pezzi usurati o danneggiati Per i tosaerba a cilindro prestare attenzione durante la riparazione della macchina le dita possono rimanere intrappolate fra le lame...

Страница 23: ...elettricista qualificato La prolunga la spina e la presa devono essere del tipo resistente all acqua e per uso esterno Lasciare sempre raffreddare la macchina prima del rimessaggio Prima del rimessag...

Страница 24: ...23 IT DESCRIZIONE DEL PRODOTTO 1 6 5 2 3 4 1 Barra di avvio e arresto 2 Interruttore 3 Manopola 4 Contenitore dell erba 5 Vano motore 6 Ruote...

Страница 25: ...zza basate su una stima dell esposizione nelle condizioni effettive di utilizzo tener conto di tutte le fasi del ciclo operativo compresi i momenti in cui il dispositivo viene spento e quando in funzi...

Страница 26: ...i sostanze pericolose Problema Soluzione Il motore non funziona Collegare il cavo di alimentazione e l interruttore differenziale fusibile Iniziare dall erba bassa o da un area gi tagliata Pulire il c...

Страница 27: ...26 IT VISTA ESPLOS A ED ELENCO DELEPARTI...

Страница 28: ...itestatore 1 9 Cavodicollegamento 19 Asseanteriore 32 12 Rondellaamolla 1 10 Interruttore 20 Pannelloguida 32 13 Rondellapiatta 1 11 Grillettointerruttore 21 Involucro 32 14 Dadoesagonale 1 12 Mollale...

Страница 29: ...EN IEC 55014 1 2021 EN IEC 55014 2 2021 EN IEC 61000 3 2 2019 A1 EN 61000 3 3 2013 A1 IEC 62321 3 1 2013 IEC 62321 4 2013 AMD1 2017 IEC 62321 5 2013 IEC 62321 6 2015 IEC 62321 7 1 2015 IEC 62321 7 2 2...

Страница 30: ...29 EL II 96dB A WEEE...

Страница 31: ...30 EL 1 YT5139 1000W 2 3...

Страница 32: ...31 EL ISTRUZIONI DI SICUREZZA ON...

Страница 33: ...32 EL ISTRUZIONI DI SICUREZZA 30 mA...

Страница 34: ...33 EL ISTRUZIONI DI SICUREZZA...

Страница 35: ...34 EL ISTRUZIONI DI SICUREZZA H05VV F H05RN F IEC 60227 IEC53 60245 IEC57 1 0 mm2 40 m 1 5 mm2 60 m 2 5 mm2 100 m...

Страница 36: ...35 EL 1 6 5 2 3 4 1 2 3 4 5 6...

Страница 37: ...36 EL YT5139 220 240V 50 Hz 1000W 3400 320mm 96 dB A LpA 82dB A K 2 5dB A 90 dB A K 1 08 dB A 1 310m s2 1 742 m s2 K 1 5 m s2 20mm 60mm IPX4 30L 6 4 kg...

Страница 38: ...37 EL 2012 19 Soluci n...

Страница 39: ...38 EL...

Страница 40: ...3 32 6 1 4 14 32 7 1 5 15 32 8 628Z 1 6 16 32 9 1 7 17 32 10 1 8 18 32 11 1 9 19 32 12 1 10 20 32 13 1 11 21 32 14 1 12 22 33 6002 1 13 23 34 1 14 24 34 1 1 15 25 35 608 1 16 26 36 2 27 37 3 28 38 4 2...

Страница 41: ...0 3 3 2013 A1 IEC 62321 3 1 2013 IEC 62321 4 2013 AMD1 2017 IEC 62321 5 2013 IEC 62321 6 2015 IEC 62321 7 1 2015 IEC 62321 7 2 2017 EN ISO 17075 1 2017 IEC 62321 8 2017 EN IEC 63000 2018 T V Rheinland...

Страница 42: ...en using the machine keep bystanders away Beware of sharp blades Blades continue to rotate after the motor is switchedoff Removeplugfrommainsbefore maintenance or if cord is damaged Keep the flexible...

Страница 43: ...r accidents or hazards occurring to other people or their property This tool must be only for cutting grass in your garden Do not use it in public parks stadiums or forests Anyusecontrarytothisinstruc...

Страница 44: ...e other Switching ON and OFF Switching on press the button on the combined switch plug Hold down the ON button and pull the switch bar towards the handle and hold in position Switching off release the...

Страница 45: ...pairs as necessary If the appliance starts to vibrate abnormally check immediately Maintenance and storage Keep all nuts bolts and screws tight to be sure the appliance is in Be careful during adjustm...

Страница 46: ...ng the blades be aware that even though the power source is switched off the blades can still be moved Only use approved cables Extensions cables should be only used if they comply with H05VV F H05RN...

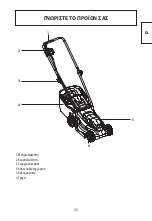
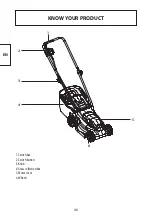
Страница 47: ...46 EN KNOW YOUR PRODUCT 1 6 5 2 3 4 1 Switch bar 2 Switch button 3 Knob 4 Grass collection box 5 Motor cover 6 Wheels...

Страница 48: ...n estimation of exposureintheactualconditionsofuse takingintoaccountallpartsoftheoperatingcyclesuchasthetimes when the tool is switched off and when it is running idle in addition to the trigger time...

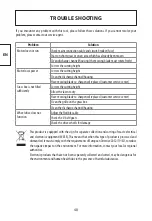
Страница 49: ...angerous for the environment and human health due to the presence of harmful substances Problem Solution Motor does not run Check mains connection cable and circuit breaker fuse Start on short grass o...

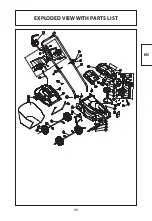
Страница 50: ...49 EN EXPLODED VIEW WITH PARTS LIST...

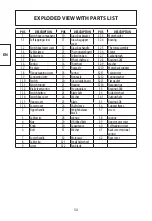
Страница 51: ...18 Spring 32 11 Statorscrew 1 9 Connectingwire 19 Frontaxle 32 12 Springwasher 1 10 Switch 20 Grassguideboard 32 13 Flatgasket 1 11 Switchtrigger 21 Housing 32 14 Hexagonnut 1 12 Brakeleverspring 22 P...

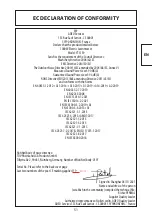
Страница 52: ...2010 EN 62233 2008 EN IEC 55014 1 2021 EN IEC 55014 2 2021 EN IEC 61000 3 2 2019 A1 EN 61000 3 3 2013 A1 IEC 62321 3 1 2013 IEC 62321 4 2013 AMD1 2017 IEC 62321 5 2013 IEC 62321 6 2015 IEC 62321 7 1...

Страница 53: ...ADEO Services 135 Rue Sadi Carnot CS 00001 59790 RONCHIN France 17 04201 141031 1 Made in P R C 2019 N di serie Serial No 203384 01 111016 01 000000...

Отзывы: