1.
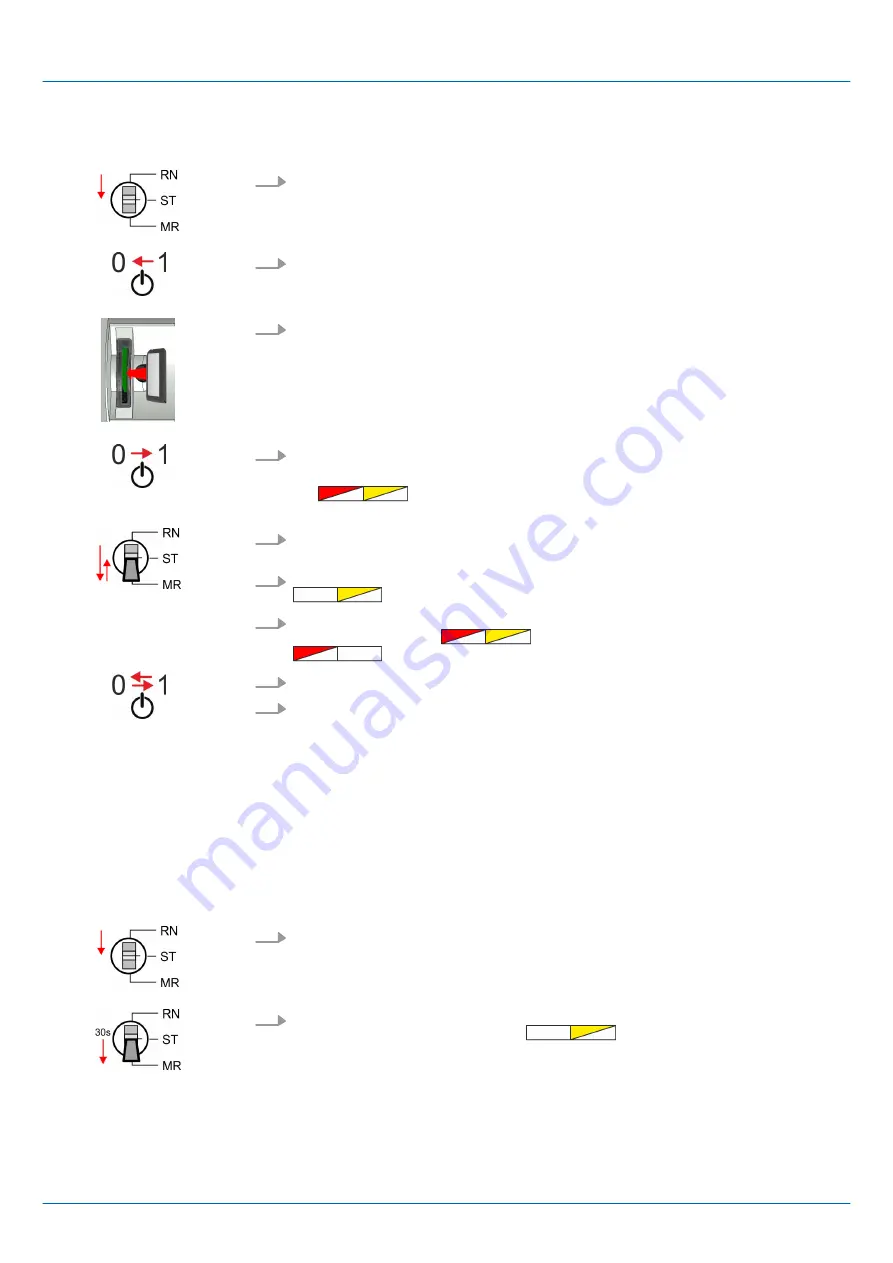
Switch the operating mode switch of your CPU in position STOP.
2.
Turn off the power supply.
3.
Plug the memory card with the firmware file into the CPU. Please take care of the
correct plug-in direction of the memory card.
4.
Switch on the power supply.
ð
After a short boot-up time, the alternate blinking of the red and yellow LED
of the status bar shows that at least a more current firmware file
was found at the memory card.
5.
You start the transfer of the firmware as soon as you tip the operating mode switch
downwards to MR within 10s and then leave the switch in STOP position.
6.
During the update process, the yellow LED of the status bar flashes or flickers
. This may last several minutes.
7.
The update is completed without errors when the red and yellow LEDs of the status
bar are flashing (1Hz)
. If only the red LED of the status bar
is flashing, an error has occurred.
8.
Turn power OFF and ON.
9.
Now execute a
Reset to factory setting
. After that the CPU is ready for duty.
Chap. 4.14 ‘Reset to factory settings’ page 97
4.14 Reset to factory settings
n
With the following proceeding the internal RAM of the CPU is completely deleted and
the CPU is reset to delivery state.
n
Please regard that the MPI address is also reset to default 2 and the IP address of
the Ethernet PG/OP channel is reset to 0.0.0.0!
n
A
factory reset
may also be executed by the command FACTORY_RESET.
4.17 ‘CMD - auto commands’ page 102
1.
Switch the CPU to STOP.
2.
Push the operating mode switch down to position MR for 30 seconds. Here the
yellow LED of the status bar blinks
. After a few seconds the LED
changes to static light. Now the LED changes between static light and blinking.
Start here to count the static light of the LED.
Transfer firmware from
memory card into CPU
Proceeding
VIPA System MICRO
Deployment CPU M13-CCF0000
Reset to factory settings
HB400 | CPU | M13-CCF0000 | en | 18-50
97


