


5-6
155976-1CD
HW0485249
ES165D
5 Basic Specifications
5.5 Alterable Operating Range
5.5.2 Notes on the Mechanical Stopper Installation
•
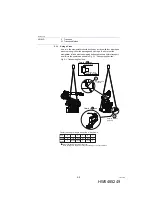
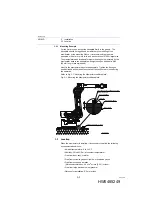
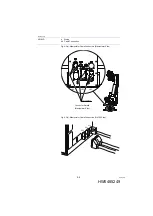
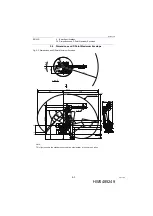
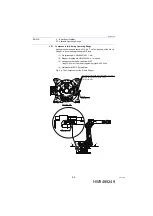
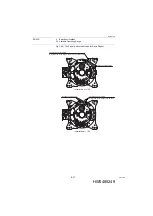
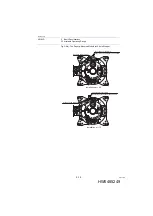
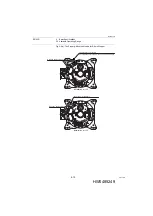
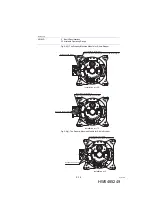
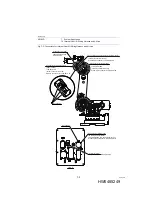
For S-Axis mechanical stopper, install the stopper (drawing No.
HW0302424-2) with the pin which is used bottom up (drawing No.
HW0402104-1) as in
Fig. 5-4 “The Components of the S-Axis
.
•
DO NOT forget to apply the locktite 242 to the thread part of pin before
inserting it into the stopper.
•
Mount the stopper to the S-head with three hexagon head screws M20
(length: 45 mm) and tighten the screws to the tightening torque of 402
N•m (tensile strength: 1200 N/mm
2
or more). The stopper is to be
installed as shown in the
Fig. 5-4 “The Components of the S-Axis
when the operating range is ±180°.
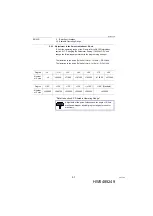
•
The stopper can be installed by every 15 degree pitch, however, to
avoid the mechanical troubles caused by interference between
stoppers (e.g. ±15°, ±165°), install the S-axis mechanical stopper
referring to
Table 5-3 "The settable angle for S-Axis Stopper"
.
•
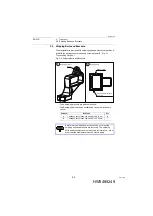
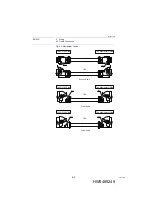
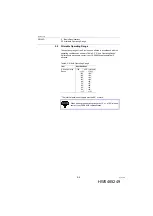
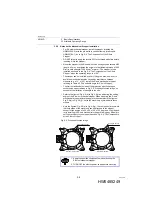
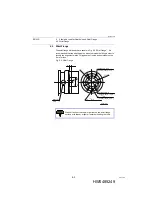
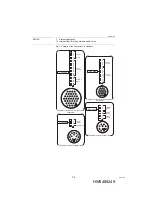
Confirm to stabilize both sides of the protrusion with the hexagon
socket head cap screws as in
Fig. 5-5 “Properly-Mounted Image”
on
account of the limitation of strength to the unit.
•
as adjusting the setting
angle of the S-Axis mechanical stopper. When mounting the S-Axis
mechanical stopper by inverse angle to the examples in the figures:
, settle the machinery symmetrical to those
models.
•
, the component is reversible
that both sides of the machinery can be attached to the stopper,
except for the angles of ±30, ±60, ±120, ±150 degrees. Flip side and
retry installing the S-Axis mechanical stopper if finding any difficulty to
set the machinery to the stopper based on
.
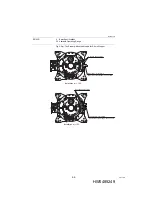
Fig. 5-5:
Properly-Mounted Image
Improperly-mounted
Properly-mounted
Hexagon socket
head cap scerws
Hexagon socket
head cap scerws
NOTE
1. Apply the specified components when mounting the
S-Axis mechanical stopper.
2. TURN OFF the electric power supply before mounting.
33 of 92


