YASKAWA E7 Drive Скачать руководство пользователя страница 8

Electrical Installation  2 - 7

4185

300/350

R/L1, S/L2, T/L3, 

M8

88.5

(10.0)

300 X 2P

(152 X 2P)

600Vac  

UL Approved 

vinyl-sheathed

 or equivalent

U/T1, V/T2, W/T3, R1/L11, S1/L21, T1/L33

M8

88.5

(10.0)

300 X 2P

(152 X 2P)

3

M8

88.5

(10.0)

2/0

(67.4)

M16

867.4

(98.0)

3/0 X 2P

(85 X 2P)

r/

l

1, 

s

200/

l

2

200, 

s

400/

l

2

400

M4

12.4

(1.4)

14

(2.1)

4220

400/450

R/L1, S/L2, T/L3, 

M8

88.5

(10.0)

500 X 2P

(253 X 2P)

U/T1, V/T2, W/T3, R1/L11, S1/L21, T1/L33

M8

88.5

(10.0)

400 X 2P

(203 X 2P)

3

M8

88.5

(10.0)

2/0

(67.4)

M16

867.4

(98.0)

250 X 2P

(127 X 2P)

r/

l

1, 

s

200/

l

2

200, 

s

400/

l

2

400

M4

12.4

(1.4)

14

(2.1)

4300

500+

R/L1, S/L2, T/L3, 

M8

88.5

(10.0)

700 X 2P

(355 X 2P)

U/T1, V/T2, W/T3, R1/L11, S1/L21, T1/L33

M8

88.5

(10.0)

600 X 2P

(304 X 2P)

3

M8

88.5

(10.0)

2/0

(67.4)

M8

867.4

(98.0)

400 X 2P

(203 X 2P)

r/

l

1, 

s

200/

l

2

200, 

s

400/

l

2

400

M16

12.4

(1.4)

14

(2.1)

* Use  75

°

C copper wire or equivalent.

IMPORTANT

Determine the wire size for the main circuit so that line voltage drop is within 2% of the rated voltage. Line

voltage drop is calculated as follows:

Line voltage drop (V) = 


x wire resistance (

Ω

/km) x wire length (m) x current (A) x 10

-3

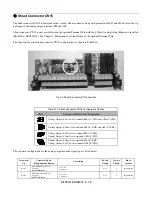
Table 2.2  480Vac Wire Sizes and Connector Specifications

Drive Model

CIMR-E7U

Nominal

Hp

Terminal Symbol

Terminal 

Screws

Clamping 

Torque

lb. in.

(N•m)

Recommended 

Wire Size AWG

(mm

2

)


Wire Type

3

WARNING

Prior to removing any protective cover or wiring any part of the Drive, remove all power sources, including 
main input power and control circuit power. Wait a minimum of 5 minutes after power removal, before 
removing any cover. The charge lamp located within the Drive should be off prior to working inside. Even if 
the charge lamp is off, one must measure the AC input, output, and DC Bus potential to insure safe levels 
prior to resuming work. Failure to adhere to this warning may result in personal injury or death.

Содержание E7 Drive

Страница 1: ...ent reflects the most recent information provided by Yaskawa regarding these specific wire size tables This document is subject to change without notice The latest version of this document can be obta...

Страница 2: ...chapter describes wiring terminals main circuit terminal connections main circuit terminal wiring specifications control circuit terminals and control circuit wiring specifications Terminal Block Conf...

Страница 3: ...0 40 HP 480V and larger AC MP AM S6 V IG R M5 FM R RP S1 S4 SP S7 M4 V S3 SC S A2 M2 SN M6 AC A1 E G E G MC MB S5 M1 AC MA M3 S2 S AC MP AM S6 V IG R M5 FM R RP S1 S4 SP S7 M4 V S3 SC S A2 M2 SN M6 AC...

Страница 4: ...T3 M4 13 3 1 5 14 2 1 22P2 3 R L1 S L2 T L3 1 2 B1 B2 U T1 V T2 W T3 M4 13 3 1 5 12 3 3 23P7 5 R L1 S L2 T L3 1 2 B1 B2 U T1 V T2 W T3 M4 13 3 1 5 10 5 3 25P5 7 5 R L1 S L2 T L3 1 2 B1 B2 U T1 V T2 W...

Страница 5: ...39 2 4 0 X 2P 80 X 2P U T1 V T2 W T3 R1 L11 S1 L21 T1 L31 M10 199 22 5 3 0 X 2P 85 X 2P 3 M8 88 5 10 0 2 0 67 4 M10 199 22 5 2 0 X 2P 67 4 X 2P r l1 s l2 M4 12 4 1 4 14 2 1 2090 125 R L1 S L2 T L3 1...

Страница 6: ...W T3 M4 13 3 1 5 14 2 1 14 2 1 45P5 7 5 R L1 S L2 T L3 1 2 B1 B2 U T1 V T2 W T3 M4 13 3 1 5 12 3 5 14 2 47P5 10 R L1 S L2 T L3 1 2 B1 B2 U T1 V T2 W T3 M4 13 3 1 5 10 5 5 12 3 5 49P0 4011 15 20 R L1...

Страница 7: ...10 0 4 0 107 2 M12 347 39 2 2 0 67 4 r l1 s200 l2200 s400 l2400 M4 12 4 1 4 14 2 1 4110 200 R L1 S L2 T L3 1 M12 347 39 2 2 0 X 2P 67 4 X 2P U T1 V T2 W T3 R1 L11 S1 L21 T1 L31 M12 347 39 2 1 0 X 2P 5...

Страница 8: ...5 C copper wire or equivalent IMPORTANT Determine the wire size for the main circuit so that line voltage drop is within 2 of the rated voltage Line voltage drop is calculated as follows Line voltage...

Страница 9: ...n Circuit Terminal Functions 208 240Vac and 480Vac Purpose Terminal Designation Model CIMR E7U_ _ _ _ 208 240Vac 480Vac Main circuit power input R L1 S L2 T L3 20P4 to 2110 40P4 to 4300 R1 L11 S1 L21...

Страница 10: ...to use recommended fuses circuit breakers See Appendix E may result in damage to the wiring Drive and or personal injury 2 Control power is supplied internally from the main circuit DC power supply f...

Страница 11: ...uses circuit breakers See Appendix E may result in damage to the wiring Drive and or personal injury 2 Control power is supplied internally from the main circuit DC power supply for all Drives 3 Consu...

Страница 12: ...than 100 2 480Vac Drives should have a ground connection with resistance of less than 10 3 Do not share the ground wire with other devices such as motors or large current electrical equipment 4 Alway...

Страница 13: ...Digital Opera tor use shielded twisted pair wires and ground the shield to terminal E G as shown in Fig 2 3 Terminal numbers and wire sizes are shown in Table 2 7 Fig 2 3 Analog Input Terminal Configu...

Страница 14: ...3 Wiring Checks After all wiring is completed perform the following checks 1 Is all wiring correct 2 Have all wire clippings screws or other foreign material been removed from the Drive enclosure 3 Ar...

Страница 15: ...100 0 to 10 V 20 k A2 Multi function analog input 4 to 20 mA 100 0 to 10Vdc 100 H3 0 Function set by H3 09 4 to 20 mA 250 0 to 10 V 20k AC Analog common E G Shield wire optional ground line connectio...

Страница 16: ...ble 2 9 DIP Switch S1 Name Function Setting S1 1 RS 485 and RS 422 terminating resistance OFF No terminating resistance ON Terminating resistance of 110 Factory Default OFF S1 2 Input method for analo...

Страница 17: ...iguration for the analog output monitor signal type is listed below Table 2 10 Shunt Connector CN15 Configuration Options CN15 Analog Output Monitor Configurations Voltage Output 0 10Vdc for terminals...

Страница 18: ...ng the terminals SN SC and SP An external power supply can also be connected providing more freedom in signal input methods Table 2 11 Sinking Sourcing Mode and Input Signals Internal Power Supply Sin...

Страница 19: ...Electrical Installation 2 18 Terminal Connections Connections to Drive terminals are shown in Fig 2 6 Fig 2 6 Terminal Connections 24...

Страница 20: ...trol circuit terminals 3 If using an optional external power supply ensure it is a UL Listed Class 2 power supply source 4 Use twisted pair or shielded twisted pair cables for control circuits to prev...

Страница 21: ...Electrical Installation 2 20 Field Wiring Diagram Use this diagram to document field wiring It may be helpful to copy this page Fig 2 8 Field Wiring Diagram...

Отзывы: