Yardworks 60-3014-6 Скачать руководство пользователя страница 12

GENERAL MAINTENANCE

Keep your hedge trimmer clean and in good repair for maximum performance

and machine longevity. 

Before each use:

• Inspect the switch and extension cord  for damage.

• Check for damaged, missing, or worn parts.

• Check for loose screws, misalignment, moving parts that are jammed, or any

other conditions that may affect the operation.

During use:

• If abnormal vibration or noise occurs, turn off the tool immediately and have

the problem corrected before further use. Do not use the hedge trimmer until it

is properly repaired or replaced.

CLEANING

• Wipe the outside of the hedge trimmer with a dry soft cloth. Do not hose down

or wash the hedge trimmer with water. 

• Remove dried clippings and mud. Brush or blow dust, debris, and grass

clippings out of the air vents. Keep the vents free of obstruction.

TO AVOID INJURY, ELECTRIC SHOCK, OR DAMAGE TO

THE HEDGE TRIMMER, NEVER IMMERSE THE HEDGE TRIMMER IN

LIQUID OR ALLOW LIQUID


 TO FLOW INSIDE THE TOOL.

ALWAYS TURN OFF THE TOOL AND UNPLUG THE

EXTENSION


CORD FROM THE OUTLET BEFORE MAINTAINING THE HEDGE

TRIMMER.

TO AVOID DAMAGE OR ELECTRIC SHOCK, DO NOT

USE STRONG SOLVENTS OR DETERGENTS ON THE PLASTIC

HOUSING OR PLASTIC COMPONENTS. CERTAIN HOUSEHOLD

CLEANERS MAY DAMAGE PLASTIC COMPONENTS, AND MAY

ALSO CAUSE A SHOCK HAZARD.

12

MAINTENANCE

WARNING:

WARNING:

WARNING:

Содержание 60-3014-6

Страница 1: ...ELECTRIC HEDGE TRIMMER Owner s Manual TOLL FREE HELPLINE 1 866 523 5218 IMPORTANT Read all safety rules and instructions carefully before using this product 60 3014 6...

Страница 2: ...acity 9 16 14 mm Weight 6 lb 2 7 kg 3 2 SPECIFICATIONS SAFETY INFORMATION 6 SPECIFIC SAFETY RULES 7 KNOW YOUR HEDGE TRIMMER ASSEMBLY INSTRUCTIONS 8 WARRANTY 13 14 MAINTENANCE 12 OPERATING INSTRUCTIONS...

Страница 3: ...maged cords immediately they may create a shock or fire hazard 10 NEVER LEAVE A RUNNING TOOL UNATTENDED Turn the power switch to OFF Do not leave the tool until it has come to a complete stop 11 DO NO...

Страница 4: ...DOUBLE INSULATION DOES NOT TAKE THE PLACE OF NORMAL SAFETY PRECAUTIONS WHEN OPERATING THIS TOOL TO AVOID INJURY WHEN SERVICING THE HEDGE TRIMMER USE ONLY IDENTICAL REPLACEMENT PARTS TO AVOID ELECTRIC...

Страница 5: ...have it repaired by a qualified person before using it Keep your extension cords away from sharp objects excessive heat and damp or wet areas Use a separate electrical circuit for your tools This circ...

Страница 6: ...ep proper footing and balance at all times 10 ALWAYS use accessories provided or recommended by the manufacturer of the hedge trimmer Do not substitute 11 KEEP guards in place and in working order Kee...

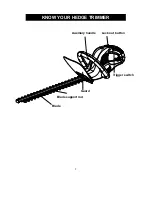
Страница 7: ...Blade Blade support rod Guard Auxiliary handle Trigger switch KNOW YOUR HEDGE TRIMMER Lock out button 7...

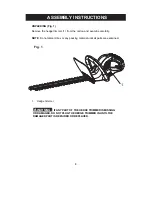
Страница 8: ...efully NOTE Do not discard box or any packing material until all parts are examined Fig 1 1 Hedge trimmer IF ANY PART OF THE HEDGE TRIMMER IS MISSING OR DAMAGED DO NOT PLUG THE HEDGE TRIMMER IN UNTIL...

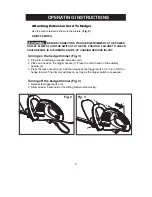
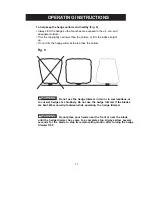
Страница 9: ...Fig 3 1 Plug into a matching grounded extension cord 2 Place one hand on the trigger handle 1 Place the other hand on the auxiliary handle 2 3 Press the lock out button 4 and then squeeze the trigger...

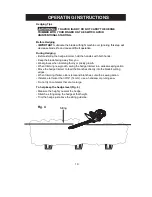
Страница 10: ...ction Move the hedge trimmer to feed the branches directly into the blade s cutting edges When trimming thicker older stems and branches cut with a sawing action If stems are thicker than 9 16 14 mm u...

Страница 11: ...Do not use the hedge trimmer in rain or in wet locations or to cut wet hedges or shrubbery Do not use the hedge trimmer if the blades are bent Wear non slip footwear while operating the hedge trimmer...

Страница 12: ...Wipe the outside of the hedge trimmer with a dry soft cloth Do not hose down or wash the hedge trimmer with water Remove dried clippings and mud Brush or blow dust debris and grass clippings out of th...

Страница 13: ...the date of retail purchase How to Obtain Service Warranty service is available with proof of purchase through your local authorized service dealer or distributor If you do not know the dealer or dis...

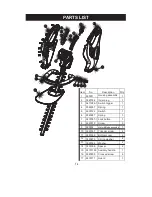
Страница 14: ...ng 3410787 1 Lock button 3220313 Screw 920002 Motor Blade assembly 3220187 Trigonal screw 3220186 Bottom cover 3290675 Spring washer 3290186 Washer 3250186 Spacer 34101165 Auxiliary handle 3220905 Cro...

Отзывы: