background image

15

OPERATIOn

CONNECTING THE POWER CORD
(See Fig.6)

1. Secure the extension cord to the motor  housing 

using the notch at rear of blower. This prevents 

accidental removal of the electrical cord.

2. Plug the female end of the electrical cord into 

the receptacle at the back of the unit.

STARTING/STOPPING THE BLOWER/
MULCHER 
(See Fig.7)

This unit is equipped with a three-way (Off/ LOW/ 

HIGH) switch

• Slide the switch forward to the first position for 

LOW speeds up to 150 MPH (241Kph).

• Slide the switch forward to the second position for 

HIGH speeds up to 230 MPH (370Kph).

Once the unit is plugged in, stand in the operating 

position. Slide the power/speed switch to LOW or 

HIGH to start the unit. To stop the unit, slide the 

switch to Off.

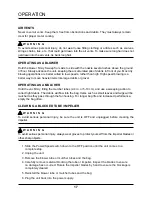
HOLDING THE BLOWER/MULCHER

Before operating the unit, stand in the operating position. Check for the following:

• Operator is wearing proper clothing, such as boots, safety glasses or goggles, ear/hearing pro

-

tection, gloves, long pants and a long sleeve shirt.

W A R N I N G

To avoid serious personal injury, wear goggles or safety glasses that comply with AnSI Z87.1 at all 

times when operating this unit. Wear a face mask or dust mask in dusty locations.

W A R N I N G

To prevent serious personal injury or damage to the unit, make sure the blower tube or the mulcher 

tubes and the bag are in place before operating the unit.

Fig. 6

Fig. 7

ON

OFF

Содержание 267-2929

Страница 1: ...Read all safety rules and instructions carefully before operating this tool Owner s Manual TOLL FREE HELPLINE 1 888 266 7096 12 AMP ELECTRIC BLOWER MULCHER 267 2929...

Страница 2: ...wer 11 Assembly 12 14 Operation 15 17 Maintenance 18 Troubleshooting 19 Warranty 2 0 Exploded View 21 Parts List 22 Specifications 12 AMP ELECTRIC BLOWER MULCHER Motor 120V AC only 60Hz 12 0 Amps Air...

Страница 3: ...at least 50 ft away Always wear safety glasses with side shields marked to comply with ANSI Z87 1 Everyday glasses have only impact resistant lenses They are NOT safety glasses Following this rule wil...

Страница 4: ...rocks broken glass nails wire or string which can be thrown or become entangled in the machine Do not pull or carry by cord do not use cord as a handle do not close a door on a cord or do not pull cor...

Страница 5: ...d safest performance Follow instructions for proper maintenance Do not attempt to clear clogs from tool without first unplugging it Do not pull or carry by cord do not use cord as a handle or do not p...

Страница 6: ...dles dry clean and free from debris Clean after each use See the Cleaning and Storage instructions Keep these instructions Refer to them often and use them to instruct other users If you loan someone...

Страница 7: ...Revolutions strokes surface speed orbits etc per minute Wet Conditions Alert Do not expose to rain or use in damp locations Read The Operator s Manual To reduce the risk of injury user must read and...

Страница 8: ...G The operation of any power tool can result in foreign objects being thrown into your eyes which can result in severe eye damage Before beginning power tool operation always wear safety goggles or s...

Страница 9: ...uge The smaller the gauge number the heavier the cord Make sure your extension cord is properly wired and in good electrical condition Always replace a damaged extension cord or have it repaired by a...

Страница 10: ...arts When servicing use only identical replacement parts Polarized Appliance Connections To reduce the risk of electric shock this appliance has a polarized plug one blade is wider than the other and...

Страница 11: ...e Fig 2 BLOWER TUBE The blower tube can be easily installed on the blower without any additional tools CORD RETAINER A convenient cord retainer helps keep the extension cord connection secure during b...

Страница 12: ...oduct carefully to make sure no breakage or damage occurred during shipping Do not discard the packing material until you have carefully inspected and satisfactorily operated the product If any parts...

Страница 13: ...o engage the mulcher tube See fig 3 4 4 To remove mulcher tubes follow the steps 3 2 1 5 Insert the bag adaptor into the blower outlet Lock the bag adaptor with the lock button To re move the bag simp...

Страница 14: ...e onto the regular nozzle to lock Concentrator nozzle is used to increase air flow in tight areas flowerbeds under decks etc INSTALLING BAG WITH SHOULDER HARNESS See Fig 5 While standing in the operat...

Страница 15: ...ed in stand in the operating position Slide the power speed switch to LOW or HIGH to start the unit To stop the unit slide the switch to OFF HOLDING THE BLOWER MULCHER Before operating the unit stand...

Страница 16: ...in the morning or late at night when people might be disturbed Comply with times listed in local ordinances Usual recommendations are 9 00 am to 5 00 pm Monday through Saturday To reduce noise levels...

Страница 17: ...the mulcher tubes 2 4 in or 5 10 cm and use a sweeping action to collect light debris The debris will flow into the bag Items such as small leaves and twigs will be mulched as they pass through the f...

Страница 18: ...hold cleaners that contain aromatic oils such as pine and lemon and solvents such as kerosene as they can damage plastic housings or handles Wipe off any moisture with a soft dry cloth CLEANING THE BA...

Страница 19: ...2 Power speed switch is in the OFF position 3 Defective power switch 4 Vac tubes are not correctly installed 5 Intake gate cover is not closed 6 House circuit may have tripped 1 Check cord to make su...

Страница 20: ...NOT COVERED BY WARRANTY 1 Any part that has become inoperative due to misuse commercial use abuse neglect accident improper maintenan ce or alteration or 2 The unit if it has not been operated and or...

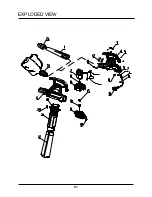
Страница 21: ...21 EXPLODED VIEW...

Страница 22: ...650339 cord connector 2 10 36409142 power cord 1 11 3410679 11 lock button for blower tube 1 12 34201148 shockproof pad 4 13 3320128 bushing 1 14 34112142 impeller 1 15 3340427 washer 1 16 3410127 1 i...

Отзывы: