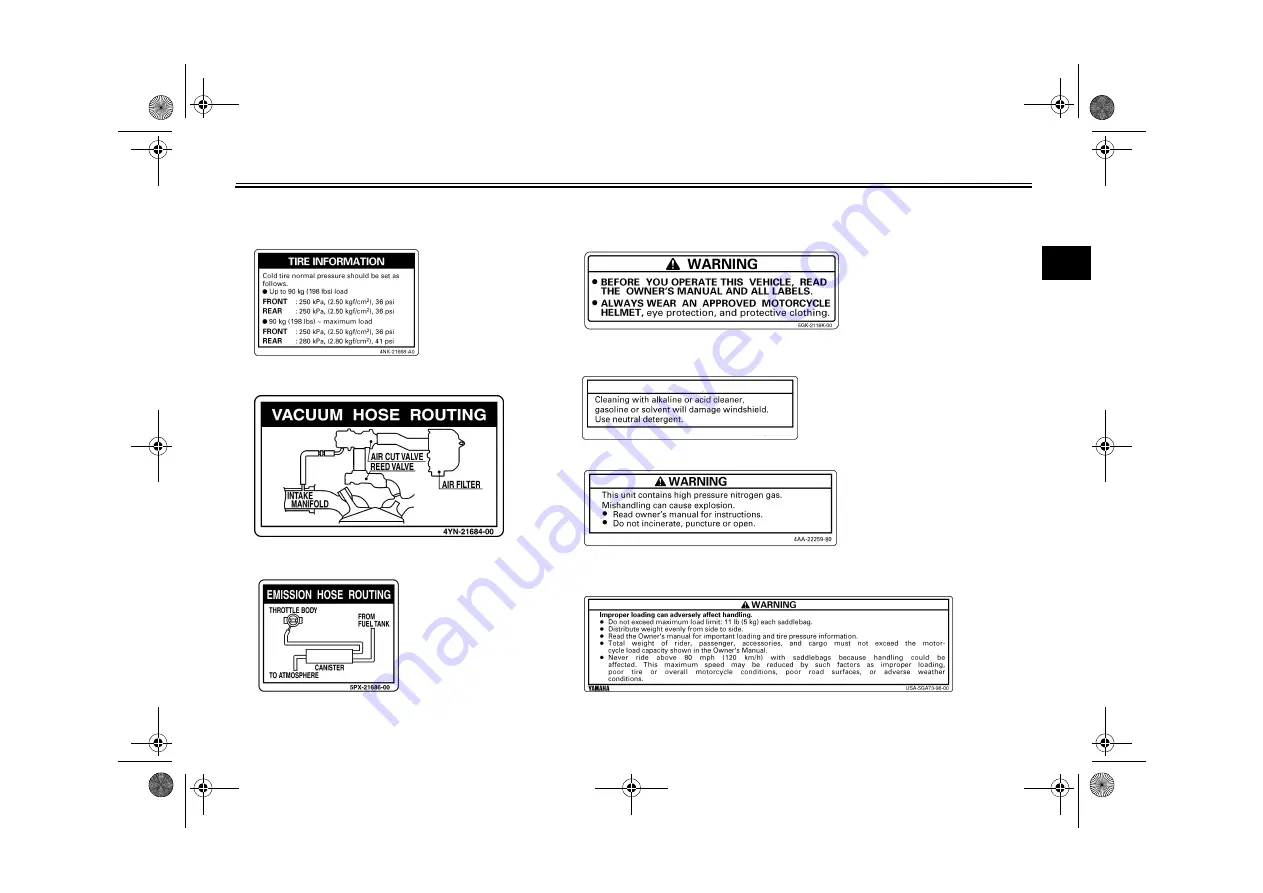
LOCATION OF IMPORTANT LABELS
1-2
1
•
2C5-F815K-00
NOTICE
4
6
7 XV17ATSA(C)
2 California only
3 California only
5 XV17ATSA(C)
U1BH11E0.book Page 2 Monday, May 24, 2010 9:33 AM
Страница 1: ...DIC183 1BH 28199 11 XV17ASA C XV17ATSA C OWNER S MANUAL Read this manual carefully before operating this vehicle LIT 11626 24 27 ...
Страница 2: ...EAU10042 Read this manual carefully before operating this vehicle This manual should stay with this vehicle if it is sold U1BH11E0 book Page 1 Monday May 24 2010 9 33 AM ...
Страница 3: ...aintain these high standards it is important that you and your Yamaha dealer pay close attention to the recommended maintenance schedules and operating instructions contained within this manual Yamaha continually seeks advancements in product design and quality Therefore while this manual contains the most cur rent product information available at the time of printing there may be minor discrepanc...
Страница 4: ...Obey all safety messages that follow this symbol to avoid possible injury or death A WARNING indicates a hazardous situation which if not avoided could result in death or serious injury A NOTICE indicates special precautions that must be taken to avoid damage to the vehicle or other property A TIP provides key information to make procedures easier or clearer WARNING NOTICE TIP U1BH11E0 book Page 1...
Страница 5: ...y Yamaha Motor Corporation U S A 1st edition May 2010 All rights reserved Any reprinting or unauthorized use without the written permission of Yamaha Motor Corporation U S A is expressly prohibited Printed in Japan P N LIT 11626 24 27 U1BH11E0 book Page 2 Monday May 24 2010 9 33 AM ...
Страница 6: ...ol kit 7 2 Periodic maintenance chart for the emission control system 7 3 General maintenance and lubrication chart 7 5 Removing and installing panels 7 9 Checking the spark plugs 7 10 Canister for California only 7 11 Engine oil and oil filter cartridge 7 12 Transfer case oil 7 15 Cleaning the air filter element 7 16 Checking the throttle grip free play 7 18 Valve clearance 7 18 Tires 7 19 Cast w...
Страница 7: ...ting 7 36 Troubleshooting chart 7 37 MOTORCYCLE CARE AND STORAGE 8 1 Matte color caution 8 1 Care 8 1 Storage 8 4 SPECIFICATIONS 9 1 CONSUMER INFORMATION 10 1 Identification numbers 10 1 Reporting safety defects 10 3 Motorcycle noise regulation 10 4 Maintenance record 10 5 YAMAHA MOTOR CORPORATION U S A STREET AND ENDURO MOTORCYCLE LIMITED WARRANTY 10 7 YAMAHA EXTENDED SERVICE Y E S 10 9 U1BH11E0 ...
Страница 8: ...cle They contain important information for safe and proper operation of your vehicle Never remove any labels from your vehicle If a label becomes difficult to read or comes off a replacement label is available from your Yamaha dealer 1 7 6 2 3 4 5 U1BH11E0 book Page 1 Monday May 24 2010 9 33 AM ...
Страница 9: ...LOCATION OF IMPORTANT LABELS 1 2 1 2C5 F815K 00 NOTICE 4 1 6 7 XV17ATSA C 2 California only 3 California only 5 XV17ATSA C U1BH11E0 book Page 2 Monday May 24 2010 9 33 AM ...
Страница 10: ... passenger The failure of motorists to detect and recognize motorcycles in traf fic is the predominating cause of automobile motorcycle accidents Many accidents have been caused by an automobile driver who did not see the motorcycle Making yourself conspicuous appears to be very effective in reducing the chance of this type of accident Therefore Wear a brightly colored jacket Use extra caution whe...
Страница 11: ...uld contribute to an impairment of vision that could delay seeing a hazard The use of a jacket heavy boots trousers gloves etc is effective in preventing or reducing abrasions or lacerations Never wear loose fitting clothes otherwise they could catch on the control levers footrests or wheels and cause injury or an accident Always wear protective clothing that covers your legs ankles and feet The e...
Страница 12: ...n both sides of the motorcycle to minimize imbalance or instabili ty Shifting weights can create a sud den imbalance Make sure that ac cessories and cargo are securely attached to the motorcycle before riding Check accessory mounts and cargo restraints frequently Properly adjust the suspension for your load suspension ad justable models only and check the condition and pres sure of your tires Neve...
Страница 13: ... changes If accessories are added to the handlebar or front fork area they must be as lightweight as possible and should be kept to a minimum Bulky or large accessories may seriously affect the stability of the motorcycle due to aerody namic effects Wind may at tempt to lift the motorcycle or the motorcycle may become un stable in cross winds These ac cessories may also cause instability when pass...
Страница 14: ... tie downs or suitable straps that are attached to solid parts of the mo torcycle such as the frame or up per front fork triple clamp and not for example to rubber mounted handlebars or turn signals or parts that could break Choose the lo cation for the straps carefully so the straps will not rub against painted surfaces during transport The suspension should be com pressed somewhat by the tie dow...
Страница 15: ...1 3 EAU32220 Left view XV17ASA C 1 2 3 4 5 1 Engine oil filler cap page 7 12 2 Battery page 7 30 3 Owner s tool kit page 7 2 4 Fuse box page 7 31 5 Shift pedal page 4 8 U1BH11E0 book Page 1 Monday May 24 2010 9 33 AM ...
Страница 16: ...IPTION 3 2 3 XV17ATSA C 1 2 3 4 5 1 Engine oil filler cap page 7 12 2 Battery page 7 30 3 Owner s tool kit page 7 2 4 Fuse box page 7 31 5 Shift pedal page 4 8 U1BH11E0 book Page 2 Monday May 24 2010 9 33 AM ...
Страница 17: ...tank page 4 9 3 Fuel tank cap page 4 9 4 Brake pedal page 4 9 5 Rear brake light switch page 7 22 6 Engine oil filter cartridge page 7 12 7 Air filter element page 7 16 8 Transfer case oil level check bolt page 7 15 9 Shock absorber assembly spring preload adjusting nut page 4 16 U1BH11E0 book Page 3 Monday May 24 2010 9 33 AM ...
Страница 18: ... tank cap page 4 9 4 Windshield page 4 14 5 Brake pedal page 4 9 6 Rear brake light switch page 7 22 7 Engine oil filter cartridge page 7 12 8 Air filter element page 7 16 9 Transfer case oil level check bolt page 7 15 10 Shock absorber assembly spring preload adjusting nut page 4 16 U1BH11E0 book Page 4 Monday May 24 2010 9 33 AM ...
Страница 19: ...5 6 7 1 Clutch lever page 4 8 2 Left handlebar switches page 4 6 3 Multi function meter unit page 4 3 4 Main switch steering lock page 4 1 5 Right handlebar switches page 4 6 6 Throttle grip page 7 18 7 Brake lever page 4 8 U1BH11E0 book Page 5 Monday May 24 2010 9 33 AM ...
Страница 20: ...ever page 4 8 2 Left handlebar switches page 4 6 3 Multi function meter unit page 4 3 4 Main switch steering lock page 4 1 5 Right handlebar switches page 4 6 6 Throttle grip page 7 18 7 Brake lever page 4 8 U1BH11E0 book Page 6 Monday May 24 2010 9 33 AM ...
Страница 21: ... engine is started and stays on until the key is turned to OFF even if the engine stalls EAU10661 OFF All electrical systems are off The key can be removed WARNING EWA10061 Never turn the key to OFF or LOCK while the vehicle is moving Otherwise the electrical systems will be switched off which may result in loss of control or an accident EAU10683 LOCK The steering is locked and all electrical syst...
Страница 22: ...occurs refuel as soon as possible The electrical circuit of the warning light can be checked by turning the key to ON The warning light should come on for a few seconds and then go off If the warning light does not come on initially when the key is turned to ON or if the warning light remains on have a Yamaha dealer check the electrical circuit TIP This model is also equipped with a self diagnosis...
Страница 23: ...r check the electrical circuit EAU45683 Multi function meter unit WARNING EWA12422 Be sure to stop the vehicle before making any setting changes to the multi function meter unit Changing settings while riding can distract the operator and increase the risk of an accident The multi function meter unit is equipped with the following a speedometer a fuel gauge an odometer two tripmeters which show th...
Страница 24: ...ll sweep once across the fuel level range and then return to the current amount in order to test the electrical circuit Odometer tripmeters and fuel re serve tripmeter Push the side of the SELECT switch to switch the display between the odometer mode ODO the tripme ter modes TRIP A and TRIP B in the following order ODO TRIP A TRIP B ODO TIP Push the side of the SELECT switch to switch the display ...
Страница 25: ...rned to ON To set the clock 1 Turn the key to ON 2 Push the side of the SE LECT switch and RESET switch together for at least two seconds 3 When the hour digits start flashing push the or side of the SELECT switch to set the hours 4 Push the RESET switch and the minute digits will start flashing 5 Push the or side of the SELECT switch to set the min utes 6 Push the RESET switch and then release it...
Страница 26: ...urn the key to OFF 2 Push and hold the side of the SELECT switch 3 Turn the key to ON and then re lease the SELECT switch after five seconds or more 4 Push the or side of the SELECT switch to select the de sired brightness level 5 Push the RESET switch to con firm the selected brightness level The display will return to the odom eter or tripmeter mode EAU12348 Handlebar switches Left 1 Speedometer...
Страница 27: ...Set this switch to before starting the engine Set this switch to to stop the engine in case of an emergen cy such as when the vehicle overturns or when the throttle cable is stuck EAU12711 Start switch Push this switch to crank the engine with the starter See page 6 1 for start ing instructions prior to starting the en gine EAU41700 The engine trouble warning light will come on when the key is tur...
Страница 28: ...n circuit cut off system See page 4 18 EAU12881 Shift pedal The shift pedal is located on the left side of the motorcycle and is used in combination with the clutch lever when shifting the gears of the 5 speed con stant mesh transmission equipped on this motorcycle TIP Use your toes or heel to shift up and your toes to shift down EAU12890 Brake lever The brake lever is located at the right handleb...
Страница 29: ...ap 1 Insert the fuel tank cap into the tank opening with the key inserted in the lock and with the mark facing forward 2 Turn the key counterclockwise to the original position remove it and then close the lock cover TIP The fuel tank cap cannot be installed unless the key is in the lock In addition the key cannot be removed if the cap is not properly installed and locked WARNING EWA10131 Make sure...
Страница 30: ... sure to securely close the fuel tank cap WARNING EWA15151 Gasoline is poisonous and can cause injury or death Handle gaso line with care Never siphon gaso line by mouth If you should swallow some gasoline or inhale a lot of gas oline vapor or get some gasoline in your eyes see your doctor immedi ately If gasoline spills on your skin wash with soap and water If gaso line spills on your clothing ch...
Страница 31: ... fuel tank breather over flow hose for cracks or damage and replace it if damaged Make sure that the end of the fuel tank breather overflow hose is not blocked and clean it if necessary EAU13445 Catalytic converters This vehicle is equipped with catalytic converters in the exhaust system WARNING EWA10862 The exhaust system is hot after op eration To prevent a fire hazard or burns Do not park the v...
Страница 32: ...the steering with a padlock To do so turn the handlebar until the holes in the two brackets are aligned and then lock the steering with a suitable pad lock EAU14152 Rider seat To remove the rider seat 1 Turn the key to OFF and then turn it to OPEN TIP Do not push inward when turning the key 2 Pull the rider seat off To install the rider seat 1 Insert the projection on the rear of the rider seat in...
Страница 33: ...r 1 Remove the rider seat See page 4 12 2 Hook the helmet onto the helmet holder and then securely install the seat WARNING Never ride with a helmet attached to the helmet holder since the helmet may hit objects causing loss of control and possibly an acci dent EWA10161 To release the helmet from the hel met holder Remove the rider seat remove the hel met from the helmet holder and then install th...
Страница 34: ...stall the bolts and tighten them to the specified torque 4 Loosen the screws holding the windshield cover located above the headlight position the cover close to the headlight without touching it and then tighten the screws WARNING EWA10920 After adjusting the windshield Securely tighten the windshield bolts Turn the handlebar to the left and right to make sure that the handlebar is not obstructed...
Страница 35: ...ht evenly on each side of the motorcycle Do not exceed the load limit of 5 kg 11 lb for each sidecase Do not exceed the maximum load of 177 kg 390 lb for the ve hicle Do not exceed 120 km h 80 mi h when riding with luggage in the sidecases otherwise han dling could be affected Improp er loading poor tire or overall motorcycle conditions poor road surfaces or adverse weath er conditions may make it...
Страница 36: ... to turn beyond the maximum or minimum settings Adjust the spring preload as follows 1 Loosen the locknut 2 To increase the spring preload and thereby harden the suspension turn the adjusting nut in direction a To decrease the spring pre load and thereby soften the sus pension turn the adjusting nut in direction b The spring preload setting is deter mined by measuring distance A shown in the illus...
Страница 37: ...nd The sidestand is located on the left side of the frame Raise the sidestand or lower it with your foot while holding the vehicle upright TIP The built in sidestand switch is part of the ignition circuit cut off system which cuts the ignition in certain situations See page 4 18 for an explanation of the ignition circuit cut off system WARNING EWA10241 The vehicle must not be ridden with the sides...
Страница 38: ...functions It prevents starting when the trans mission is in gear and the side stand is up but the clutch lever is not pulled It prevents starting when the trans mission is in gear and the clutch le ver is pulled but the sidestand is still down It cuts the running engine when the transmission is in gear and the sidestand is moved down Periodically check the operation of the ignition circuit cut off...
Страница 39: ...10 Move the sidestand up 11 Keep the clutch lever pulled 12 Push the start switch Does the engine start The system is OK The motorcycle can be ridden The neutral switch may not be working correctly The motorcycle should not be ridden until checked by a Yamaha dealer The sidestand switch may not be working correctly The motorcycle should not be ridden until checked by a Yamaha dealer The clutch swi...
Страница 40: ... the fuse may blow or the battery may discharge WARNING EWA12531 To prevent electrical shock or short circuiting make sure that the cap is installed when the auxiliary DC con nector is not being used A 12 V accessory connected to the auxiliary DC connector behind panel A see page 7 9 can be used when the key is in the ON position 1 Auxiliary DC connector 2 Auxiliary DC connector cap 1 2 U1BH11E0 b...
Страница 41: ... check the following points ITEM CHECKS PAGE Fuel Check fuel level in fuel tank Refuel if necessary Check fuel line for leakage Check fuel tank breather overflow hose for obstructions cracks or damage and check hose connection 4 10 4 11 Engine oil Check oil level in oil tank If necessary add recommended oil to specified level Check vehicle for oil leakage 7 12 Transfer case oil Check vehicle for o...
Страница 42: ...able and grip housing 7 18 7 26 Control cables Make sure that operation is smooth Lubricate if necessary 7 25 Wheels and tires Check for damage Check tire condition and tread depth Check air pressure Correct if necessary 7 19 7 20 Brake and shift pedals Make sure that operation is smooth Lubricate pedal pivoting points if necessary 7 26 Brake and clutch levers Make sure that operation is smooth Lu...
Страница 43: ...RATION CHECKS 5 3 5 Sidestand switch Check operation of ignition circuit cut off system If system is not working correctly have Yamaha dealer check vehicle 4 17 ITEM CHECKS PAGE U1BH11E0 book Page 3 Monday May 24 2010 9 33 AM ...
Страница 44: ... stops automatically if left idling for 20 minutes In this case the multi function meter unit indi cates error code 70 but this is not a malfunction Push the start switch to clear the error code and to restart the engine EAU16247 Starting the engine In order for the ignition circuit cut off system to enable starting one of the following conditions must be met The transmission is in the neutral pos...
Страница 45: ...IP To shift the transmission into the neu tral position press the shift pedal down repeatedly until it reaches the end of its travel and then slightly raise it NOTICE ECA10260 Even with the transmission in the neutral position do not coast for long periods of time with the engine off and do not tow the motorcycle for long dis tances The transmission is properly lubricated only when the engine is r...
Страница 46: ...n EAU16720 Recommended shift points The recommended shift points during acceleration and deceleration are shown in the table below EAU16841 Engine break in There is never a more important period in the life of your engine than the period between 0 and 1600 km 1000 mi For this reason you should read the follow ing material carefully Since the engine is brand new do not put an excessive load on it f...
Страница 47: ...the vehicle EAU17213 Parking When parking stop the engine and then remove the key from the main switch WARNING EWA10311 Since the engine and exhaust system can become very hot park in a place where pedestri ans or children are not likely to touch them and be burned Do not park on a slope or on soft ground otherwise the vehicle may overturn increasing the risk of a fuel leak and fire Do not park ne...
Страница 48: ...en performing maintenance unless otherwise specified A running engine has moving parts that can catch on body parts or clothing and electrical parts that can cause shocks or fires Running the engine while ser vicing can lead to eye injury burns fire or carbon monoxide poisoning possibly leading to death See page 2 1 for more in formation about carbon monox ide WARNING EWA15460 Brake discs calipers...
Страница 49: ...the owner s tool kit are intended to assist you in the performance of preventive maintenance and minor repairs How ever additional tools such as a torque wrench may be necessary to perform certain maintenance work correctly TIP If you do not have the tools or experi ence required for a particular job have a Yamaha dealer perform it for you 1 Owner s tool kit 1 U1BH11E0 book Page 2 Monday May 24 20...
Страница 50: ...nths 8000 mi 13000 km or 12 months 12000 mi 19000 km or 18 months 16000 mi 25000 km or 24 months 20000 mi 31000 km or 30 months 1 Fuel line Check fuel hoses for cracks or damage Replace if necessary 2 Spark plugs Check condition Adjust gap and clean Replace every 8000 mi 13000 km or 12 months Replace Replace 3 Valve clearance Check and adjust valve clearance when engine is cold Adjust if necessary...
Страница 51: ...uction sys tem Check the air cut off valve reed valve and hose for damage Replace any damaged parts No ITEM ROUTINE INITIAL ODOMETER READINGS 600 mi 1000 km or 1 month 4000 mi 7000 km or 6 months 8000 mi 13000 km or 12 months 12000 mi 19000 km or 18 months 16000 mi 25000 km or 24 months 20000 mi 31000 km or 30 months U1BH11E0 book Page 4 Monday May 24 2010 9 33 AM ...
Страница 52: ...ation Adjust or replace cable 3 Front brake Check operation fluid level and for fluid leakage Adjust brake lever free play and replace brake pads if necessary 4 Rear brake Check operation fluid level and for fluid leakage Replace brake pads if necessary 5 Brake hoses Check for cracks or damage Replace Every 4 years 6 Wheels Check runout and for damage Replace if necessary 7 Tires Check tread depth...
Страница 53: ...k all chassis fitting and fas teners Correct if necessary 13 Brake lever pivot shaft Apply silicone grease lightly 14 Brake pedal pivot shaft Apply lithium soap based grease lightly 15 Clutch lever pivot shaft Apply lithium soap based grease lightly 16 Shift pedal pivot shaft Apply lithium soap based grease lightly 17 Sidestand pivot Check operation Apply lithium soap based grease lightly No ITEM ...
Страница 54: ... 23 Engine oil filter car tridge Replace 24 Transfer case oil Check for leakage Change at initial 600 mi 1000 km or 1 month and thereafter every 16000 mi 25000 km or 24 months Change Change 25 Front and rear brake switches Check operation 26 Control cables Apply Yamaha chain and cable lube or engine oil thoroughly No ITEM ROUTINE INITIAL ODOMETER READINGS 600 mi 1000 km or 1 month 4000 mi 7000 km ...
Страница 55: ... brake master cylinders and calipers and change the brake fluid Replace the brake hoses every four years and if cracked or damaged 27 Throttle grip Check operation Check throttle grip free play and adjust if necessary Lubricate cable and grip housing 28 Lights signals and switches Check operation Adjust headlight beam No ITEM ROUTINE INITIAL ODOMETER READINGS 600 mi 1000 km or 1 month 4000 mi 7000...
Страница 56: ...Panel A To remove the panel Remove the bolt and then pull the pan el off as shown To install the panel Place the panel in the original position and then install the bolt EAU45670 Panel B To remove the panel 1 Remove panel A 2 Remove the bolts and then take the panel off as shown To install the panel 1 Place the panel in the original posi tion and then install the bolts 1 Panel A 2 Panel B 1 2 1 Bo...
Страница 57: ...ve the spark plug cap 2 Remove the spark plug as shown with the spark plug wrench includ ed in the owner s tool kit To check the spark plugs 1 Check that the porcelain insulator around the center electrode on each spark plug is a medium to light tan the ideal color when the vehicle is ridden normally 2 Check that all spark plugs installed in the engine have the same color TIP If any spark plug sho...
Страница 58: ...not available when installing a spark plug a good estimate of the correct torque is 1 4 1 2 turn past finger tight However the spark plug should be tightened to the speci fied torque as soon as possible 3 Install the spark plug cap EAU19672 Canister for California only This model is equipped with a canister to prevent the discharging of fuel vapor into the atmosphere Check each hose connection Che...
Страница 59: ...rn ing light will come on but this is not a malfunction Simply turn the main switch to OFF and then back to ON to restart the engine and reset the engine trouble warn ing light 4 Wait a few minutes until the oil set tles remove the oil filler cap wipe the dipstick clean insert it back into the oil filler hole without screwing it in and then remove it again to check the oil level TIP The engine oil...
Страница 60: ...olt and its gasket to drain the oil from the oil tank 5 Place an oil pan under the engine to collect the used oil 6 Remove the engine oil drain bolt and its gasket to drain the oil from the crankcase TIP Skip steps 7 9 if the oil filter cartridge is not being replaced 7 Remove the oil filter cartridge with an oil filter wrench TIP An oil filter wrench is available at a Yamaha dealer 8 Apply a thin...
Страница 61: ... gradually fill the oil tank with the remaining oil quantity while regularly checking the oil lev el on the dipstick TIP Be sure to wipe off spilled oil on any parts after the engine and exhaust sys tem have cooled down NOTICE ECA11620 In order to prevent clutch slip page since the engine oil also lubricates the clutch do not 1 O ring 1 Oil filter cartridge 2 Torque wrench Tightening torque Oil fi...
Страница 62: ...cked and the oil must be changed at the intervals specified in the periodic maintenance and lubrication chart To check the transfer case oil level 1 Place the vehicle on a level sur face and hold it in an upright posi tion TIP Make sure that the vehicle is positioned straight up when checking the oil level A slight tilt to the side can result in a false reading 2 Remove the oil check bolt and its ...
Страница 63: ...while checking the transfer case for oil leakage If oil is leaking immediately turn the en gine off and check for the cause EAU45701 Cleaning the air filter element The air filter element should be cleaned or replaced at the intervals specified in the periodic maintenance and lubrica tion chart Clean or if necessary re place the air filter element more frequently if you are riding in unusually wet...
Страница 64: ...hen blow the remaining dirt out with compressed air as shown If the air filter element is damaged replace it 7 Install the air filter element by in serting it into the air filter case then installing the screws and then connect the hose shown 8 Install the air filter case cover by in stalling the screws 9 Connect the hose 1 Bolt 2 Air filter case 1 Hose 2 Screw 3 Air filter case cover 2 1 3 1 Air ...
Страница 65: ...nner edge of the throttle grip Periodi cally check the throttle grip free play and if necessary have a Yamaha deal er adjust it EAU21401 Valve clearance The valve clearance changes with use resulting in improper air fuel mixture and or engine noise To prevent this from occurring the valve clearance must be adjusted by a Yamaha dealer at the intervals specified in the periodic maintenance and lubri...
Страница 66: ...le could cause an accident Tire inspection Always check the tires before operating the motorcycle If a tire tread shows crosswise line minimum tread depth if the tire has a nail or glass fragments in it or if the sidewall is cracked con tact a Yamaha dealer immediately and have the tire replaced Tire air pressure measured on cold tires 0 90 kg 0 198 lb Front 250 kPa 2 50 kgf cm 36 psi Rear 250 kPa...
Страница 67: ...ay be different which could lead to an accident After extensive tests only the tires list ed below have been approved for this model by Yamaha Motor Co Ltd EAU21961 Cast wheels To maximize the performance durabil ity and safe operation of your vehicle note the following points regarding the specified wheels The wheel rims should be checked for cracks bends or warpage be fore each ride If any damag...
Страница 68: ...e play could be obtained as described above skip steps 4 7 4 Fully turn the adjusting bolt in di rection a to loosen the clutch ca ble 5 Loosen the locknut further down the clutch cable 6 To increase the clutch lever free play turn the clutch lever free play adjusting nut in direction a To decrease the clutch lever free play turn the adjusting nut in direction b 7 Tighten the locknut at the clutch...
Страница 69: ...in the hy draulic system have a Yamaha dealer bleed the system before operating the motorcycle Air in the hydraulic system will dimin ish the braking performance which may result in loss of con trol and an accident EAU22273 Brake light switches The brake light which is activated by the brake pedal and brake lever should come on just before braking takes ef fect If necessary adjust the rear brake l...
Страница 70: ...e disc have a Yamaha dealer replace the brake pads as a set EAU22470 Rear brake pads Each rear brake pad is provided with a wear indicator groove which allows you to check the brake pad wear with out having to disassemble the brake To check the brake pad wear check the wear indicator groove If a brake pad has worn to the point that the wear indicator groove has almost disap peared have a Yamaha de...
Страница 71: ...t water does not en ter the brake fluid reservoir when refilling Water will significantly lower the boiling point of the fluid and may result in vapor lock Brake fluid may deteriorate paint ed surfaces or plastic parts Al ways clean up spilled fluid immediately As the brake pads wear it is nor mal for the brake fluid level to grad ually go down However if the brake fluid level goes down sud denly ...
Страница 72: ...ing the measurement not ed in step 2 from the measurement noted in step 3 5 If the drive belt slack is incorrect have a Yamaha dealer adjust it EAU23093 Checking and lubricating the cables The operation of all control cables and the condition of the cables should be checked before each ride and the ca bles and cable ends should be lubricat ed if necessary If a cable is damaged or does not move smo...
Страница 73: ... lubricated by a Yamaha dealer at the intervals speci fied in the periodic maintenance chart EAU44272 Checking and lubricating the brake and shift pedals Brake pedal Shift pedal The operation of the brake and shift pedals should be checked before each ride and the pedal pivots should be lu bricated if necessary Recommended lubricant Lithium soap based grease U1BH11E0 book Page 26 Monday May 24 201...
Страница 74: ...nd should be checked before each ride and the sidestand pivot and metal to metal contact surfaces should be lubricated if necessary WARNING EWA10731 If the sidestand does not move up and down smoothly have a Yamaha dealer check or repair it Otherwise the sidestand could contact the ground and distract the operator re sulting in a possible loss of control Recommended lubricants Brake lever Silicone...
Страница 75: ...ront fork must be checked as follows at the intervals specified in the periodic main tenance and lubrication chart To check the condition Check the inner tubes for scratches damage and excessive oil leakage To check the operation 1 Place the vehicle on a level sur face and hold it in an upright posi tion WARNING To avoid injury securely support the vehicle so there is no danger of it falling over ...
Страница 76: ...off the ground See page 7 35 for more information WARNING To avoid injury securely support the vehicle so there is no danger of it falling over EWA10751 2 Hold the lower ends of the front fork legs and try to move them for ward and backward If any free play can be felt have a Yamaha dealer check or repair the steering EAU23291 Checking the wheel bearings The front and rear wheel bearings must be c...
Страница 77: ...ging it in an enclosed space KEEP THIS AND ALL BATTER IES OUT OF THE REACH OF CHILDREN To charge the battery Have a Yamaha dealer charge the bat tery as soon as possible if it seems to have discharged Keep in mind that the battery tends to discharge more quickly if the vehicle is equipped with optional electrical accessories NOTICE ECA16521 To charge a VRLA Valve Regulated Lead Acid battery a spec...
Страница 78: ...the fuses The main fuse and fuel injection system fuse are located in the starter relay case behind panel B See page 7 9 To access the fuses remove the quick fastener and push the starter relay case cover inward to unhook it from the slot and then pull the cover off The fuse box which contains the fuses for the individual circuits is located be hind panel A See page 7 9 1 Starter relay case cover ...
Страница 79: ...are not to damage the follow ing parts Headlight bulb Do not touch the glass part of the headlight bulb to keep it free from oil otherwise the transpar ency of the glass the luminosity of the bulb and the bulb life will be adversely affected Thor oughly clean off any dirt and fin gerprints on the headlight bulb using a cloth moistened with al cohol or thinner Headlight lens Do not affix any type o...
Страница 80: ... 4 Place a new headlight bulb into po sition and then secure it with the bulb holder 5 Install the headlight bulb cover and then connect the coupler 6 Install the headlight unit by install ing the screws 7 Have a Yamaha dealer adjust the headlight beam if necessary 1 Do not touch the glass part of the bulb 1 Screw 1 Headlight coupler 2 Headlight bulb cover 1 Headlight bulb holder U1BH11E0 book Pag...
Страница 81: ...t in and turning it counter clockwise 3 Insert a new bulb into the socket push it in and then turn it clock wise until it stops 4 Install the lens by installing the screws NOTICE Do not over tighten the screws otherwise the lens may break ECA10681 EAU31963 Replacing a license plate light bulb 1 Remove the license plate light unit by removing the bolts 2 Remove the license plate light socket togeth...
Страница 82: ...d up right Check that the motorcycle is in a stable and level position before starting any maintenance A strong wooden box can be placed under the engine for added stability To service the front wheel 1 Stabilize the rear of the motorcycle by using a motorcycle stand or if an additional motorcycle stand is not available by placing a jack un der the frame in front of the rear wheel 2 Raise the fron...
Страница 83: ...tal systems your self However should your motorcycle require any repair take it to a Yamaha dealer whose skilled technicians have the necessary tools experience and know how to service the motorcycle properly Use only genuine Yamaha replace ment parts Imitation parts may look like Yamaha parts but they are often inferi or have a shorter service life and can lead to expensive repair bills WARNING E...
Страница 84: ...e vehicle Remove the spark plugs and check the electrodes 3 Ignition Wipe off with a dry cloth and correct the spark plug gaps or replace the spark plugs Have a Yamaha dealer check the vehicle The engine does not start Have a Yamaha dealer check the vehicle The engine does not start Check the battery Operate the electric starter 4 Battery The engine turns over quickly The engine turns over slowly ...
Страница 85: ...uffler outlets with plas tic bags after the engine has cooled down 2 Make sure that all caps and covers as well as all electrical couplers and connectors including the spark plug caps are tightly in stalled 3 Remove extremely stubborn dirt like oil burnt onto the crankcase with a degreasing agent and a brush but never apply such prod ucts onto seals gaskets the drive belt and wheel axles Always ri...
Страница 86: ...sponge and then rinse thoroughly with clean water Use a toothbrush or bottlebrush for hard to reach areas Stubborn dirt and insects will come off more easily if the area is covered with a wet cloth for a few minutes before cleaning After riding in the rain near the sea or on salt sprayed roads Since sea salt or salt sprayed on roads during winter are extremely corrosive in combination with water c...
Страница 87: ...y stones etc 6 Wax all painted and chrome plat ed surfaces Avoid combination cleaner waxes many of which contain abrasives that may mar the paint or protective finish 7 Let the motorcycle dry completely before storing or covering it WARNING EWA11131 Contaminants on the brakes or tires can cause loss of control Make sure that there is no oil or wax on the brakes or tires If necessary clean the brak...
Страница 88: ... spark plugs on the cylinder head so that the electrodes are grounded This will limit spark ing during the next step d Turn the engine over several times with the starter This will coat the cylinder walls with oil e Remove the spark plug caps from the spark plugs and then install the spark plugs and the spark plug caps WARNING To prevent damage or injury from sparking make sure to ground the spark...
Страница 89: ...PI service SG type or higher JASO standard MA Engine oil quantity Without oil filter cartridge replacement 3 70 L 3 91 US qt 3 26 Imp qt With oil filter cartridge replacement 4 10 L 4 33 US qt 3 61 Imp qt Transfer gear oil Type SAE 80 API GL 4 Hypoid gear oil Quantity 0 40 L 0 42 US qt 0 35 Imp qt Air filter Air filter element Dry element Fuel Recommended fuel Unleaded gasoline only Fuel tank capa...
Страница 90: ...d accessories Tire air pressure measured on cold tires Loading condition 0 90 kg 0 198 lb Front 250 kPa 2 50 kgf cm 36 psi Rear 250 kPa 2 50 kgf cm 36 psi Loading condition XV17ASA 90 191 kg 198 421 lb XV17ASAC 90 191 kg 198 421 lb XV17ATSA 90 177 kg 198 390 lb XV17ATSAC 90 177 kg 198 390 lb Front 250 kPa 2 50 kgf cm 36 psi Rear 280 kPa 2 80 kgf cm 41 psi Front wheel Wheel type Cast wheel Rim size...
Страница 91: ...rn signal position light 12 V 23 W 8 0 W 2 Rear turn signal light 12 V 21 0 W 2 License plate light 12 V 5 0 W 1 Meter lighting LED Neutral indicator light LED High beam indicator light LED Turn signal indicator light LED Fuel level warning light LED Engine trouble warning light LED Fuses Main fuse 50 0 A Headlight fuse 20 0 A Signaling system fuse 15 0 A Ignition fuse 20 0 A Fuel injection system...
Страница 92: ...identification number The key identification number is stamped into the key tag Record this number in the space provided and use it for reference when ordering a new key EAU26400 Vehicle identification number The vehicle identification number is stamped into the steering head pipe Record this number in the space pro vided TIP The vehicle identification number is used to identify your motorcycle an...
Страница 93: ... ordering spare parts from a Yamaha dealer EAU48270 Vehicle Emission Control Informa tion label The Vehicle Emission Control Informa tion label is affixed at the location in the illustration This label shows specifica tions related to exhaust emissions as required by federal law state law and Environment Canada 1 Model label 1 Vehicle Emission Control Information label 1 U1BH11E0 book Page 2 Monda...
Страница 94: ...n and if it finds that a safety defect exists in a group of vehicles it may order a recall and remedy campaign However NHTSA cannot become involved in individual problems between you your dealer or Yamaha Motor Corporation U S A To contact NHTSA you may call the Vehicle Safety Hotline toll free at 1 888 327 4236 TTY 1 800 424 9153 go to http www safercar gov or write to Administrator NHTSA 400 Sev...
Страница 95: ... hicle for the purpose of noise control prior to its sale or delivery to the ultimate purchaser or while it is in use or 2 the use of the vehicle after such device or element of design has been removed or rendered inoperative by any person AMONG THOSE ACTS PRESUMED TO CONSTITUTE TAMPERING ARE THE ACTS LISTED BELOW These acts include tampering with the following systems i e modification removal etc...
Страница 96: ...minder that maintenance work is required It is not acceptable proof of maintenance work Maintenance interval Date of service Mileage Servicing dealer name and address Remarks 600 mi 1000 km or 1 month 4000 mi 7000 km or 6 months 8000 mi 13000 km or 12 months 12000 mi 19000 km or 18 months 16000 mi 25000 km or 24 months 20000 mi 31000 km or 30 months 24000 mi 37000 km or 36 months 28000 mi 43000 km...
Страница 97: ...ORMATION 10 6 10 36000 mi 55000 km or 54 months 40000 mi 61000 km or 60 months Maintenance interval Date of service Mileage Servicing dealer name and address Remarks U1BH11E0 book Page 6 Monday May 24 2010 9 33 AM ...
Страница 98: ...for warranty by an authorized Yamaha motorcycle dealer In order for this warranty to remain in effect this inspection and registration must take place within ten 10 days after transfer An inspection and registration fee will be charged for this service EMISSION CONTROL SYSTEM WARRANTY Yamaha Motor Corporation U S A also warrants to the ultimate purchaser and each subsequent purchaser of each Yamah...
Страница 99: ...any later date Each Yamaha motorcycle dealer is held responsible for his setup service and warranty repair work Is the warranty transferable to second owners Yes The remainder of the existing warranty can be transferred upon request The unit has to be inspected and re registered by an authorized Yamaha motorcycle dealer for the policy to remain effective CUSTOMER SERVICE If your machine requires w...
Страница 100: ...red repairs There s no deductible to pay and repairs aren t pro rated You don t have any out of pocket expenses for covered repairs In addition Travel and Recreation Interruption Protection TRIP is included at no extra cost TRIP gives you up to 150 reimbursement per occurrence for any reasonable expenses you incur because your Yamaha needs covered service replacement vehicle rental emergency towin...
Страница 101: ...acked protection even after your Yamaha Limited Warranty expires A special note If visiting your dealer isn t convenient contact Yamaha with your Primary ID number your frame number We ll be happy to help you get the Y E S coverage you need Yamaha Service Marketing P O Box 6555 Cypress CA 90630 1 866 YES EXTD 1 866 937 3983 U1BH11E0 book Page 10 Monday May 24 2010 9 33 AM ...
Страница 102: ...hts and warning lights 4 2 K Key identification number 10 1 L Labels location 1 1 License plate light bulb replacing 7 34 M Main switch steering lock 4 1 Maintenance and lubrication periodic 7 5 Maintenance emission control system 7 3 Maintenance record 10 5 Matte color caution 8 1 Model label 10 2 Multi function meter unit 4 3 N Neutral indicator light 4 2 Noise regulation 10 4 P Panels removing ...
Страница 103: ...V Valve clearance 7 18 Vehicle Emission Control Information label 10 2 Vehicle identification number 10 1 W Warranty extended 10 9 Warranty limited 10 7 Wheel bearings checking 7 29 Wheels 7 20 Windshield XV17ATSA C 4 14 U1BH11E0 book Page 2 Monday May 24 2010 9 33 AM ...
Страница 104: ...A5 yoko_Blank fm Page 1 Tuesday April 8 2003 11 43 AM ...
Страница 105: ...A5 yoko_Blank fm Page 1 Tuesday April 8 2003 11 43 AM ...
Страница 106: ...PRINTED IN JAPAN 2010 06 0 3 1 CR E PRINTED ON RECYCLED PAPER YAMAHA MOTOR CO LTD DIC183 ...