background image

3

SW60XG SETUP

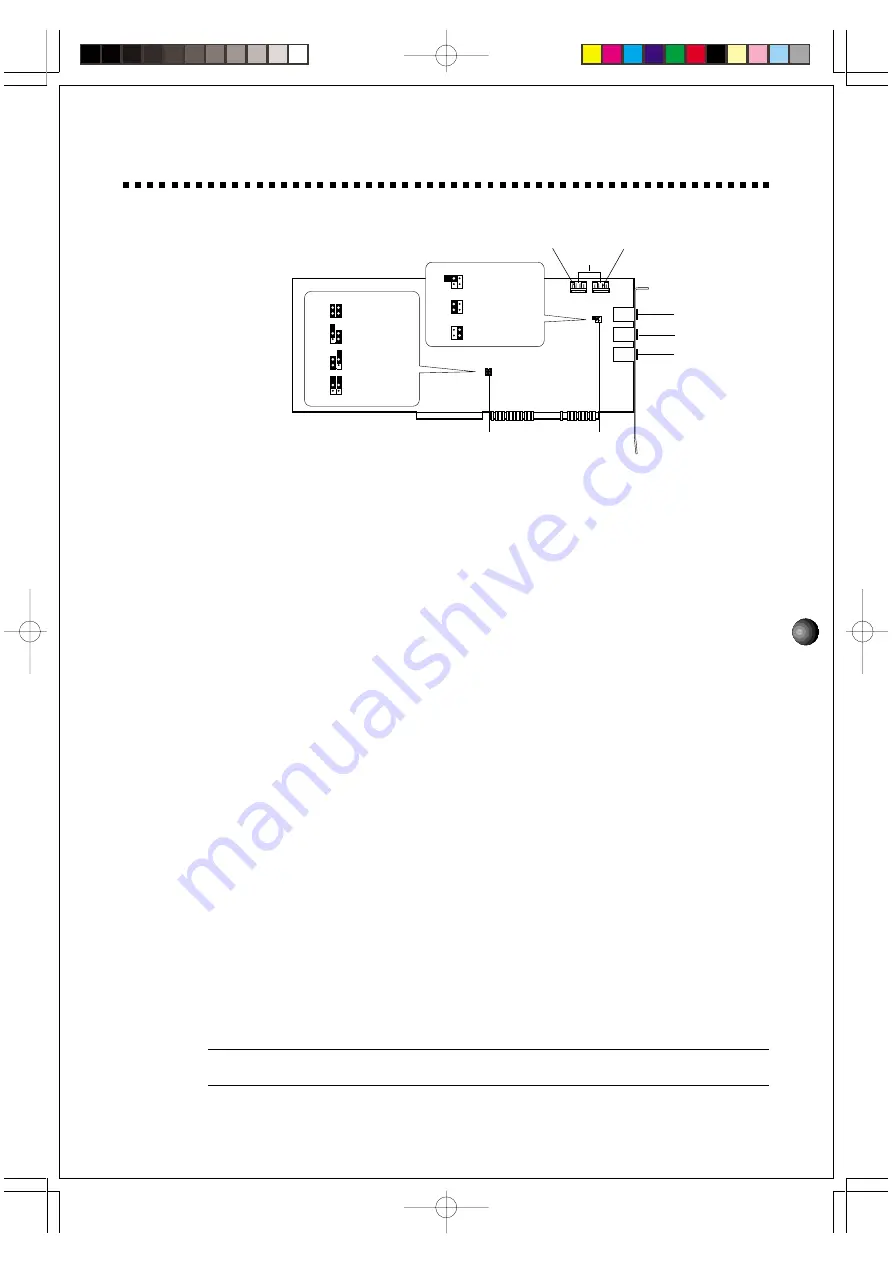
1. NAMES AND FUNCTIONS

1

MIC IN jack:

 Mono mini plug type jack allows connection to the separately available

dynamic microphone (Monaural). MIC TYPE jumper (see below) allows use of a 2-lead or
3-lead condenser type microphone.

2

LINE IN jack:

 Stereo mini plug type jack allows input of line-level stereo signals from

external audio devices.

3

OUTPUT jack:

 Stereo mini plug type jack outputs standard line-level stereo signals. Allows

connection to powered speakers or the inputs of a recording mixer and other audio devices
including headphones.

4

CD IN connector:

 Allows stereo input of line-level signals from a CD-ROM built in the

computer. (Panasonic or MITSUMI)

5


MIC type jumper:

 Lets you select the type of amplifier configurations  depending on the

type of microphone connected. (3-lead condenser or dynamic microphone; 2-lead condenser
microphone.)

1

1-2 Open/3-4 Open: dynamic microphone.

2

1-2 Short/3-4 Open: 2-lead condenser microphone.

3

1-2 Open/3-4 Short: 3-lead condenser microphone.

* Default position is 1: dynamic microphone.

6

MIDI Port Address jumper:

 Allows to select the appropriate MIDI Port Address for

sending the MIDI signals from the ISA bus to the SW60XG.
You may need to change the MIDI Port Address (default address) if some conflict problem
occurs. Please consider which address to use before the sound card installation.

1

1-2 Short/3-4 Short: 300

2

1-2 Open/3-4 Short: 310

3

1-2 Short/3-4 Open: 320

4

1-2 Open/3-4 Open: 330

* Default position is 1: 300.

¢

If you change the MIDI Port Address position here, you are required to select the same Address for the

Driver. (See page 9)

2

1

4

3

2

1

4

3

2

1

4

3

2

1

4

3

2

1

4

3

2

1

4

3

1

2

3

4

2

1

4

3

2

1

4

3

2

1

4

3

1

2

3

1-2 OPEN &
3-4 OPEN

1-2 SHORT &
3-4 OPEN

1-2 OPEN &
3-4 SHORT

1-2 SHORT &
3-4 SHORT

1-2 OPEN &
3-4 SHORT

1-2 SHORT &
3-4 OPEN

1-2 OPEN &
3-4 OPEN

6

5

1

3

2

4

For Panasonic

For MITSUMI

SW60XG̲E01.PM

99.12.14, 3:45 PM

Page 3

PageMaker 5.0J

Содержание SW60XG

Страница 1: ...OWNER S MANUAL SOUND CARD SW60XG...

Страница 2: ...appear on your computer Future upgrades of application and system software and any changes in specifications and functions will be announced separately FCC ID A6RSW60 This device complies with Part 1...

Страница 3: ...ng The EFFECTCON a DOS application lets you control the sounds for the GM compatible DOS games You can NOT directly select and control the voices and effects from the SW60XG since neither knob nor but...

Страница 4: ...tallation and running the SW60XG requires at least 3MB of free space on your hard disk Floppy Disk Drive To install the application software and to save and load user data Mouse Requires a Windows 3 1...

Страница 5: ...ophone 1 1 2 Open 3 4 Open dynamic microphone 2 1 2 Short 3 4 Open 2 lead condenser microphone 3 1 2 Open 3 4 Short 3 lead condenser microphone Default position is 1 dynamic microphone 6 MIDI Port Add...

Страница 6: ...ect the proper cables and adaptors according to your respective devices 2 SOUND CARD INSTALLATION The sound card fits into an ISA bus expansion slot in your computer 1 Turn off the computer and unplug...

Страница 7: ...to prevent possible interference with or damage to the circuitry 5 Hold the sound card with two hands as shown and slowly and steadily insert it into the expansion slot making sure to properly line up...

Страница 8: ...ave them before you install the SW60XG application software Installation Procedure for Windows 3 1 1 Insert Install Disk into your floppy disk drive 2 Click File in the Menu Bar of the Program Manager...

Страница 9: ...g installs the software to the C drive and _SW60XG directory If you want to use a different drive directory type in the name of the different drive directory The following window appears and installat...

Страница 10: ...ppear 3 Click Install Install Program from Floppy Disk Or CD ROM will appear 4 Insert Install Disk into your floppy disk drive and click Next Run Installation Program Dialog Box will appear 5 Verify t...

Страница 11: ...ha SW60XG Driver Setup 4 Change the MIDI Port Address as required In a similar way you can change the MIDI Port Address in the Advanced setup in the Multimedia Properties Control Panel for Windows 95...

Страница 12: ...this button to exit EffectGearII 4 EFFECT MENU buttons Click one of these buttons to select an effect Click the Others button to display the effect type list You can assign the effect you frequently...

Страница 13: ...ffects which create Karaoke sing along environment are as follows CD KARAOKE Reduces the volume of the main vocal from a song playing on an audio CD and lets you sing along the accompaniments Reverb w...

Страница 14: ...z ENTER z Off On status 0 Off 1 On 9 DETECT Allows you to verify the status of four MIDI Port Addresses KEY OPERATION EFCON_ DETECT ENTER 10 TEST Allows you to test the contents of the SW60XG hardwar...

Страница 15: ...6 Normal Voices 21 drum Voices sets Polyphony 32 note AWM 2 wave table Multi timbral Capacity 16 voices simultaneously Wave ROM 4MB Compatibility Sound Module Mode GM System Level 1 XG TG300B Effects...

Страница 16: ...is provided that you retain no copies and the recipient agrees to the terms of the licensing agreement 3 TERMINATION The licensing condition of the software program becomes effective on the day that y...

Отзывы: