SB168-ES Owner’s Manual
14
Setup
4.
Install the MY16-ES64 and MY16-EX cards in
the digital mixing console’s slots, then connect
the required Ethernet cables.
• For details on installing and connecting the cards,
refer to instructions provided with each product.
• When installing an MY16-ES64 card in an LS9-32
console, install the card in SLOT 1.
5.
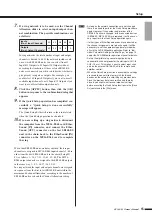
Set the ID of each SB168-ES unit via the DIP
switches (1–4) in the order they are connected,
taking care not to duplicate any of the ID set-
tings.
The DIP switch corresponding to the desired ID num-
ber should be moved to it’s “down” (ON) position. All
other switches should remain in their “up” positions.
6.
Make the required daisy chain connections
between the MY16-ES64 card and the SB168-ES
units.
• When setting up a ring type network, initial set-
tings should be made with the system connected
as a daisy chain. Close the ring connection after
the initial settings have been made.
7.
Connect the computer to the MY16-ES64 Ether-
Sound [IN] connector.
8.
If you selected option B in step 1, connect the dig-
ital mixing console’s [REMOTE] connector to the
MY16-ES64 card [HA REMOTE] connector via
a 9-pin D-sub cross cable.
9.
Turn the power to all devices ON.
10.
Select the word clock master on the digital mix-
ing console. For a daisy chain network select
either [INT48K] or [INT44.1K], and for a ring
network select the [1/2] channel of the slot in
which the MY16-ES64 card is installed.
11.
If you selected option A in step 1, and are using
an LS9-32 console, select [SLOT 1] via the con-
sole’s EXTERNAL HA display COMM PORT
parameter.
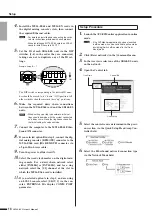
1.
Launch the AVS-ESMonitor application in online
mode.
• If the AVSMonitor application has been launched
in offline mode, it can be switched to online mode
by clicking [Switch offline mode] in the [Com-
mand] menu.
2.
Click [Reset networks] in the [Command] menu.
3.
In the tree views select one of the SB168-ES units
on the network.
4.
Open the Control tab.
5.
Select the control source determined in the previ-
ous section via the Quick Setup Head Amp Con-
troller field.
6.
Select the EtherSound network connection type
via the Network Mode field.
NOTE
Example: Setup ID = 1
ON
NOTE
Setup Procedure
NOTE
Quick Setup
Control Tab
Tree Views
Содержание SB168-ES
Страница 26: ...SB168 ES Owner s Manual 170 MEMO ...
Страница 27: ...SB168 ES Owner s Manual 171 MEMO ...


