PREPARATIONS
➤
Connecting other devices
En
34
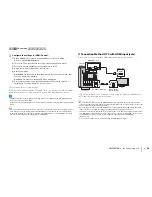
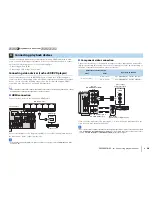
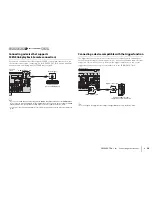
Connecting a device that supports
SCENE link playback (remote connection)
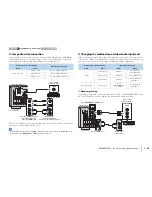
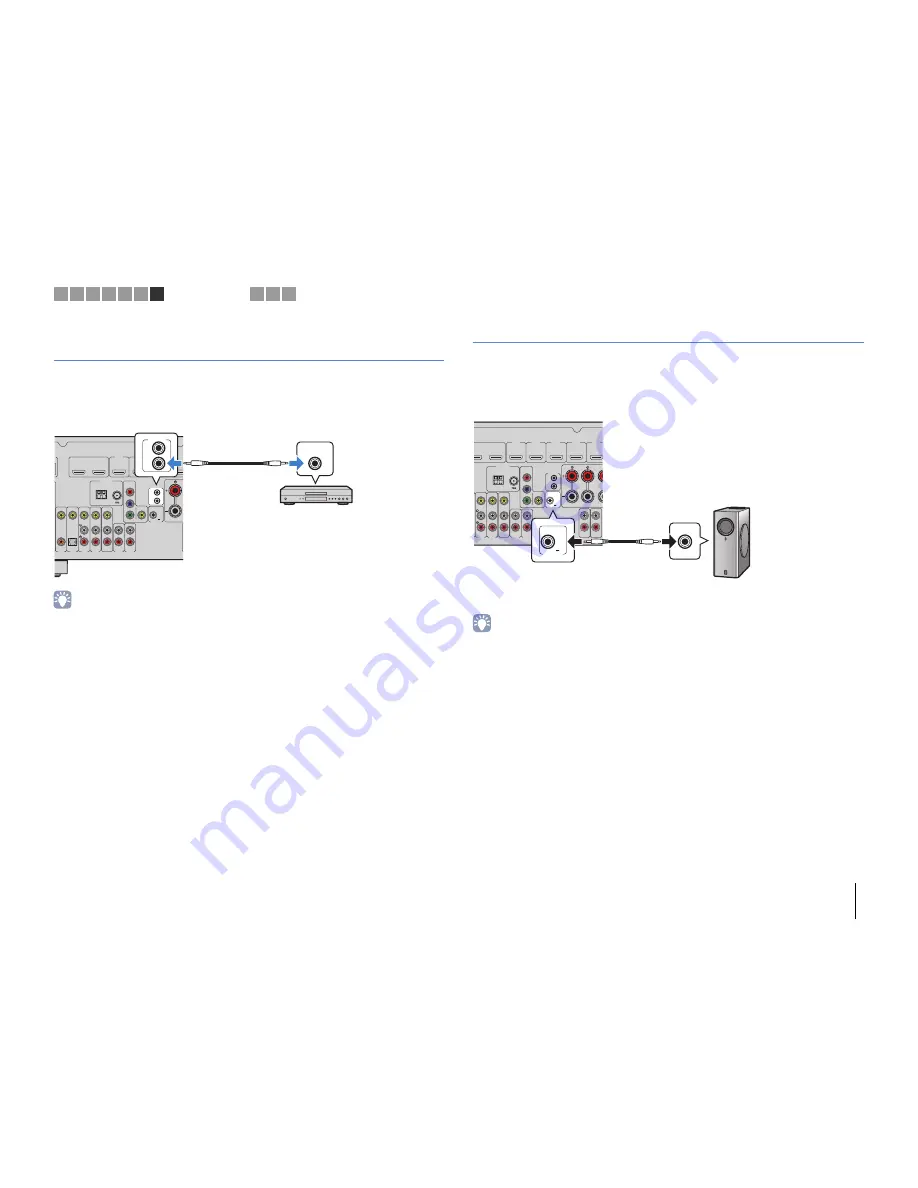
If you have a Yamaha product that supports SCENE control signal transmission, you
can operate it remotely by connecting it to the REMOTE OUT jack, using a monaural
mini-jack cable, and linking with the SCENE function (p.46).
• If you connect a Yamaha product that supports the SCENE link playback function, to the REMOTE OUT
jack, you can remotely start playback on it by linking with a scene selection (p.46). To enable the SCENE
link playback function, specify the device type in “Device Control” (p.84) in the “Scene” menu.
• You can also connect an infrared signal receiver/emitter to operate devices in the main zone from Zone2
(p.74).
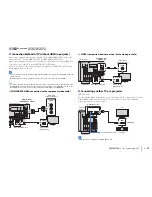
Connecting a device compatible with the trigger function
The trigger function can control an external device in conjunction with operating the
unit (such as powering on/off and input selection). If you have a Yamaha subwoofer that
supports a system connection or a device with a trigger input jack, you can use the
trigger function by connecting the external device to the TRIGGER OUT jack.
• You can configure the trigger function settings in “Trigger Output” (p.101) in the “Setup” menu.
FRO
AV
3
AV 4
AV 5
AUDIO 1
AUDIO 2
AV
OUT
AV 6
VIDEO
OPTICAL
(TV)
COAXIAL
COMPONENT
VIDEO
VIDEO
MONITOR OUT
OUT
IN
REMOTE
TRIGGER OUT
P
B
Y
P
R
HDMI 1
(BD/DVD)
K
HDMI 4
HDMI
3
HDMI 2
ANTENNA
(RADIO)
HDMI
1
2
OUT
ARC
FM
AM
12V
0.1A
IN
OUT
REMOTE
REMOTE
IN
The unit
(rear)
REMOTE OUT jack
Yamaha product
(such as a DVD player)
Remote input
FRONT
CE
AV 5
AUDIO 1
AUDIO 2
AV
OUT
AV 6
COMPONENT
VIDEO
VIDEO
MONITOR OUT
OUT
IN
REMOTE
TRIGGER OUT
AUDIO
OUT
ZONE 2
OUT
P
B
Y
P
R
HDMI 1
(BD/DVD)
HDMI 4
HDMI 5
HDMI
3
HDMI 2
ANTENNA
(RADIO)
HDMI
2
OUT
ARC
FM
AM
12V
0.1A
TRIGGER OUT
12V
0.1A
The unit (rear)
TRIGGER OUT jack
System connection
input
Yamaha subwoofer that
supports a system connection
1 2 3 4 5 6 7
Other connections
8 9 10

