background image

    U S B   U P D A T E

U P D A T E   S U C C E S S

  V E R I F Y I N G . . .

P L E A S E . . .

S x - x : x x %

P O W E R   O F F !

Fig. 1

Fig. 2

Fig. 2

 Operation 

Procedures

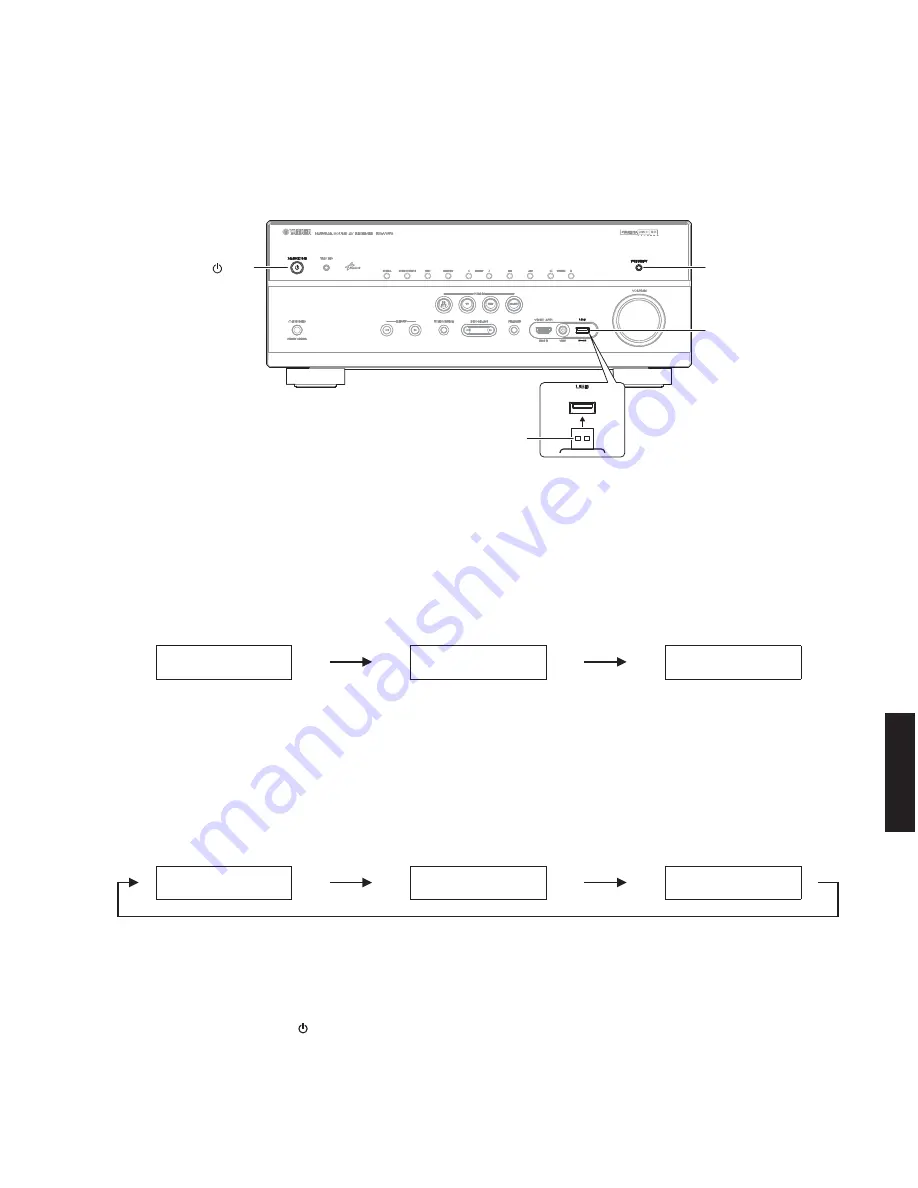
1.  Insert the USB storage device to the USB jack. (Fig. 1)

2.  While pressing the “PURE DIRECT” key, connect the power cable to the AC outlet. (Fig. 1)

3.  The USB UPDATE mode is activated and “USB UPDATE” is displayed. Writing of the firmware starts automatically.

(Fig. 2)

Writing is started.

Writing is completed.

Writing being executed.

4.  When writing of the firmware is completed, “UPDATE SUCCESS”, “PLEASE...” and “POWER OFF!” are displayed 

repeatedly. (Fig. 3)

5.  Press the “MAIN ZONE  ” key to turn off the power. (Fig. 1)

6.  Remove the USB storage device from the USB jack. (Fig. 1)

7.  Start up the self-diagnostic function and check that the firmware version and checksum are the same as written 

ones. (See “Confirmation of firmware version and checksum”)

"MAIN ZONE    " key

"PURE DIRECT" key

USB jack

USB storage device

25

RX-V673/HTR-6065/RX-A720

RX-V673/HTR-6065/

RX-A720

Содержание RX-V673

Страница 1: ...ancy appear to exist please contact the distributor s Service Division WARNING Static discharges can destroy expensive components Discharge any static electricity your body may have accumulated by gro...

Страница 2: ...be equivalent to 1500 ohms shunted by 0 15 F TO SERVICE PERSONNEL Leakage current must not exceed 0 5mA Be sure to test for leakage with the AC plug in both polarities WARNING CHEMICAL CONTENT NOTICE...

Страница 3: ...FRONT PANELS RX V673 U C R T K A B G F L S H models HTR 6065 A F models 3 RX V673 HTR 6065 RX A720 RX V673 HTR 6065 RX A720...

Страница 4: ...RX A720 U C A models 4 RX V673 HTR 6065 RX A720 RX V673 HTR 6065 RX A720...

Страница 5: ...REAR PANELS RX V673 U C models RX V673 R S models RX V673 T model 5 RX V673 HTR 6065 RX A720 RX V673 HTR 6065 RX A720...

Страница 6: ...RX V673 K model RX V673 A model RX V673 B G F models 6 RX V673 HTR 6065 RX A720 RX V673 HTR 6065 RX A720...

Страница 7: ...HTR 6065 A model RX V673 L H models HTR 6065 F model H model 7 RX V673 HTR 6065 RX A720 RX V673 HTR 6065 RX A720...

Страница 8: ...RX A720 A model RX A720 U C models 8 RX V673 HTR 6065 RX A720 RX V673 HTR 6065 RX A720...

Страница 9: ...REMOTE CONTROL PANEL RAV472 Remote control sheet T model 9 RX V673 HTR 6065 RX A720 RX V673 HTR 6065 RX A720...

Страница 10: ...ss Signal to Noise Ratio IHF A Network Input shorted 250 mV AV5 etc PURE DIRECT to SP OUT 100 dB or more Residual Noise IHF A Network FRONT L R to SP OUT 150 V or less Channel Separation 1 kHz 10 kHz...

Страница 11: ...HTR 6065 10 2 kg 22 5 lbs RX A720 10 7 kg 23 6 lbs Finish RX V673 T model Gold color U C R T K A B G F L S H models Black color R B G F L H models Titanium color HTR 6065 A F models Black color RX A7...

Страница 12: ...ized use is strictly prohibited Windows is a registered trademark of Microsoft Corporation in the United States and other countries RX V673 HTR 6065 RX A720 Front view Top view 435 17 1 8 150 5 7 8 21...

Страница 13: ...e The Bottom Line STEREO 2ch Stereo 7ch Stereo SUR DECODE SURROUND DECODER STRAIGHT Category Program Parameter Decode Type 1 DSP Level 6 to 3 dB 0 Initial Delay 1 to 99 ms Surround Initial Delay 1 to...

Страница 14: ...R Subwoofer Level Front L Front R Center Surround L Surround R 10 0 to 10 0 dB 0 0 dB 0 5 dB step Surround Back L Surround Back R Front Presence L Front Presence R Subwoofer Parametric EQ Manual YPAO...

Страница 15: ...S Server S Secondary x x x x Network Standby Off On MAC Address Filter Off On Filter MAC Address 1 5 xx xx xx xx xx xx 6 10 Network Name Input is possible to 15 characters Multi Zone Main Zone Set Zon...

Страница 16: ...s OPERATION 10 P C B R T K A B G F L S H models MAIN 1 P C B MAIN 6 P C B VIDEO 9 P C B R S models VIDEO 7 P C B VIDEO 6 P C B U C T K A B G F L H models POWER TRANSFORMER OPERATION 4 P C B OPERATION...

Страница 17: ...about 30 seconds per each C1082 C1085 on MAIN P C B C3706 on VIDEO 2 P C B For details refer to PRINTED CIRCUIT BOARDS RX A720 VIDEO 2 P C B VIDEO 3 P C B OPERATION 8 P C B MAIN 2 P C B DIGITAL 1 P C...

Страница 18: ...the top cover to remove it Fig 1 2 Removal of Front Panel Unit a Remove 6 screws and remove W4401 and W4421 Fig 1 b Remove CB8 CB82 CB458 CB472 CB947 and CB952 Fig 1 c Release 2 hooks and remove the f...

Страница 19: ...ear view Fig 3 Fig 2 3 Removal of DIGITAL 1 P C B a Remove screw and 7 screws Fig 3 b Remove 3 screws Fig 2 c Remove CB21 CB76 CB81 and CB942 Fig 2 d Unlock and remove CB78 CB79 and CB944 Fig 2 e Remo...

Страница 20: ...s Place the P C B s with rear panel upright Fig 4 Connect the heatsink and rear panel to the chassis with a ground lead Fig 4 Reconnect all cables connectors that have been disconnected When connecti...

Страница 21: ...crews and then remove the front panel unit Fig 1 c Remove 2 push rivets and then remove the side plate L and side plate R Fig 1 d Remove CB8 CB82 CB458 CB471 CB947 and CB952 Fig 1 e Remove 2 screws an...

Страница 22: ...ig 3 Fig 2 3 Removal of DIGITAL 1 P C B a Remove screw and 7 screws Fig 3 b Remove 3 screws Fig 2 c Remove CB21 CB76 CB81 and CB942 Fig 2 d Unlock and remove CB78 CB79 and CB944 Fig 2 e Remove the DIG...

Страница 23: ...P C B s Place the P C B s with rear panel upright Fig 4 Connect the heatsink and rear panel to the chassis with a ground lead Fig 4 Reconnect all cables connectors that have been disconnected When co...

Страница 24: ...ing the back up IC EEPROM IC82 on DIGITAL P C B After updating the firmware the back up IC MUST be initialized by the following procedure to store the setting information soundfield parameters system...

Страница 25: ...tically Fig 2 Writing is started Writing is completed Writing being executed 4 When writing of the firmware is completed UPDATE SUCCESS PLEASE and POWER OFF are displayed repeatedly Fig 3 5 Press the...

Страница 26: ...AUTO 2 INVALID ITEM Not for service 3 ARC1 4 INVALID ITEM Not for service 5 INVALID ITEM Not for service A4 SPEAKERS SET 1 BI AMP 2 ZONE TONE MAX 3 ZONE TONE MIN 4 INVALID ITEM Not for service 5 INVA...

Страница 27: ...BUS HIGH POWER N Network system N1 NETWORK 1 IP ADDRESS CHECK 2 MAC ADDRESS CHECK 3 LINE NOISE 100 MDI Not for service 4 LINE NOISE 100 MDIX Not for service 5 LINE NOISE 10 MDI Not for service 6 LINE...

Страница 28: ...ce 6 INVALID ITEM Not for service 7 HDMI REPEAT 8 DIGITAL CVBS 9 INVALID ITEM Not for service 10 DIGITAL COMPONENT 11 DIGITAL COMPONENT SC 12 GUI VIDEO OUT V3 TEST PATTERN 1 480i 2 480p 3 720p 60Hz 4...

Страница 29: ...L 2 DESTINATION 3 DEBUG Not for service 4 NET RESTART COUNTER Not for service S3 FACTORY PRESET 1 PRESET INHIBIT RESERVE S4 ROM VERSION CHECKSUM 1 SYSTEM VERSION 2 MICROPROCESSOR VERSION 3 MICROPROCES...

Страница 30: ...ys press the MAIN ZONE key to turn on the power and keep pressing those 2 keys and MAIN ZONE key for 3 seconds or longer The self diagnostic function mode is activated with the protection functions di...

Страница 31: ...ly be shut off 2 When the protection function worked to turn off the power The information of protection function which worked at that time is displayed Then A1 1 DSP MARGIN is displayed in a few seco...

Страница 32: ...unction to work in 5 seconds and the power supply will be shut off 2 2 When the protection function worked due to abnormal DC output Cause The voltage in the power supply section is abnormal Supplemen...

Страница 33: ...ink temperature History of protection function When the protection function has worked its history is stored in memory as backup data Even if no abnormality is noted while servicing the unit an abnorm...

Страница 34: ...IO1 Main menu A1 1 DSP MARGIN Speaker setting LARGE Bass out to SWFR All channels HDMI Control Off Zone 2 On When self diagnostic function is canceled these settings are restored to those before start...

Страница 35: ...tput including the head margin via DSP The audio signal other than SUBWOOFER is output without including the head margin via DSP A1 3 INVALID ITEM Not for service A 1 1 D S P M A R G I N A 1 2 D S P N...

Страница 36: ...2 DIRECT VL The analog input audio signal is output to FRONT L R in PURE DIRECT mode VL Voltage Low RY101 on MAIN P C B On A2 DIRECT AUDIO This menu is used to check audio signal route of PURE DIRECT...

Страница 37: ...3 5 INVALID ITEM Not for service A 3 1 H D M I A U T O A 3 2 I N V A L I D I T E M A 3 3 A R C 1 A 3 4 I N V A L I D I T E M A 3 5 I N V A L I D I T E M A3 HDMI AUDIO This menu is used to check the ro...

Страница 38: ...dio signal is output to FRONT L R CENTER and SURROUND L R terminals with the tone control BASS 6 dB TREBLE 6 dB A4 3 ZONE TONE MIN The audio signal is output to FRONT L R CENTER and SURROUND L R termi...

Страница 39: ...HECK The audio signal input to the YPAO MIC jack is output to FRONT L and FRONT R channels via A D D A A 5 1 8 o h m M U L T I C H A 5 2 6 o h m M U L T I C H A5 MULTI CHANNEL INPUT Not for service 39...

Страница 40: ...hannel A7 3 TEST CENTER The test tone is output to CENTER channel A7 4 TEST FRONT R The test tone is output to FRONT R channel A7 5 TEST SURROUND R The test tone is output to SURROUND R channel A7 6 T...

Страница 41: ...CE R channel A7 11 INVALID ITEM Not for service A7 12 INVALID ITEM Not for service A7 13 TEST LFE 1 SUBWOOFER The test tone is output to LFE 1 channel A7 14 INVALID ITEM Not for service A 7 1 0 T E S...

Страница 42: ...the above example the segments in the second row from the top are shorted D1 FL CHECK This menu is used to check operation of the FL display FL display D1 1 INITIAL DISPLAY D1 2 ALL SEGMENT OFF D1 3 A...

Страница 43: ...ce Z1 3 AV3 Not for service Z1 4 AV4 Not for service Z1 5 AV5 The audio signal input to AV5 jack is output to ZONE 2 OUT jack Z1 6 AV6 The audio signal input to AV6 jack is output to ZONE 2 OUT jack Z...

Страница 44: ...5V N 1 1 I P A D C H K O K OK Connected IP address obtained NG No traffic Disconnected N1 NETWORK This menu is used to check functions related to NETWORK Connect between LAN port of broadband router...

Страница 45: ...mission reception of the NETWORK jack is checked With the power turned off short the pins of the NETWORK jack as shown in the figure below Start up the self diagnostic function and select this menu Tr...

Страница 46: ...tic judgment result of sub menu C1 2 to C1 8 is displayed C1 4 I2C The I2C Inter integrated circuit bus line connection is checked C 1 4 0 0 0 0 0 Error detection of Front HDMI equalizer IC30 Error de...

Страница 47: ...U S O K C 1 8 E E P R O M O K OK No error detected NG An error is detected OK No error detected NG An error is detected C1 7 BUS DSP1 Communication and bus line connection between microprocessor IC83...

Страница 48: ...C952 and NETWORK microprocessor IC951 are checked OK No error detected NG An error is detected Checking C 2 1 A L L O K E x t J I G C 2 3 P H Y T E S T O K OK No error detected NG An error is detected...

Страница 49: ...A L O G B Y P A S S V1 2 INVALID ITEM Not for service V1 3 INVALID ITEM Not for service V 1 2 I N V A L I D I T E M V 1 3 I N V A L I D I T E M ANALOG BYPASS HDMI IN Component In Composite In HDMI OU...

Страница 50: ...V I D I N 4 8 0 i 6 0 MUTE CPNT_N_VMT MUTE VID_N_MMT MUTE CHECK HDMI IN Component In Composite In HDMI OUT Component Out Composite Out DIGITAL IC3 HDMI Receiver DIGITAL IC61 HDMI Transmitter DIGITAL I...

Страница 51: ...layed in a few seconds V 2 1 T E S T 1 O K IC53 128Mbit SDRAM IC61 HDMI TRANSMITTER Sii9136 3 IC21 VIDEO DECODER ADV7180BSTZ IC1 HDMI SWITCHER 1 Sii9589 3 IC2 HDMI SWITCHER 2 Sii9589 3 Front HDMI Boar...

Страница 52: ...w seconds V 2 2 T E S T 2 O K H D M I 1 V A U X Select the input source Result OK No error detected NG An error is detected Checking IC53 128Mbit SDRAM IC61 HDMI TRANSMITTER Sii9136 3 IC21 VIDEO DECOD...

Страница 53: ...NVALID ITEM Not for service V2 5 INVALID ITEM Not for service V2 6 INVALID ITEM Not for service V 2 4 I N V A L I D I T E M V 2 5 I N V A L I D I T E M V 2 6 I N V A L I D I T E M OK No error detected...

Страница 54: ...NSMITTER Sii9136 3 IC21 VIDEO DECODER ADV7180BSTZ IC1 HDMI SWITCHER 1 Sii9589 3 IC2 HDMI SWITCHER 2 Sii9589 3 Y CbCr Y C CVBS CB5 HDMI IN5 CB4 HDMI IN4 CB3 HDMI IN3 CB2 HDMI IN2 CB1 HDMI IN1 CB61 HDMI...

Страница 55: ...5 CB4 HDMI IN4 CB3 HDMI IN3 CB2 HDMI IN2 CB1 HDMI IN1 CB61 HDMI OUT1 IC50 FPGA EP4CE15F23C6N IC3 HDMI RECEIVER ADV7619 Front HDMI Board IC30 HDMI EQUALIZER TMDS261 CB30 HDMI IN Front V2 10 DIGITAL COM...

Страница 56: ...C21 VIDEO DECODER ADV7180BSTZ IC1 HDMI SWITCHER 1 Sii9589 3 IC2 HDMI SWITCHER 2 Sii9589 3 Y CbCr Y C CVBS CB5 HDMI IN5 CB4 HDMI IN4 CB3 HDMI IN3 CB2 HDMI IN2 CB1 HDMI IN1 CB61 HDMI OUT1 IC50 FPGA EP4C...

Страница 57: ...0p 60Hz 3D FP V3 17 1080i 50Hz 3D SS V3 21 4k 24Hz V3 2 480p V3 6 576i V3 10 1080p 50Hz V3 14 720p 50Hz 3D FP V3 18 720p 60Hz 3D TB V3 3 720p 60Hz V3 7 576p V3 11 1080p 24Hz V3 15 1080i 60Hz 3D FP V3...

Страница 58: ...e the protection function works to turn off the power P1 2 PS1 PS2 PS3 Power supply voltage PS protection detection The voltage at 2 pin PS1_PRT 1 pin PS2_PRT 13 pin PS3_PRT of IC78 are displayed Volt...

Страница 59: ...ence voltage 3 3 V 255 P 1 6 L M T C N T 2 5 5 P1 6 LIMITER CONTROL Power limitter control is detected The voltage at 4 pin AMP_LMT of IC83 is displayed Reference voltage 3 3 V 255 P 1 7 L 3 4 P1 7 L3...

Страница 60: ...orward key or SCENE NET reverse key on the remote control Reference voltage 3 3 V 255 P 1 8 K Y 2 5 4 2 5 5 Display KEY2 0 11 PURE DIRECT 12 32 TUNING 33 54 TUNING 55 77 AM 78 99 FM 100 121 PRESET 122...

Отзывы: