background image

13

SPEAKER SETUP

PRE

P

ARA

T

ION

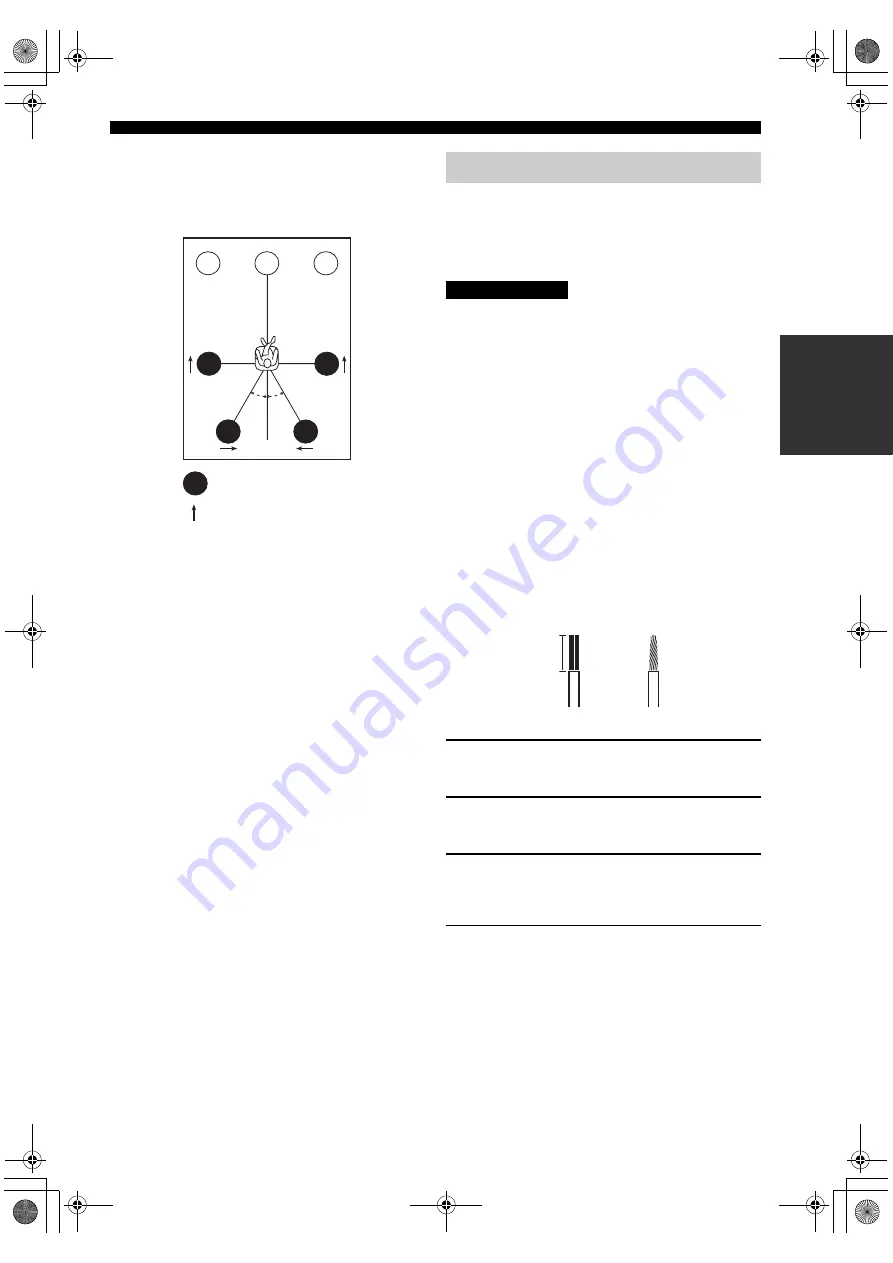
Di-pole speaker layout

Either di-pole or direct radiating speaker types can be used 
for THX surround. If you choose di-pole speakers, please 
place the surround and surround back speakers according 
to the speaker layout below.

Be sure to connect the left channel (L), right channel (R), 
“+” (red) and “–” (black) properly. If the connections are 
faulty, no sound will be heard from the speakers, and if the 
polarity of the speaker connections is incorrect, the sound 
will be unnatural and lack bass.

• If you will use 6 ohm speakers, be sure to set 

this unit’s speaker impedance setting to 
6 ohms before using (see page 25). If you will 
use 8 ohm speakers, use this unit’s initial 
setting for speaker impedance.

• Before connecting the speakers, make sure that this 

unit is disconnected from the power source.

• Do not let the bare speaker wires touch each other or do 

not let them touch any metal part of this unit. This 
could damage this unit and/or speakers.

• Use magnetically shielded speakers. If this type of 

speaker still creates interference with the monitor, 
place the speakers away from the monitor.

A speaker cord is actually a pair of insulated cables 
running side by side. One cable is colored or shaped 
differently, perhaps with a stripe, groove or ridges. 
Connect the striped (grooved, etc.) cable to the “+” (red) 
terminals on this unit and your speaker. Connect the plain 
cable to the “–” (black) terminals.

1

Remove approximately 10 mm (3/8 in) of 
insulation from each of the speaker cables.

2

Twist the exposed wires of the cable together 
to prevent short circuits.

3

Loosen the knob.

The supplied speaker terminal wrench is useful for 
loosening or tightening knobs.

4

Insert one bare wire into the hole in the side 
of each terminal.

FL

SR

SL

FR

C

SBR

SBL

30˚

30˚

:Di-pole speaker

:Direction of di-pole speaker

Speaker connections

CAUTION

10 mm (3/8 in)

1

2

00_RX-V2500U_EN.book  Page 13  Friday, August 20, 2004  5:20 PM

Содержание RX-V2500

Страница 1: ...BROISE CROIZAT BP70 CROISSY BEAUBOURG 77312 MARNE LA VALLEE CEDEX02 FRANCE YAMAHA ELECTRONICS UK LTD YAMAHA HOUSE 200 RICKMANSWORTH ROAD WATFORD HERTS WD18 7GQ ENGLAND YAMAHA SCANDINAVIA A B J A WETTERGRENS GATA 1 BOX 30053 400 43 VÄSTRA FRÖLUNDA SWEDEN YAMAHA MUSIC AUSTRALIA PTY LTD 17 33 MARKET ST SOUTH MELBOURNE 3205 VIC AUSTRALIA 2004 All rights reserved Printed in Malaysia WD64230 RX V2500 AV...

Страница 2: ...e of the type of power supply to your home consult your product dealer or local power company For products intended to operate from battery power or other sources refer to the operating instructions 12 Grounding or Polarization This product may be equipped with a polarized alternating current line plug a plug having one blade wider than the other This plug will fit into the power outlet only one w...

Страница 3: ...that provides guidelines for proper grounding and in particular specifies that the cable ground shall be connected to the grounding system of the building as close to the point of cable entry as practical FCC INFORMATION for US customers 1 IMPORTANT NOTICE DO NOT MODIFY THIS UNIT This product when installed as indicated in the instructions contained in this manual meets FCC requirements Modificati...

Страница 4: ...finish Use a clean dry cloth 12 Only voltage specified on this unit must be used Using this unit with a higher voltage than specified is dangerous and may cause fire damage to this unit and or personal injury YAMAHA will not be held responsible for any damage resulting from use of this unit with a voltage other than specified 13 To prevent damage by lightning disconnect the power cable from the wa...

Страница 5: ...ces 45 For music sources 48 ADVANCED OPERATIONS 49 Using the sleep timer 49 SYSTEM OPTIONS 50 Changing parameter settings 52 Input Select 53 Manual setup Sound 55 Manual setup Basic 58 Manual setup Option 62 System Memory 64 REMOTE CONTROL FEATURES 66 Control area 66 Setting remote control codes 67 Programming codes from other remote controls Learn 69 Changing source names in the display window 71...

Страница 6: ... U K Europe and Australia models only y indicates a tip for your operation Some operations can be performed by using either the buttons on the main unit or on the remote control In cases when the button names differ between the main unit and the remote control the button name on the remote control is given in parentheses This manual is printed prior to production Design and specifications are subj...

Страница 7: ...orrectly in accordance with your local regulations GETTING STARTED Supplied accessories CLEAR LEARN RE NAME MENU FREQ RDS EON MODE PTY SEEK START REC DISC SKIP EFFECT RETURN DISPLAY STRAIGHT NIGHT AUDIO PURE DIRECT ENTER TITLE A B C D E SELECT DTV DVR VCR2 VCR 1 DVD V AUX CBL SAT MD TAPE CD R PHONO TUNER CD MULTI CH IN VOL 3 4 2 1 9 0 10 ENT 5 6 7 8 POWER POWER POWER SYSTEM STANDBY AV TV SLEEP INP...

Страница 8: ...ning 8 TUNING MODE AUTO MAN L MONO Switches the tuning mode between automatic AUTO indicator on and manual AUTO indicator off 9 Remote control sensor Receives signals from the remote control 0 VOLUME Controls the output level of all audio channels This does not affect the REC OUT level A SPEAKERS A B Turn on or off the set of front speakers connected to the A and or B terminals on the rear panel a...

Страница 9: ...kers All Dolby Digital and DTS audio signals are mixed down to the front left and right channels I VIDEO AUX jacks Input audio and video signals from an external source such as a game console To reproduce source signals from these jacks select V AUX as the input source J ZONE ON OFF MAIN U S A Canada and Australia models only Turns the main unit on or to the standby mode see page 80 K ZONE ON OFF ...

Страница 10: ...programs or input numbers Use numbers 1 through 8 to select preset stations when this unit is in tuner mode B MEMORY 1 2 Use to recall favorite sound field programs YPAO settings or additional preset stations see page 65 C MACRO ON OFF Turns the macro function on and off D MACRO Use to program a series of operations for control by a single button see page 72 E STANDBY Sets this unit in the standby...

Страница 11: ...ctly from their respective speakers without effect processing S EXTD SUR Switches between 5 1 or 6 1 7 1 channel playback of multi channel software T SPEAKERS A B Turn on or off the set of front speakers connected to the A and or B terminals on the rear panel at each time the corresponding button is pressed U RE NAME Used to change the input source name in the display window see page 71 V CLEAR Us...

Страница 12: ...r a bath high temperature such as near a heater or stove extremely low temperature dusty places Using the remote control A SPEAKERS MULTI CH B INPUT MODE INPUT TONE CONTROL STRAIGHT EFFECT VOLUME PROGRAM INPUT STANDBY ON PURE DIRECT ZONE ON OFF MAIN ZONE 2 A B C D E SOURCE REMOTE REC OUT ZONE 2 FM AM EDIT PHONES S VIDEO VIDEO L VIDEO AUX AUDIO R OPTICAL MEMORY SILENT CINEMA MAN L AUTO FM AUTO MAN ...

Страница 13: ...hts up when headphones are connected E SP A B indicators Light up according to the set of front speakers selected Both indicators light up when both sets of speakers are selected or when bi wiring F SILENT CINEMA indicator Lights up when headphones are connected and a sound field program is selected see page 34 G Multi information display Shows the current sound field program name and other inform...

Страница 14: ...rround back speakers when using the Auto Setup setting page 26 or Speaker Level setting page 61 P ZONE 2 ZONE 3 indicators U S A Canada U K Europe and Australia models only Light up when Zone 2 or Zone 3 power is on Q RDS indicators U K and Europe models only The name s of the RDS data offered by the currently received RDS station light s up EON lights up when an RDS station that offers the EON da...

Страница 15: ... S A Canada U K Europe and Australia models only See page 78 for details C MULTI CH INPUT jacks See page 19 for connection information D PRE OUT jacks See page 22 for connection information E Speaker terminals See page 13 for connection information F PRESENCE ZONE 2 speaker terminals U S A Canada U K Europe and Australia models only PRESENCE speaker terminals other models See page 13 for connectio...

Страница 16: ... the listening position and at the same height as the surround speakers They should be positioned at least 30 cm 12 in apart Ideally they should be positioned at the same width as the front speakers Subwoofer The use of a subwoofer such as the YAMAHA Active Servo Processing Subwoofer System is effective not only for reinforcing bass frequencies from any or all channels but also for high fidelity r...

Страница 17: ...each other or do not let them touch any metal part of this unit This could damage this unit and or speakers Use magnetically shielded speakers If this type of speaker still creates interference with the monitor place the speakers away from the monitor A speaker cord is actually a pair of insulated cables running side by side One cable is colored or shaped differently perhaps with a stripe groove o...

Страница 18: ... knob and then insert the banana plug connector into the end of the corresponding terminal y You can also use banana plugs with the PRESENCE ZONE 2 and PRESENCE speaker terminals Open the tab then insert one banana plug connector into the hole of each terminal Do not attempt to close the tabs after connecting the banana plugs Red positive Black negative 5 4 3 Speaker terminal wrench 2 1 3 Banana p...

Страница 19: ...n connect both surround back and presence speakers to this unit but they do not output sound simultaneously You can set to prioritize either set of speakers in the Sound menu see page 57 The surround back speakers output the surround back channel included in Dolby Digital EX and DTS ES software and only operate when the Dolby Digital EX DTS ES or Dolby Pro Logic IIx decoder is turned on The presen...

Страница 20: ...P A and B light up on the front panel display CENTER terminals Connect a center speaker to these terminals SURROUND terminals Connect surround speakers to these terminals SUBWOOFER jack Connect a subwoofer with a built in amplifier such as the YAMAHA Active Servo Processing Subwoofer System to this jack SURROUND BACK terminals Connect surround back speakers to these terminals If you only connect o...

Страница 21: ... availability of input jacks on your monitor The signals input through the S VIDEO jacks on this unit are automatically converted for output through the VIDEO jacks When Video Conv is set to On see page 62 signals input through the VIDEO jacks can be output through the S VIDEO and COMPONENT VIDEO jacks Likewise signals input through the S VIDEO jacks can also be output through the COMPONENT VIDEO ...

Страница 22: ...onents DVD DVD MONITOR AUDIO VIDEO S VIDEO DVD VIDEO R L OUTPUT COMPONENT VIDEO PR MONITOR OUT PB Y DVD ZONE 3 C O L R DVD player Video monitor U S A model Optical out Video out Audio out Video in Coaxial out 00_RX V2500U_EN book Page 18 Friday August 20 2004 5 20 PM ...

Страница 23: ... INPUT as the input source this unit automatically turns off the digital sound field processor and you cannot select sound field programs This unit does not redirect signals input to the MULTI CH INPUT jacks to accommodate for missing speakers We recommend that you connect at least a 5 1 channel speaker system before using this feature When headphones are used only front L R channels are output No...

Страница 24: ...AL INPUT CBL SAT COAXIAL DVR VCR 2 COMPONENT VIDEO DTV DTV CBL SAT O L R L R L R C Cable TV or satellite tuner U S A model DVD recorder or VCR Audio out Video out Optical out Audio out Video out Video in Audio in Coaxial out S VIDEO VIDEO L AUDIO R OPTICAL VIDEO AUX O V S L R Game console or video camera Video out S video out Audio out L Audio out R Optical out 00_RX V2500U_EN book Page 20 Friday ...

Страница 25: ...al to reduce noise in the signal However you may hear less noise without the connection to the GND terminal for some record players Connecting audio components DIGITAL INPUT GND AUDIO R L IN PLAY IN PLAY OUT REC OUT REC CD R MD TAPE CD PHONO DIGITAL OUTPUT OPTICAL MD TAPE CD R CD CD O L R L R L R L R L R L R C O O CD player MD recorder or tape deck U S A model CD recorder Turntable Optical out Coa...

Страница 26: ...3 SUBWOOFER PRE OUT jack Connect a subwoofer with built in amplifier such as the YAMAHA Active Servo Processing Subwoofer System to this jack 4 SURROUND BACK PRESENCE PRE OUT jacks Surround back or presence channel line output jacks If you only connect one external amplifier for the surround back channel connect it to the left L jack 5 CENTER PRE OUT jack Center channel line output jack Each PRE O...

Страница 27: ...ality an outdoor antenna may improve the quality Consult the nearest authorized YAMAHA dealer or service center about outdoor antennas 75 ohm 300 ohm antenna adapter U K model only 1 Open the cover of the included 75 ohm 300 ohm antenna adapter 2 Cut the external sleeve of the 75 ohm coaxial cable and prepare it for connection 3 Cut the lead wire and remove it 4 Insert the cable wire into the slot...

Страница 28: ...on The maximum power total power consumption of components that can be connected to the AC OUTLETS S is Asia and General models 50 W Other models 100 W VOLTAGE SELECTOR Asia and General models only The VOLTAGE SELECTOR on the rear panel of this unit must be set for your local main voltage BEFORE plugging into the AC main supply Voltages are General model AC 110 120 220 230 240 V 50 60 Hz Asia mode...

Страница 29: ...on the video monitor connected to this unit Press STANDBY ON again STANDBY on the remote control to enter the standby mode Speaker impedance setting Note CAUTION STRAIGHT EFFECT STANDBY ON SP IMP 8 MIN Turning on the power Note VOLUME VIDEO AUX REC OUT ZONE 2 SPEAKERS INPUT MULTI CH INPUT INPUT MODE PRESET TUNING SOURCE REMOTE MD TAPE CD R TUNER CD DVD D TV CBL SAT VCR 1 VCR2 DVR A B C D E S VIDEO...

Страница 30: ...some channels or have a room with unique sonic characteristics YPAO equalizing calibration incorporates three parameters frequency level and Q factor for each of the seven bands in its parametric equalizer to provide highly precise automatic adjustment of frequency characteristics Level Checks and adjusts the sound level volume of each speaker 1 Connect the supplied optimizer microphone to the OPT...

Страница 31: ...ct Check To automatically check and adjust the selected item Skip To skip the selected item and perform no adjustments y When using THX speakers select Skip for Size and make sure that Small or Small x2 is selected in Speaker Set page 58 and that 80Hz THX is selected in Bass Cross Over page 60 Starting the setup CROSSOVER HIGH CUT MIN MAX Subwoofer VOLUME MIN MAX TOP TITLE Sound Option Basic Manua...

Страница 32: ...up Menu 8 Press n to select Setup Type then select Auto To automatically perform the entire auto setup procedure Step To pause for confirmation between each check in the auto setup procedure 9 Press n to select Start then press ENTER Loud test tones are output from each speaker and Measuring appears during the auto setup procedure To stop the auto setup procedure press one of the cursor buttons k ...

Страница 33: ...een and the results for each item are displayed Press n and select Setup to set the measured values Press k and select Retry to retry the auto setup procedure Press h and select Detail to view information about measurement results and warning messages For more details about warning messages see Troubleshooting for the auto setup procedure on page 30 Press l and select Exit to exit from the auto se...

Страница 34: ...nce speaker connections E04 SBR SBL Only the surround back right channel signal is detected Connect the surround back speaker to the LEFT SURROUND BACK SPEAKERS terminal if you only have one surround back speaker E05 Noisy Background noise is too loud Try auto setup in a quiet environment Turn off noisy electric equipment like air conditioners or move them away from this unit E06 Check Surr Surrou...

Страница 35: ...aker connections W2 Over Distance The distance between the speaker and the listening position is over 24 m 80 ft Bring the speaker closer to the listening position W3 Level Error The difference in volume level between the speakers is excessive No level correction is made Readjust the speaker installation Check the speaker connections Use speakers of similar quality Adjust the output volume of the ...

Страница 36: ...MODE VIDEO AUDIO OPTICAL L R STANDBY ON A B OPTIMIZER MIC TONE CONTROL PROGRAM STRAIGHT EFFECT PURE DIRECT SILENT CINEMA PHONES YP AO 1 4 7 6 3 ZONE ON OFF MAIN ZONE 2 MENU PURE DIRECT TITLE A B C D E SELECT DTV DVR VCR2 VCR 1 DVD V AUX CBL SAT MD TAPE CD R PHONO TUNER CD MULTI CH IN VOL POWER POWER POWER SYSTEM STANDBY AV TV SLEEP INPUT MODE A B CH TV VOL TV MUTE TV INPUT MUTE AMP SOURCE TV EXIT ...

Страница 37: ...10 ENT 5 6 7 8 1 2 B THX STANDARD SELECT EXTD SUR STEREO MUSIC ENTERTAIN MOVIE A SPEAKERS MEMORY Remote control Front panel or DialNorm 4dB Selecting sound field programs VOLUME VIDEO AUX REC OUT ZONE 2 SPEAKERS INPUT MULTI CH INPUT INPUT M MODE PRESET TUNING SOURCE REMOTE MD TAPE CD R TUNER CD DVD D TV CBL SAT VCR 1 VCR2 DVR A B C D E S VIDEO MEMORY FM AM EDIT PRESET TUNING MAN L AUTO FM AUTO MAN...

Страница 38: ...s the bass treble balance of your headphones see page 56 To mute the sound Press MUTE on the remote control The MUTE indicator flashes on the front panel display To resume the audio output press MUTE again or press VOL The MUTE indicator disappears from the display y You can adjust the muting level see page 57 To listen with headphones SILENT CINEMA SILENT CINEMA allows you to enjoy multi channel ...

Страница 39: ...IxMusic For playing back Dolby Digital or DTS signals in 6 1 7 1 channels using the Pro Logic IIx music decoder EX ES For playing back Dolby Digital signals in 6 1 7 1 channels using the Dolby Digital EX decoder DTS signals are played back in 6 1 7 1 channels using the DTS ES decoder EX For playing back Dolby Digital or DTS signals in 6 1 7 1 channels using the Dolby Digital EX decoder Off OFF For...

Страница 40: ...ftware PLIIx Movie Dolby Pro Logic IIx processing for movie software PLIIx Music Dolby Pro Logic IIx processing for music software PLIIx Game Dolby Pro Logic IIx processing for game software Neo 6 Cinema DTS processing for movie software Neo 6 Music DTS processing for music software When you select the SUR ENHANCED MOVIE THEATER or THX program PRO LOGIC Dolby Pro Logic processing for any sources P...

Страница 41: ...dby mode Night listening modes The night listening modes are designed to improve listenability at lower volumes or at night Choose either NIGHT CINEMA or NIGHT MUSIC depending on the type of material you are playing Press NIGHT on the remote control repeatedly to select cinema or music When night listening is selected the NIGHT indicator in the front panel display lights up Select NIGHT CINEMA whe...

Страница 42: ...ect a CINEMA DSP sound field program Virtual CINEMA DSP will not activate even when Surround is set to None see page 59 in the following cases When MULTI CH INPUT is selected as the input source When headphones are connected to the PHONES jack Playing video sources in the background You can combine images from a video source with sound from an audio source For example you can enjoy listening to cl...

Страница 43: ...put signal 1 Press TOP on the remote control 2 Press n repeatedly to select Audio Info The following information appears on display Format Signal format display When the unit cannot detect a digital signal it automatically switches to analog input Sampling Sampling frequency When the unit is unable to detect the sampling frequency appears Channel Number of source channels in the input signal For e...

Страница 44: ...steps 1 and 2 as described in Automatic tuning 2 Press TUNING MODE AUTO MAN L MONO so that the AUTO indicator disappears from the front panel display If a colon appears in the front panel display this unit is in PRESET mode and tuning is not possible Press PRESET TUNING EDIT to turn it off 3 Press PRESET TUNING l h to tune into the desired station manually Hold down the button to continue searchin...

Страница 45: ...ting stations Automatic preset tuning options You can select the preset number from which this unit will store FM stations and or begin tuning toward lower frequencies After pressing MEMORY in step 3 1 Press A B C D E then PRESET TUNING l h to select the preset number under which the first station will be stored Automatic preset tuning will stop when stations have all been stored up to E8 2 Press ...

Страница 46: ...existing under a preset number is cleared when you store a new station under that preset number The reception mode stereo or monaural is stored along with the station frequency VOLUME VIDEO AUX REC OUT ZONE 2 SPEAKERS INPUT MULTI CH INPUT INPUT MODE PRESET TUNING SOURCE REMOTE MD TAPE CD R TUNER CD DVD D TV CBL SAT VCR 1 VCR2 DVR A B C D E S VIDEO MEMORY FM AM EDIT PRESET TUNING MAN L AUTO FM AUTO...

Страница 47: ...tions VOLUME VIDEO AUX REC OUT ZONE 2 SPEAKERS INPUT MULTI CH INPUT INPUT MODE PRESET TUNING SOURCE REMOTE MD TAPE CD R TUNER CD DVD D TV CBL SAT VCR 1 VCR2 DVR A B C D E S VIDEO MEMORY FM AM EDIT PRESET TUNING MAN L AUTO FM AUTO MAN L MONO TUNING MODE VIDEO AUDIO OPTICAL L R STANDBY ON A B OPTIMIZER MIC TONE CONTROL PROGRAM STRAIGHT EFFECT PURE DIRECT ZONE ON OFF MAIN ZONE 2 SILENT CINEMA PHONES ...

Страница 48: ... signal you can record only an S video or only a composite video signal to your VCR Digital signals input to the DIGITAL INPUT jacks are not output to the analog AUDIO OUT L R jacks for recording Likewise analog signals input to the AUDIO IN L R jacks are not output to the DIGITAL OUTPUT jack Therefore if your source component is connected to provide only digital or analog signals you can only rec...

Страница 49: ...arge concert hall This effect enhances the experience of watching various TV programs such as news variety shows music programs or sports programs ENTERTAINMENT Mono Movie This program is provided for reproducing monaural video sources such as old movies The program produces the optimum reverberation to create sound depth using only the presence sound field ENTERTAINMENT Game This program adds a d...

Страница 50: ...essing for DTS and 96 kHz 24 bit DTS sources DTS 96 24 SUR STANDARD Standard 5 1 channel processing for 96kHz 24 bit DTS sources DTS PLIIx Movie SUR STANDARD Standard 7 1 channel processing Dolby Pro Logic IIx for DTS sources DTS PLIIx Movie SUR ENHANCED CINEMA DSP enhanced 7 1 channel processing Dolby Pro Logic IIx for DTS sources DTS DOLBY EX SUR STANDARD Standard 6 1 channel processing Dolby Di...

Страница 51: ...IIx for movie software PLII Movie SUR STANDARD Dolby Pro Logic II processing for movie software PLII Movie SUR ENHANCED CINEMA DSP enhanced precessing Dolby Pro Logic II for movie software PLIIx Game SUR STANDARD Dolby Pro Logic IIx processing for game software PLII Game SUR STANDARD Dolby Pro Logic II processing for game software Neo 6 Cinema SUR STANDARD DTS processing for movie software Neo 6 C...

Страница 52: ...d vibrant sound MUSIC The Roxy Thtr HiFi DSP processing The ideal program for lively dynamic rock music The data for this program was recorded at LA s hottest rock club The listener s virtual seat is at the center left of the hall MUSIC Pop Rock CINEMA DSP processing This program produces a vibrant atmosphere and lets you feel as if you are at an actual jazz or rock concert MUSIC Classic Opera CIN...

Страница 53: ...ns to the selected sound field program Canceling the sleep timer Press SLEEP repeatedly until SLEEP OFF appears on the front panel display After a few seconds SLEEP OFF disappears and the SLEEP indicator goes off y The sleep timer setting can also be canceled by pressing STANDBY on the remote control or STANDBY ON on the front panel to set this unit to the standby mode ADVANCED OPERATIONS Using th...

Страница 54: ... the output volume of each jack 53 Rename Changes the name of the input 54 Multi CH Assign Selects the number of audio channels input through the MULTI CH INPUT jacks 54 Item Features Page LFE Level Adjusts the output level of the LFE channel for Dolby Digital or DTS signals 55 Dynamic Range Adjusts the dynamic range for Dolby Digital or DTS signals 55 Parametric EQ Adjusts the tonal quality of ea...

Страница 55: ...ttings see page 64 Audio Info Audio signal information Use to check audio signal information see page 39 Item Features Page Display Adjusts the GUI and front panel displays 62 Multi Zone Customizes the Zone 2 Zone 3 and Zone B settings 63 Surr Initialize Initializes the parameters of all or a group of sound field programs 63 Input Mode Selects the initial input mode of the source 64 Memory Guard L...

Страница 56: ...Guard to Free see page 64 Changing parameter settings EXIT MENU EFFECT RETURN DISPLAY STRAIGHT NIGHT AUDIO PURE DIRECT ENTER TOP TITLE A B C D E VOL CH TV VOL TV MUTE TV INPUT MUTE AMP SOURCE TV 2 1 3 5 6 Center Surround Front Speaker Set Speaker Distance Speaker Level Test Tone None Large Small Surround Surround Back Presence Center Front Notes Memory back up The memory back up circuit prevents t...

Страница 57: ... 2 To clear a jack assignment 1 Select Input Select then select the input source DVD etc 2 Select I O Assignment then select the jack assignment Optical Output Optical Input Coaxial Input or Component Video 3 Select NONE then press ENTER to clear the assignment y This menu item is also available in the front panel display system options menu see page 82 You cannot select a specific item more than ...

Страница 58: ... 82 Multi CH Assign Multi channel assignment Use this feature to set the direction of the signals input into the center subwoofer and surround channels when a source component is connected to the MULTI CH INPUT jacks If you are inputting 8 channel signals from an external decoder use this feature to select jacks for the additional front signals Input Select MULTI CH Multi CH Assign Input Channels ...

Страница 59: ...t panel display system options menu see page 82 Depending on the settings of LFE Level some signals may not be output from the SUBWOOFER jack Dynamic Range Dynamic range Use to select the amount of dynamic range compression to be applied to your speakers and headphones This setting is effective only when the unit is decoding Dolby Digital and DTS signals To access these parameters select Manual Se...

Страница 60: ...ow The parameter selected in PARAM is highlighted Press l h to adjust the parameter Press k n to adjust the Gain Press ENTER to exit the edit window 5 Repeat steps 3 and 4 until you are satisfied with the results y If you want to reset all PEQ parameter settings for the selected speaker select RESET and press ENTER 6 Select EXIT and press ENTER to exit the settings window y If you select Band in s...

Страница 61: ...hronize it with the video image This may be necessary when using certain LCD monitors or projectors Choices 0 to 240 ms y This menu item is also available in the front panel display system options menu see page 82 PR SB Select Presence speakers surround back speakers select Surround back and presence speakers do not output sound simultaneously You can select to prioritize either speaker set when p...

Страница 62: ...ually adjust any speaker setting Manual Setup Basic Speaker Set y If you are not satisfied with the bass sounds from your speakers you can change these settings according to your preference Set any THX speakers to Small Front Front speakers Choices Large Small Select Large if you have large front speakers The unit directs the entire range of the front left and right channel signals to the front le...

Страница 63: ...hannel signal to the surround back left speaker Select Small x1 if you have a small surround back speaker The low frequency signals of the surround back channel are directed to the speakers selected with Bass Out and the rest of the frequency signals are directed to the surround back left speaker Select Small x2 if you have two small surround back speakers The low frequency signals of the surround...

Страница 64: ...ts all LFE and low frequency signals in accordance with other speaker settings Select Front if you have not connected a subwoofer The unit directs all low frequency and LFE signals to the front speakers even if you have previously set Front to Small in Speaker Set Bass Cross Over Bass cross over Use this feature to select a cross over cut off frequency for all low frequency signals All frequencies...

Страница 65: ...akers set to None in Speaker Set If you are only using one surround back speaker connect it to the SURROUND BACK SINGLE jack and adjust the distance in Surround Back L Speaker Level Speaker level Use these settings to manually balance the speaker levels between the front left speakers and each speaker selected in Speaker Set see page 58 Manual Setup Basic Speaker Level Choices 10 0 dB to 10 0 dB I...

Страница 66: ... video or S video signals from a VCR to component video signals the picture quality may suffer depending on your VCR Short Message Short message Use this feature to turn on off the short message display Choices Off On Select Off to turn off the short message display Select On to turn on the short message display The short message display may not display properly depending on the type of input sign...

Страница 67: ...te with regard to the ZONE 2 OUTPUT jacks When Zone2 Amplifier is set to Internal this feature is automatically set to Variable Choices Fixed Variable Select Fixed to fix the ZONE 2 OUTPUT volume level to a standard line level Select Variable to adjust the ZONE 2 OUTPUT volume simultaneously using VOL on the remote control Zone3 Volume Zone 3 volume Use to select how the volume control will operat...

Страница 68: ...u see page 82 In general front panel and remote control operations are not affected by Guard functions However you cannot adjust the tone control using TONE CONTROL This feature allows you to save up to six of your favorite settings that can be easily recalled when needed You can save settings such as the following Sound field program parameters Speaker settings Speaker channel settings LFE level ...

Страница 69: ...gs can be recalled simply by pressing MEMORY 1 2 on the remote control When you press MEMORY 1 the message Load Memory 1 Yes Press Again appears in the front panel display Press MEMORY 1 once more to recall the settings When you press MEMORY 2 the message Load Memory 2 Yes Press Again appears in the front panel display Press MEMORY 2 once more to recall the settings AMP SOURCE TV The Bottom Line S...

Страница 70: ...X TEST RETURN ON SCREEN DISPLAY STRAIGHT NIGHT AUDIO PURE DIRECT ENTER LEVEL TITLE A B C D E SELECT DTV DVR VCR2 VCR 1 DVD V AUX CBL SAT MD TAPE CD R PHONO TUNER CD MULTI CH IN THX SURROUND SUR BACK ENTERTAIN MUSIC TV THTR MOVIE STEREO HALL JAZZ ROCK VOL 3 4 2 1 9 0 10 ENT 5 6 7 8 POWER POWER POWER SYSTEM STANDBY AV TV SLEEP INPUT MODE A B CH TV VOL TV MUTE TV INPUT MUTE AMP SOURCE TV MACRO ON OFF...

Страница 71: ...able shows the default component Library component category and the remote control code for each input area Remote Control Code Default Settings Additional YAMAHA codes available are given in parentheses You may not be able to operate your YAMAHA component even if a YAMAHA remote control code is preset as listed above In this case try setting another YAMAHA remote control code 1 Set AMP SOURCE TV ...

Страница 72: ...the other components simultaneously with the default code setting In this case set one of the alternative codes to operate this unit separately 4 Press ENTER The four digit code set for the selected component appears in the display window 0000 appears in the display window if no code has been set 5 Press the numeric buttons to enter the four digit remote control code for the component you want to ...

Страница 73: ...he Learn feature if you want to program functions not included in the basic operations covered by remote control codes or an appropriate remote control code is not available You can program any of the buttons available in the component control area see page 66 The buttons can be programmed independently for each component This remote control transmits infrared beams If the other remote control als...

Страница 74: ...button not indicated in the respective step or when you press more than one button simultaneously This remote control can learn approximately 200 functions However depending on the signals learned FULL may appear in the display before you program 200 functions In this case clear unnecessary programmed functions to make room for further learning Learning may not be possible in the following cases W...

Страница 75: ...o Z 1 to 9 0 plus hyphen semicolon slash and space Pressing k changes the characters in reverse order 5 Press l h to move the cursor to the next position 6 Press ENTER to set the new name OK appears in the display window if renaming was successful NG appears in the display window if renaming was unsuccessful In this case start over from step 4 y If you continuously want to rename another component...

Страница 76: ...tions for the connected component 2 Playback can be started for any YAMAHA remote control compatible MD recorder CD player CD recorder DVD player or DVD recorder When using macros to operate other components you will need to program the play button on the control area of that component see page 69 or set a remote control code see page 67 3 When TUNER is selected as the input source this unit plays...

Страница 77: ...he programmed macro is cleared It is not possible to add a new signal macro step to the default macro Programming a macro changes all macro contents 1 Set AMP SOURCE TV to AMP or SOURCE 2 Press MACRO using a ballpoint pen or similar object MCR appears in the display window If you do not complete each of the following steps within 30 seconds the macro programming mode will be automatically canceled...

Страница 78: ... input selector button to select the component L AMP Clears all learned functions for this unit s control area L ALL Clears all learned functions M ALL Clears all programmed macros RNAME Clears all renamed source names FCTRY Clears all remote functions and returns the remote to the factory settings 4 Press and hold CLEAR again for about 3 seconds WAIT appears in the display window If clearing was ...

Страница 79: ...ning the function you want to clear The selected component name appears in the display window 3 Press LEARN using a ballpoint pen or similar object LEARN and the selected component name ex DVD appear alternately in the display window Do not press and hold LEARN If you hold it down for more than 3 seconds the remote control enters the remote control code setting mode If you do not complete each of ...

Страница 80: ...play window If you do not complete each of the following steps within 30 seconds the macro programming mode will be automatically canceled In this case press MACRO again 3 Press and hold CLEAR using a ballpoint pen or similar object then press the macro button you want to clear for about 3 seconds C OK appears in the display window if clearing was successful y If you continuously want to clear ano...

Страница 81: ... Mute TV mute 2 TV mute 2 TV mute 2 TV mute 2 TV mute 2 4 TITLE Title Title Title Title 5 MENU Menu Menu Menu 6 ENTER Menu enter Menu select Menu select k Menu up Menu up Menu up n Menu down Menu down Menu down l Menu left Menu left Menu left h Menu right Menu right Menu right 7 RETURN Return Return Return Return 8 1 9 0 10 Numeric buttons Numeric buttons Numeric buttons Numeric buttons Numeric bu...

Страница 82: ...onnect directly to the CONTROL OUT jack on this unit If you own these products you may not need to use an infrared emitter Up to six YAMAHA components can be connected as shown System configuration and connections example Using external amplifiers To use an external amplifier in Zone 2 select External in Zone2 Amplifier page 63 When not using the main room turn down the volume of this unit in the ...

Страница 83: ...T ZONE 2 on the front panel to SOURCE REMOTE 2 Repeat steps 1 through 3 of the procedure in Setting remote control codes on page 67 3 Press l h to select L AMP 4 Press ENTER 2000 appears in the display window 5 Enter the code number 2001 or 2003 For details see page 68 6 Press ENTER to set the number OK appears in the display window if setting was successful 7 Press LEARN to complete the Zone setu...

Страница 84: ...and Zone 3 to on standby simultaneously MAIN appears for a few seconds when SYSTEM POWER or STANDBY is pressed Special considerations for DTS software The DTS signal is a digital bitstream If you attempt to send the DTS signal to the second third room you will only hear digital noise that may damage your speakers Thus the following considerations and adjustments need to be made when playing DTS en...

Страница 85: ...s unit s parameters to the initial factory settings with the exception of System Memory and Auto Setup settings Choices CANCEL RESET Select CANCEL if you do not want to reset this unit s parameters Select RESET to reset this unit s parameters REMOTE Remote control ID Use to set this unit s ID for remote control recognition see page 68 Choices ID1 ID2 Select ID1 when the remote control amplifier li...

Страница 86: ...y If you want to adjust another parameter press RETURN to return to the previously selected menu item AUTO SETUP Front panel display system options menu EXIT MENU EFFECT RETURN DISPLAY STRAIGHT NIGHT AUDIO PURE DIRECT ENTER TOP TITLE A B C D E VOL CH TV VOL TV MUTE TV INPUT MUTE AMP SOURCE TV 2 6 1 3 5 Item Sub items Features SETUP AUTO RELOAD Use to specify the speaker parameters auto setup adjus...

Страница 87: ...3 0m CENTER 3 0m SURR L 3 0m SURR R 3 0m SB L 2 1m SB R 2 1m SWFR 3 0m PRES L 3 0m PRES R 3 0m FRONT L 10 0 FRONT R 10 0 CENTER 10 0 SURR L 10 0 SURR R 10 0 SB L 7 0 SB R 7 0 SWFR 10 0 PRES L 10 0 PRES R 10 0 Adjusts the delay time of each speaker Corresponds to Speaker Distance in the GUI menu see page 61 C SP LEVEL FR C FL SL SBL SBR SR SWFR PR R PR L Adjusts the output level of each speaker Cor...

Страница 88: ...in the GUI menu see page 57 Item Sub items Features A I O ASSIGN C V A DVD C V B DTV C V C CBL SAT OUT 1 MD TAPE OUT 2 CD R IN 3 CD IN 4 DVD IN 5 DTV IN 6 CBL SAT IN 7 CD IN 8 DVD IN 9 DVR VCR2 Assigns jacks according to the component to be used Corresponds to I O assignment in the GUI menu see page 53 B INPUT TRIM PHONO 0 Adjusts the output volume of each jack Corresponds to Volume Trim in the GU...

Страница 89: ...rameters of all or a group of sound field programs Corresponds to Surr Initialize in the GUI menu see page 63 D ZONE SET SP B MAIN Customizes the Zone B parameters Corresponds to Multi Zone in the GUI menu see page 63 E ZONE2 SET OUT VOL VAR ZONE2 AMP EXT Customizes the Zone 2 parameters U S A Canada U K Europe and Australia models only Corresponds to Multi Zone in the GUI menu see page 63 F ZONE3...

Страница 90: ... listening environment The acoustics in your room could be changed to those of a concert hall a dance floor or virtually any size room at all This ability to create sound fields at will is exactly what YAMAHA has done with the digital sound field processor You can enjoy good quality sound with the factory preset parameters Although you do not have to change the initial settings you can change some...

Страница 91: ...ource The larger the value the farther it seems For a small room set to a small value For a large room set to a large value Control range 1 99 ms Room Size Room size Function This parameter adjusts the apparent size of the surround sound field The larger the value the larger the surround sound field becomes Description As the sound is repeatedly reflected around a room the larger the hall is the l...

Страница 92: ...wo front channels and two surround channels are used Control Range 1 49 ms Sur Room Size Surround room size Function This parameter adjusts the apparent size of the surround sound field Control Range 0 1 2 0 Sur Liveness Surround liveness Function This parameter adjusts the apparent reflectivity of the virtual walls in the surround sound field Control Range 0 10 SB Init Delay Surround back initial...

Страница 93: ...und and the beginning of the reverberation sound Description The larger the value the later the reverberation sound begins A later reverberation sound makes you feel like you are in a larger acoustic environment Control Range 0 250 ms Rev Level Reverberation level Function This parameter adjusts the volume of the reverberation sound Description The larger the value the stronger the reverberation b...

Страница 94: ... PLIIx Music and PLII Music Panorama Function Extends the front stereo image to include the surround speakers for a wraparound effect Choices Off On initial setting is Off Dimension Function Gradually adjusts the sound field either towards the front or towards the rear Control range 3 towards the rear to 3 towards the front initial setting is STD standard Center Width Function Adjusts the center i...

Страница 95: ...el sources using THX Cinema Choices Pro Logic Pro Logic II Pro Logic IIx Neo 6 For SURROUND Standard Function Selects the decoder used to playback 2 channel sources using SURROUND Standard Choices Pro Logic PLII Movie PLII Music PLII Game PLIIx Movie PLIIx Music PLIIx Game Neo 6 Cinema Neo 6 Music For SURROUND Enhanced Function Selects the decoder used to playback 2 channel sources using SURROUND ...

Страница 96: ...he power cable plug it back in after 30 seconds then use it normally No sound Incorrect input or output cable connections Connect the cables properly If the problem persists the cables may be defective 17 22 The optimizer microphone is connected Disconnect the optimizer microphone The input mode is set to DTS or ANALOG Set the input mode to AUTO 39 No appropriate input source has been selected Sel...

Страница 97: ...el of the center speaker is set to minimum Raise the level of the center speaker 61 Center is set to None in Speaker Set Select the appropriate setting for the center speaker 58 One of the HiFi DSP programs except for 7ch Stereo has been selected Try another sound field program 33 No sound from the surround speakers The output level of the surround speakers is set to minimum Raise the output level...

Страница 98: ...t s DIGITAL INPUT jacks Connect the source component to the DIGITAL INPUT jacks 17 21 Some components cannot record the Dolby Digital or DTS sources A source cannot be recorded by an analog component connected to the AUDIO OUT jacks The source component is not connected to this unit s analog AUDIO IN jacks Connect the source component to the analog AUDIO IN jacks 17 21 The sound field parameters a...

Страница 99: ...gh quality directional FM antenna 23 Use the manual tuning method 40 Previously preset stations can no longer be tuned in This unit has been disconnected for a long period Preset the stations again 41 AM The desired station cannot be tuned in with the automatic tuning method The signal is weak or the antenna connections are loose Tighten the AM loop antenna connections and orient it for best recep...

Страница 100: ...t to the TV position The remote control code was not correctly set Set the remote control code correctly 67 Try setting another code of the same manufacturer 67 Even if the remote control code is correctly set there are some models that do not respond to the remote control Program the necessary functions independently into the programmable buttons using the Learn feature 69 The remote control does...

Страница 101: ... a 4 channel analog recording system to reproduce realistic and dynamic sound effects 2 front left and right channels stereo a center channel for dialog monaural and a surround channel for special sound effects monaural The surround channel reproduces sound within a narrow frequency range Dolby Surround is widely used with nearly all video tapes and laser discs and in many TV and cable broadcasts ...

Страница 102: ...here are differences in the sound heard Based on a wealth of actually measured data YAMAHA CINEMA DSP uses YAMAHA original sound field technology to combine Dolby Pro Logic Dolby Digital and DTS systems to provide the visual and audio experience of a movie theater in the listening room of your own home SILENT CINEMA YAMAHA has developed a natural realistic sound effect DSP algorithm for headphones...

Страница 103: ...nd is not changed for playback in a small home theatre environment THX engineers developed patented technologies to accurately translate the sound from the movie theatre environment into the home correcting the tonal and spatial errors that occur On this product when the THX indicator is on THX features are automatically added in Cinema modes e g THX Cinema THX Surround EX Adaptive decorrelation I...

Страница 104: ...chnology can be found at www thx com Only receiver and controller products bearing the THX Surround EX logo when in the THX Surround EX mode faithfully reproduce this new technology in the home This product may also engage the THX Surround EX mode during the playback of 5 1 channel material that is not Dolby Digital Surround EX encoded In such cases the information delivered to the Surround Back c...

Страница 105: ...requency band is referred to as the Q factor This parameter is adjustable between the values 0 5 and 10 YPAO adjusts frequency characteristics to suit your listening requirements using a combination of the above three parameters Frequency Gain and Q factor for each equalizer band in this unit s parametric equalizer This unit has 7 equalizer bands for each channel The use of multiple equalizer band...

Страница 106: ... 3 OUTPUT U S A Canada U K Europe and Australia models 1 0 V 1 2 kΩ VIDEO SECTION Video Signal Type PAL NTSC Signal to Noise Ratio 60 dB Frequency Response MONITOR OUT Composite S video 5 Hz to 10 MHz 3 dB Component 5 Hz to 60 MHz 3 dB FM SECTION Tuning Range U S A and Canada models 87 5 to 107 9 MHz Asia and General model 87 5 87 50 to 108 0 108 00 MHz Other models 87 50 to 108 00 MHz Usable Sens...

Страница 107: ...IMUS 0027 0059 0064 0206 0332 PANASONIC 0056 PHILIPS 0184 PIONEER 0059 0332 POLK AUDIO 0184 PROTON 0184 QED 0184 QUAD 0184 QUASAR 0056 RCA 0059 0206 0332 REALISTIC 0206 REVOX 0184 ROTEL 0184 SAE 0184 SANSUI 0184 0332 SANYO 0206 SCOTT 0332 SEARS 0332 SHARP 0064 SIMAUDIO 0184 SONIC FRONTIERS 0184 SONY 0027 SYMPHONIC 0332 TAG MCLAREN 0184 TANDY 0059 TECHNICS 0056 THORENS 0184 THULE 0184 UNIVERSUM 018...

Страница 108: ...LABGEAR 1323 LOGIX 1044 LORENZEN 0326 MAGNAVOX 0749 0751 MANHATTAN 0482 1044 1110 MARANTZ 0227 MEDIASAT 0880 MEMOREX 0751 METRONIC 0111 MITSUBISHI 0776 MOTOROLA 0896 MYRYAD 0227 NEXT LEVEL 0896 NOKIA 0482 0750 0778 1154 1250 1750 OCTALTV 1032 ORBITECH 1127 PACE 0482 0874 1202 1350 PANASONIC 0274 0728 0874 1347 PANDA 0482 PAYSAT 0751 PHILIPS 0160 0227 0482 0749 0751 0776 0880 1103 1169 1776 PIONEER...

Страница 109: ... 0081 0181 0183 0205 LEYCO 0064 0291 LIESENK TTER 0064 LOEWE 0539 LUXOR 0383 0388 M ELECTRONIC 0036 0064 0131 0132 0136 0190 0314 0373 0401 0507 MGA 0057 0177 0205 MTC 0057 0087 0539 MAGNADYNE 0274 0543 MAGNAFON 0543 MAGNAVOX 0057 0081 1281 1481 MANESTH 0291 0347 MARANTZ 0057 0064 0081 0583 MARK 0064 MATSUI 0036 0064 0235 0398 0514 0543 MATSUSHITA 0277 0677 MEDIATOR 0064 MEDION 0695 0835 1064 MEGA...

Страница 110: ...5 0379 CCE 0099 0305 CGE 0027 CALIX 0064 CANON 0062 CARVER 0108 CIMLINE 0099 CINERAL 0305 CITIZEN 0064 0305 1305 COLT 0099 COMBITECH 0379 CRAIG 0064 0074 0099 0267 CROWN 0099 0305 CURTIS MATHES 0062 0068 0087 1062 CYBERNEX 0267 CYRUS 0108 DAEWOO 0072 0131 0305 0669 1305 DANSAI 0099 DE GRAAF 0069 DECCA 0027 0108 DENON 0069 DUAL 0068 DUMONT 0027 0108 0131 DYNATECH 0027 ESC 0267 0305 ELCATECH 0099 EL...

Страница 111: ...0834 SHINTOM 0099 0131 SIEMENS 0064 0108 0131 SILVA 0064 SINGER 0072 0099 SINUDYNE 0108 SONIC BLUE 0641 0643 SONTEC 0064 SONY 0027 0059 0060 0062 0663 1259 SUNKAI 0375 SUNSTAR 0027 SUNTRONIC 0027 SYLVANIA 0027 0062 0108 0070 1808 SYMPHONIC 0027 TMK 0267 TANDY 0027 0131 TASHIKO 0027 0064 TATUNG 0027 0068 0072 0094 0108 TEAC 0027 0068 0305 0334 0669 TECHNICS 0062 0253 TECO 0062 0064 0068 0075 TEKNIK...

Страница 112: ...BROISE CROIZAT BP70 CROISSY BEAUBOURG 77312 MARNE LA VALLEE CEDEX02 FRANCE YAMAHA ELECTRONICS UK LTD YAMAHA HOUSE 200 RICKMANSWORTH ROAD WATFORD HERTS WD18 7GQ ENGLAND YAMAHA SCANDINAVIA A B J A WETTERGRENS GATA 1 BOX 30053 400 43 VÄSTRA FRÖLUNDA SWEDEN YAMAHA MUSIC AUSTRALIA PTY LTD 17 33 MARKET ST SOUTH MELBOURNE 3205 VIC AUSTRALIA 2004 All rights reserved Printed in Malaysia WD64230 RX V2500 AV...

Отзывы: