background image

Selecting and Playing Styles

43

When it is set to on (page 36), the auto accompaniment function automatically 
generates bass and chord accompaniment for you to play along with, by using 
Multi Fingering operation.  You can change the chords of the accompaniment by 
playing keys in the auto accompaniment area of the keyboard using either the 
“Single Finger” or “Fingered” method.  With Single Finger you can simply play a 
one-, two- or three-finger chord indication (see Single Finger Chords below).  The 
Fingered technique is that of conventionally playing all the notes of the chord.  
Whichever method you use, the DGX-200 “understands” what chord you indicate 
and then automatically generates the accompaniment.

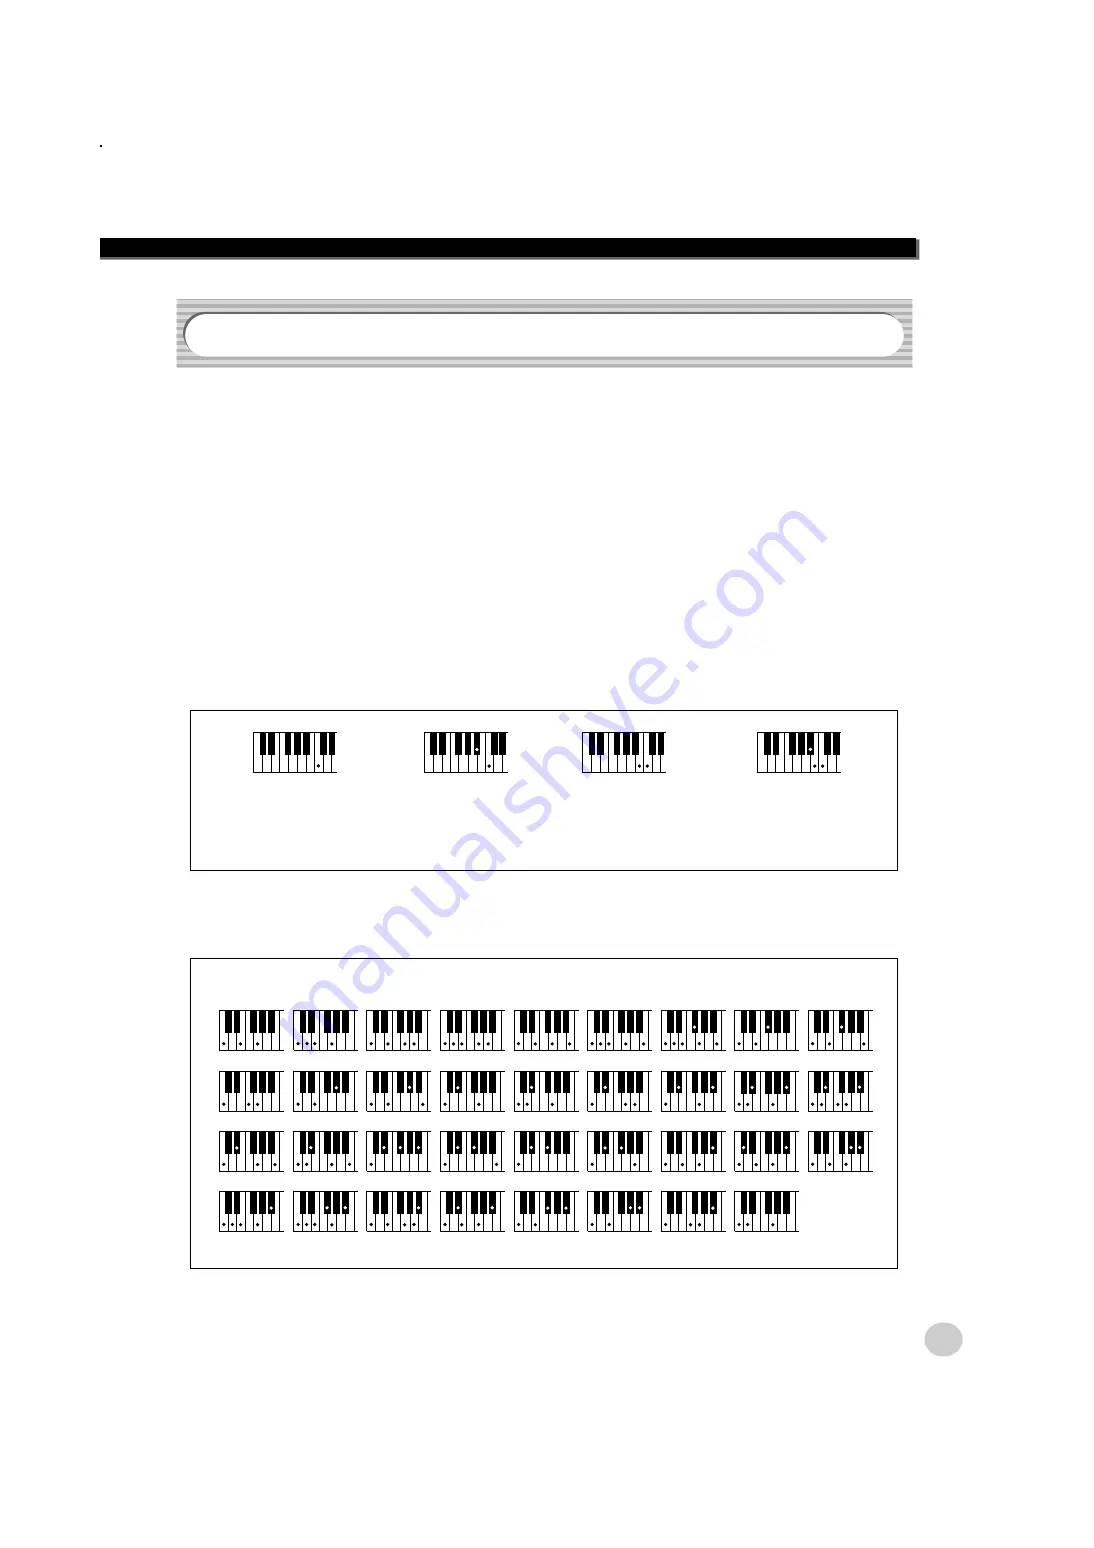
 Single Finger Chords • • • • • • • • • • • • • • • • • • • • • • • • • • • • • •

Chords that can be produced in Single Finger operation are major, minor, seventh 
and minor seventh.  The illustration shows how to produce the four chord types.  
(The key of C is used here as an example; other keys follow the same rules.  For 
example, B

b

7 is played as B

b

 and A.)

 Fingered Chords  • • • • • • • • • • • • • • • • • • • • • • • • • • • • • • • • •

Using the key of C as an example, the chart below shows the types of chords that 
can be recognized in the Fingered mode.

Using Auto Accompaniment — Multi Fingering

C

Cm

C

7

Cm

7

To play a major chord: 
Press the root note of 
the chord.  

To play a minor chord: 
Press the root note 
together with the nearest 
black key to the left of it.  

To play a seventh chord: 
Press the root note 
together with the nearest 
white key to the left of it.  

To play a minor seventh 
chord: Press the root note 
together with the nearest 
white and black keys to 
the left of it (three keys 
altogether).

C

Cm

7

C

(    )

CM

(    )

7

C

(9)

C

(    )

(9)

6

Caug

Cm

6

Cm

7

(    )

Cm

b

5

7

CmM

b

5

7

Cm

(    )

(9)

7

Cm

(9)

CmM

7

(    )

CmM

(9)

7

(    )

Cdim

Cdim

7

C

(9)

7

(    )

C

(13)

7

(    )

C

(

b

9)

7

(    )

C

(

b

13)

7

Csus

4

C

1+2+5

C


b

5

7

C

6

(    )

(    )

CM

7 (9)

7

CM

(

#

11)

(    )

7

CM

b

5

C

(

b

5)

(    )

C

(

#

11)

7

C

(

#

9)

7

(    )

C  aug

7

Cm

7(11)

(    )

(    )

CM  aug

7

(    )

C  sus

4

7

(    )

 Example for “C” chords

* Notes enclosed in parentheses are optional; the chords will be recognized without them.

Содержание Portable Grand DGX-200

Страница 1: ......

Страница 2: ...s used to produce them meet these goals In keeping with both the letter and the spirit of the law we want you to be aware of the following Battery Notice This product MAY contain a small non rechargea...

Страница 3: ...ng measures Relocate either this product or the device that is being affected by the interference Utilize power outlets that are on different branch circuit breaker or fuse circuits or install AC line...

Страница 4: ...s listed below to avoid the possibility of physical injury to you or others or damage to the instrument or other property These precautions include but are not limited to the following When removing t...

Страница 5: ...lost due to malfunction or incorrect operation Save important data to external media such as the Yamaha MDF3 MIDI data filer Always turn the power off when the instrument is not in use When using a p...

Страница 6: ...g page 28 The One Touch Setting feature lets you automatically call up an appropriate voice for playing with the selected style Each style has memory space for two One Touch Settings and you can chang...

Страница 7: ...ingering 43 Dictionary 45 Using the Music Database 48 Data stored by the Music Database 50 Selecting and Playing Songs 51 Selecting a Song 51 Playing the Songs 53 A B Repeat 54 Melody Voice Change 55...

Страница 8: ...d Piano voice See page 12 3 DEMO button This is used to play the Demo song See page 14 4 FUNCTION Button This calls up the Function mode and stores the speci fied panel setting to the flash memory see...

Страница 9: ...P button When the Style mode is selected this alternately starts and stops the style See page 36 In the Song mode this alternately starts and stops song playback See page 54 7 TEMPO TAP button This bu...

Страница 10: ...cated on the instrument s bottom panel w Insert the six new batteries being careful to follow the polarity markings on the inside of the compartment e Replace the compartment cover making sure that it...

Страница 11: ...tch as you play the keyboard to sustain the sound Using the MIDI Terminals The DGX 200 also features MIDI terminals allowing you to interface the DGX 200 with other MIDI instruments and devices For mo...

Страница 12: ...an 020 16 4 Organ 021 Theater Organ 022 Church Organ 023 Chapel Organ 024 Reed Organ No Voice Name ACCORDION 025 Traditional Accordion 026 Musette Accordion 027 Bandoneon 028 Harmonica GUITAR 029 Clas...

Страница 13: ...066 Breathy Tenor 067 Baritone Sax 068 Oboe 069 English Horn 070 Bassoon 071 Clarinet TRUMPET 072 Trumpet 073 Muted Trumpet 074 Trombone 075 Trombone Section 076 French Horn 077 Tuba BRASS 078 Brass S...

Страница 14: ...ith 001 z Start the Demo song x Stop the Demo song Playing the Demo song 001 Just You You can also play back songs of other categories Simply select the appropriate number of the desired song during p...

Страница 15: ...g Name 051 Muss I Denn 052 Liebestr ume Nr 3 053 Jesu Joy Of Man s Desiring 054 Symphonie Nr 9 055 Song Of The Pearl Fisher 056 Gavotte 057 String Quartet No 17 2nd Mov Serenade 058 Menuett 059 Canon...

Страница 16: ...Database and the DGX 200 makes all the right settings for you Accompaniment area Left hand Auto accompaniment for example bass guitar drums Right hand Melody For more infomation on playing proper cho...

Страница 17: ...type Example Dict c Specify the chord type of the chord in this case M7 v Play the notes of the chord as indicated in the keyboard diagram in the display The chord name flashes when the chord is playe...

Страница 18: ...small flash in sequence and in time with the song or style The large arrow indicates the first beat of the measure r Song Voice Style M D B name and number This portion of the display indicates the na...

Страница 19: ...s indicates the current chord root and type It also indi cates chords played in the ACMP area of the keyboard when the Style mode and auto accompaniment are on 3 Song track indicators In song recordin...

Страница 20: ...set the desired Tempo value or use the buttons to increase or decrease the value Playing the Portable Grand 001 GrandPno Using the Metronome Current Tempo value 148 TEMPO 148 Restoring the Default Tem...

Страница 21: ...ous quarter note based meters The Time Signature can be set in the Function mode page 76 Thetimesignaturechangesautomaticallywhenastyleorsongis selected Numeric keypad Time signature 01 1 4 Plays only...

Страница 22: ...ard 4 Stop the DJ style Playing the DJ 000 DJ Set 1 The DGX 200 has a Demo song and DJ Cancel function that allowsyoutodisableDemosong and DJ function Set Demo and DJ Cancel in the Function mode page...

Страница 23: ...the keyboard 1 Press the VOICE button 2 Select the desired voice number The categories of each voice and their numbers are shown on the panel A complete voice list of the available voices is given on...

Страница 24: ...e 109 press 1 on the numeric keypad then 0 9 For voice numbers beginning with zeroes such as 042 or 006 the initial zeroes may be omitted In this case there is a short pause before the indi cation app...

Страница 25: ...a l 2 R i d e C y m b a l 2 B o n g o H C o n g a H M u t e M i d T o m L M i d T o m H H i g h T o m L o w T o m F l o o r T o m H C o n g a L S n a r e H S o f t B a s s D r u m S o f t B a s s D r...

Страница 26: ...is selected in the Function mode page 75 You can also set various parameters independently for these voices such as giving them separate volume octave Pan Reverb Chorus and DSP settings This lets you...

Страница 27: ...page 75 along with the other Split Voice parameters shown below The following parameters can be set in the Function mode page 75 To turn the Split Voice on or off press the SPLIT button The Split Poin...

Страница 28: ...niment is automatically set to on Synchro Start is automatically set to on when style is stopped Calling up a One Touch Setting 1 Select the style 2 Press the ONE TOUCH SETTING button 1 or 2 Main Voic...

Страница 29: ...erent key without changing your fingering The Transpose settings can be adjusted over a range of 12 semitones 1 octave Transpose can be set in the Function mode page 75 Tuning Tuning determines the fi...

Страница 30: ...heel that lets you change the pitch of the voices in real time as you play Pitch Bend Range lets you set how the DGX 200 responds to your wheel playing allowing you to customize the range to suite you...

Страница 31: ...the Function mode page 76 The Reverb effect reproduces the natural ambient wash of sound that occurs when a instrument is played in a room or concert hall A total of eight different Reverb types simul...

Страница 32: ...hanging the sound of the voices Included among these miscellaneous effects are reverse gate reverb phaser rotary speaker tremolo echo delay distortion equalization and wah A total of thirty eight DSP...

Страница 33: ...e Trill effect Types 6 12 create two note trills alternating notes when two notes are held The Tremolo effect Types 13 19 repeat all held notes up to four The Echo effect Types 20 26 create delayed re...

Страница 34: ...1 Tremolo1 Rich Tremolo effect with both volume and pitch modulation 22 Tremolo 2 Tremolo2 23 Guitar Tremolo Guitar Tremolo Simulated electric guitar tremolo 24 Auto Pan AutoPan Several panning effect...

Страница 35: ...for playing a melody line and the lower set by default to keys F 2 and lower is for the auto accompaniment function The DGX 200 also features the convenient Dictionary function page 45 Dictionary pro...

Страница 36: ...tyles Pressing this button alter nately enables and can cels the Sync Stop function See page 40 Pressing this button alter nately starts and stops style playback Pressing this button alter nately enab...

Страница 37: ...to matically start the style at that tapped speed Simply tap the TEMPO TAP button four times or three times for a 3 4 time style and the style starts automatically at the tempo you tapped You can also...

Страница 38: ...Start with an Intro section You can also use the Sync Start function with the special Intro section of the selected style To use Sync Start with an Intro section 1 Press the MAIN AUTO FILL button to s...

Страница 39: ...d Pressing the SYNC START button This immediately stops the style and automatically enables Sync Start let ting you restart the style by simply playing a chord or key in the auto accom paniment area o...

Страница 40: ...ss the ACMP button To turn accompaniment on 2 Press the SYNC STOP button Setting Sync Stop to on before starting the style automatically sets Sync Start to on as well 3 Play a chord on the keyboard in...

Страница 41: ...new style When switching styles during playback the last tempo setting is main tained Thisallowsyoutokeep the same tempo even when changing styles Current Tempo value 120 TEMPO 120 Restoring the Defa...

Страница 42: ...tyle can be adjusted in the Function mode page 76 This volume control affects only the Style volume The volume range is 000 127 Accompaniment Sections Main A B and Fill ins Rhythm sounds and fill in s...

Страница 43: ...produce the four chord types The key of C is used here as an example other keys follow the same rules For example Bb7 is played as Bb and A Fingered Chords Using the key of C as an example the chart...

Страница 44: ...im7 1 b3 b5 6 Cdim7 Cdim7 Seventh 7 1 3 5 b7 or 1 3 5 b7 C7 C7 Seventh flatted ninth 7 b9 1 b2 3 5 b7 C7 b9 C7 b9 Seventh add flatted thirteenth 7 b13 1 3 5 b6 b7 C7 b13 C7 b13 Seventh ninth 7 9 1 2 3...

Страница 45: ...ord root as printed on the panel 3 Specify the type of the chord major minor seventh etc Press the key on the keyboard that corresponds to the desired chord type as printed on the panel Dictionary Dic...

Страница 46: ...and common chords in most music In this triad the lowest note is the root The root is the most important note in the chord because it anchors the sound harmonically by determining its key and forms t...

Страница 47: ...should be indicated to the right as well Exam ples for the key of C are shown below One important point Chords are made up of notes stacked on top of each other and the stacked notes are indicated in...

Страница 48: ...ase is given on page 87 Use the dial You can also use the CATEGORY and or SELECT buttons Turn the dial and select the Music Database Select the appropriate category by using the CATEGORY buttons When...

Страница 49: ...with your left hand the style starts For information on how to enter chords see Multi Fingering on page 43 4 When you reach the point in the music indicated by the arrow above press the ENDING button...

Страница 50: ...tting one by one M D B Parameters Accompaniment is automatically set to on Synchro Start is automatically set to on when style is stopped Style Style Number Split Voice ON Off Accompaniment Split Poin...

Страница 51: ...hem For instructions on recording your own songs see page 56 You can also transfer song data from your computer to the DGX 200 for playback For details see page 71 1 Press the SONG button Babbino 012...

Страница 52: ...rough the song numbers Use the numeric keypad Song numbers can be selected in the same way as with the voices page 24 You can use the numeric keypad to directly enter the song number or use the button...

Страница 53: ...54 Reverses the playback position Starts and stops song playback Pauses playback Advances the playback position Indicates track is enabled for playing Indicates track is muted or contains no data Abou...

Страница 54: ...ping playback does not cancel the set A B points or the A B Repeat function 4 Turn off the A B Repeat function Press the button A B Repeat A REPEAT 006 006 The A and B points can only be specified at...

Страница 55: ...sired song Press the SONG button then use the dial numeric keypad or but tons to select the desired song See page 51 2 Select the desired voice Press the VOICE button then use the dial numeric keypad...

Страница 56: ...ntro Main A B etc Tempo Time Signature Reverb Type Chorus Type DSP Type 1 Make all desired DGX 200 settings Before you actually start recording you ll need to make various settings for the song such a...

Страница 57: ...Selecting the Chord track automatically turns on the accompaniment Recording to a Melody Track 1 5 Five independent Melody tracks are provided for recording your keyboard performance Normally you ll w...

Страница 58: ...ove Make sure that when you press the SONG MEMORY button corresponding to the desired track the track number in the display flashes 7 Listen to your new recording To play back the song from the beginn...

Страница 59: ...on page 60 1 Select the desired song Press the SONG button then use the numeric keypad or buttons to select the desired song 201 205 2 While holding down the A button press SONG MEMORY button 1 All tr...

Страница 60: ...e 59 1 Select the desired song Press the SONG button then use the numeric keypad or buttons to select the desired song 201 205 2 Press and hold down the button corresponding to the track to be erased...

Страница 61: ...u practice just the timing of the notes any note can be used as long as you play in rhythm Lesson 2 Waiting In this lesson step the DGX 200 waits for you to play the correct notes before continuing pl...

Страница 62: ...in count as soon as the Lesson step is selected When the Lesson is finished your performance grade is shown in the display if the Grade function is turned on page 65 After a short pause the Lesson beg...

Страница 63: ...on 1 Press the L or R button repeatedly if necessary until Lesson 1 is indicated 3 Play the appropriate melody or chord with the song After the lead in the song starts automatically and the appropriat...

Страница 64: ...ng starts automatically and the appropriate notes appear in the display In Lesson 2 play the correct notes at your own pace until you can master playing them in rhythm This lesson step lets you practi...

Страница 65: ...1 Select one of the Lesson songs 2 Select Lesson 4 Press the L and R buttons simultaneously so that Lesson 4 is indicated 3 Play both the left and right hand parts with the song After the lead in the...

Страница 66: ...d piano sound on the DGX 200 keyboard Unlike an acoustic instrument that puts out a resonated note the electronic instrument puts out information from the keyboard such as with what voice with which k...

Страница 67: ...messages like Exclusive Messages that transmit data unique to each instrument manufacturer and Realtime Messages that control the MIDI device The messages transmitted received by the DGX 200 are shown...

Страница 68: ...ct the UX16 and the com puter with a standard USB cable then make the proper MIDI con nections between the DGX 200 and the UX16 Connecting to a Personal Computer MIDI IN MIDI OUT MIDI OUT MIDI IN Comp...

Страница 69: ...y changing the DGX 200 settings for the next section of the song This determines whether the style and song playback functions are controlled by the DGX 200 s internal clock off or by MIDI clock data...

Страница 70: ...mode page 76 This determines whether Song data is transmitted via MIDI OUT or not These settings can be made in the Function mode page 76 Keyboard Out Style Out Song Out For the Song 001 data is not...

Страница 71: ...aha PK CLUB Portable Keyboard Home Page http www yamahaPKclub com Loading a Song into DGX 200 s Flash Memory Song data that can be saved in flash memory The number of songs max 99 songs Song 101 199 A...

Страница 72: ...l included in the Song Filer application Computer Transmit DGX 200 Never attempt to turn the power off while transmitting song data Doing so will not only result in failure to save the data but also m...

Страница 73: ...d MIDI parameters in the Function mode The following PC Mode parameters can be stored to memory LOCAL ON OFF EXTERNAL KEYBOARD STYLE OUT SONG OUT 2 Store the parameters to the PC memory Press and hold...

Страница 74: ...Use the SELECT buttons to select a Function name 3 Input the appropriate value or use the buttons to set the selected Function You can also use the dial Using the Function parameters OVERALL Tosaveth...

Страница 75: ...Volume D Volume 0 127 This determines the volume of the Dual voice letting you create an opti mum mix with the Main voice Octave D Octave 2 2 octave This determines the octave range for the Dual voic...

Страница 76: ...ata Use the NO button to stop the transmission Keyboard Out KbdOut On Off This determines whether Keyboard performance data of the DGX 200 is transmitted or not Use the buttons to change the setting S...

Страница 77: ...me page 42 is set to an appropriate level Make sure that the Split Point page 27 is set to an appropriate val ue When playing back one of the Pianist styles 124 135 the rhythm cannot be heard This is...

Страница 78: ...C Memory FUNCTION Tuning Split Point Touch Sensitivity Style Volume Song Volume Metronome Volume Grade On Off Demo DJ Cancel Touch Touch On Off About the Internal Flash Memory The Song One Touch Setti...

Страница 79: ...l Organ 024 0 112 20 Reed Organ ACCORDION 025 0 113 21 Traditional Accordion 026 0 112 21 Musette Accordion 027 0 113 23 Bandoneon 028 0 112 22 Harmonica GUITAR 029 0 112 24 Classical Guitar 030 0 112...

Страница 80: ...29 0 1 2 Electric Grand Piano KSP 130 0 32 2 Detuned CP80 131 0 40 2 Layered CP 1 132 0 41 2 Layered CP 2 133 0 0 3 Honky tonk Piano 134 0 1 3 Honky tonk Piano KSP 135 0 0 4 Electric Piano 1 136 0 1 4...

Страница 81: ...ar 241 0 41 30 Feedback Guitar 2 242 0 0 31 Guitar Harmonics Voice No Bank Select MIDI Program Change Voice Name MSB LSB 243 0 65 31 Guitar Feedback 244 0 66 31 Guitar Harmonics 2 BASS 245 0 0 32 Acou...

Страница 82: ...353 0 20 62 Resonant Synth Brass 354 0 24 62 Poly Brass 355 0 27 62 Synth Brass 3 Voice No Bank Select MIDI Program Change Voice Name MSB LSB 356 0 32 62 Jump Brass 357 0 45 62 Analog Velocity Brass...

Страница 83: ...9 0 66 98 Loud Glockenspiel 470 0 67 98 Christmas Bells Voice No Bank Select MIDI Program Change Voice Name MSB LSB 471 0 68 98 Vibraphone Bells 472 0 69 98 Digital Bells 473 0 70 98 Air Bells 474 0 7...

Страница 84: ...64 0 33 Thunder 565 64 0 34 Wind 566 64 0 35 Stream 567 64 0 36 Bubble 568 64 0 37 Feed 569 64 0 48 Dog 570 64 0 49 Horse 571 64 0 50 Bird Tweet 2 572 64 0 54 Ghost 573 64 0 55 Maou 574 64 0 64 Phone...

Страница 85: ...Tom 5 Analog Tom 5 049 C 2 Analog Cymbal Crash Cymbal 1 Analog Cymbal Analog Cymbal Analog Cymbal 050 D 2 Analog Tom 6 High Tom Analog Tom 6 Analog Tom 6 Analog Tom 6 051 D 2 Ride Cymbal 1 Ride Cymba...

Страница 86: ...DetroitPop1 063 60 sRock Roll 064 6 8Soul 065 CrocoTwist 066 Rock Roll 067 DetroitPop2 068 BoogieWoogie 069 ComboBoogie 070 6 8Blues Country 071 Country8Beat 072 CountryPop 073 CountrySwing 074 Count...

Страница 87: ...nd 099 OverRbow 100 Red Lady 101 ReleseMe 102 SavingLv 103 Shore Cl 104 SierraMd 105 SilverMn 106 SmokyEye 107 SndOfSil 108 TblWater 109 WhisprSx ROCK FUSION 110 DavAgain 111 JumpRock 112 OyComCha 113...

Страница 88: ...im SD Rock H Analog Snare 2 53 F 2 41 F 1 Floor Tom L Room Tom 1 Rock Tom 1 E Tom 1 Analog Tom 1 54 F 2 42 F 1 1 Hi Hat Closed Analog HH Closed 1 55 G 2 43 G 1 Floor Tom H Room Tom 2 Rock Tom 2 E Tom...

Страница 89: ...2 59 B 2 47 B 1 Mid Tom L Analog Tom 4 Jazz Tom 4 Brush Tom 4 Jazz Tom 4 60 C 3 48 C 2 Mid Tom H Analog Tom 5 Jazz Tom 5 Brush Tom 5 Jazz Tom 5 61 C 3 49 C 2 Crash Cymbal 1 Analog Cymbal Hand Cym L 62...

Страница 90: ...Pos x x Common Song Sel x x Tune x x System Clock o o Real Time Commands o 4 o 4 Aux All Sound OFF o o 120 126 127 Reset All Cntrls x o 121 Local ON OFF x o 122 5 All Notes OFF x o 123 125 Mes Active...

Страница 91: ...ls Chorus Type F0H 43H 1nH 4CH 02H 01H 20H mmH llH F7H mm Chorus Type MSB ll Chorus Type LSB Refer to the Effect Map page 92 for details DSP Type F0H 43H 1nH 4CH 02H 01H 40H mmH llH F7H mm DSP Type MS...

Страница 92: ...E MSB TYPE LSB 00 01 02 08 16 17 18 19 20 000 064 No Effect 065 Chorus Chorus2 066 Celeste Chorus1 067 Flanger Flanger1 Flanger2 068 127 No Effect TYPE MSB TYPE LSB 00 01 02 08 16 17 18 19 20 000 No E...

Страница 93: ...Initial Setup Send Keyboard Out Style Out Song Out Style Volume Song Volume Metronome Volume Time Signature Lesson Track R Lesson Track L Grade On Off Demo and DJ Cancel Pitch Bend Range Effects Rever...

Страница 94: ...47 Chord Track 57 Chord Type 47 Chords About 46 Chords Fingered 43 Chords Single Finger 43 Chorus 32 Clearing Song 59 D DEMO Cancel 14 Demo song 14 Dictionary 45 DJ 22 Drum Kit Voice Chart 88 DSP 32...

Страница 95: ...styles playing 36 styles selecting 35 Sync Start 37 Sync Stop 40 T Tap 37 Tempo 20 41 Time Signature 21 Touch Sensitivity 30 track song 57 tracks muting 58 Transpose 29 Troubleshooting 77 Tuning 29 U...

Страница 96: ...also contact Yamaha directly at the address provided below 2 Deliver the unit to be serviced under warranty to the retailer selling the product an authorized service center or toYamaha with an explan...

Страница 97: ...eet 13 P Code 10680 Athens Greece Tel 01 364 7111 SWEDEN Yamaha Scandinavia AB J A Wettergrens Gata 1 Box 30053 S 400 43 G teborg Sweden Tel 031 89 34 00 DENMARK YS Copenhagen Liaison Office Generator...

Страница 98: ...ision Yamaha Corporation 2002 Yamaha Corporation V875030 PO 04D0 Printed in China Yamaha PK CLUB Portable Keyboard Home Page English only http www yamahaPKclub com Yamaha Manual Library English versio...

Отзывы: