Yamaha PocketrakCX - POCKETRAK CX 2 GB Digital... Скачать руководство пользователя страница 20

POCKETRAK CX   Owner’s Manual

20

Recording

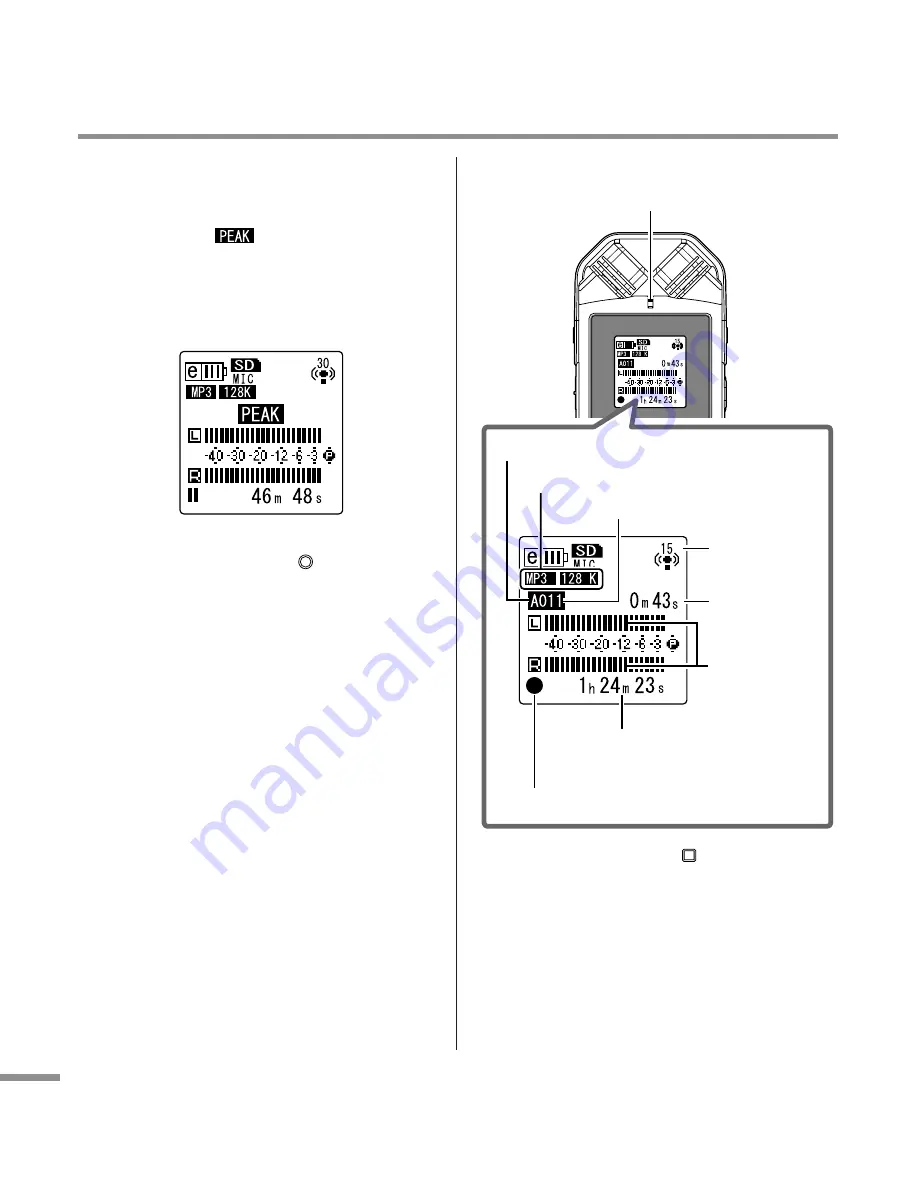
• If the recording level is too high:

The level meter frequently moves all the 
way to the right and the recording LED 
turns off. The 

 appears on the screen 

when the level exceeds the specified 
threshold during recording.
Press the [

T

] button to lower the record-

ing level.

4.

Press the [REC/PAUSE 

] button again.

The LED lights up in red, and recording 
begins.

• Indicators displayed during recording

5.

Press the [STOP/ESC 

] button to stop 

recording.

The LED will be off, and REC REMAIN 
TIME will be displayed on the screen.

VOL

MENU

ENTER

SPEED

PAUSE

ESC

PLAY

STOP

REC

Recording mode

Recording 
level

Available recording time 
(Recording remaining time)

Folder name

Recording-in-progress indicator

Recording 
level meter

File number

Elapsed 
recording 
time

Recording LED

Содержание PocketrakCX - POCKETRAK CX 2 GB Digital...

Страница 1: ...JA ZH RU IT ES FR DE EN...

Страница 2: ...ermined by turning the unit OFF and ON please try to eliminate the prob lem by using one of the following measures Relocate either this product or the device that is being affected by the interference...

Страница 3: ...ed by YAMAHA CORPORATION OF AMERICA IMPORTANT Please record the serial number of this unit in the space below Model Serial No The serial number is located inside the battery compartment of the unit Re...

Страница 4: ...h as in direct sunlight near a heater or in a car during the day to prevent the possibility of panel disfiguration or damage to the internal components Do not place the device in an unstable position...

Страница 5: ...Peeling off the external covering piercing it with a nail or sharp object striking it with a hammer or stepping on it may cause a short circuit within the battery causing ignition explosion leakage o...

Страница 6: ...sal of Old Equipment and used Batteries These symbols on the products packaging and or accompanying documents mean that used electrical and electronic products and batteries should not be mixed with g...

Страница 7: ...mmercially available musical data is strictly prohibited except for your personal use This owner s manual is the exclusive copyrights of Yamaha Corporation Windows is a registered trademark of Microso...

Страница 8: ...puter 23 Loading audio files 25 Disconnecting the recorder from your computer 25 Recharging the eneloop 26 About the accessory disk 27 SOFTWARE LICENSE AGREEMENT 28 About the manuals The operation of...

Страница 9: ...nual this book 1 Attaching the recorder to a tripod or a microphone stand You can attach the recorder to a commercially available cam era or camcorder tripod using the threaded socket on the unit You...

Страница 10: ...battery 3 Close the battery cover Hint You can use the eneloop battery repeatedly by recharging it For information on recharging the eneloop battery refer to page 26 You can also use commercially ava...

Страница 11: ...alkaline bat tery Hint For information on recharging the eneloop battery refer to page 26 Disabling the controls Hold function If you set the HOLD CHARGE switch to HOLD w during playback or recording...

Страница 12: ...with the tip of your finger until it clicks again 4 Close the card slot cover 5 Turn the power on will appear on the LCD Note If the recorder displays NO MEDIA on the LCD it means that the recorder d...

Страница 13: ...ecorder correctly Otherwise the recorder will not record or play Do not apply too much force when you insert or remove the microSD card Otherwise you might injure your hand or finger or damage the car...

Страница 14: ...ain screen is displayed This screen enables you to change Recording mode set the date and time initialize the recorder and make other various settings For details see page 15 List screen Appears when...

Страница 15: ...d to the external input jack AUTO DIVIDE Divides the file automatically after a certain period of silence dur ing recording SELF TIMER Sets the time for the Self Timer recording VAS Turns the VAS Voic...

Страница 16: ...ER button 3 Press the VOL buttons to select REC MODE then press the MENU ENTER button 4 Press the VOL buttons to select MP3 128kbps then press the MENU ENTER button 5 Press the STOP ESC button twice T...

Страница 17: ...bit rate File extension Application examples PCM 48 kHz WAV Recording a musical performance creating a master recording creating a CD and recording other original sound sources 44 1 kHz MP3 320 kbps...

Страница 18: ...sen sitivity switch to LOW 1 Press the FOLDER A B REPEAT button located on the side panel repeatedly to select a folder into which to record Hint Pressing the FOLDER A B REPEAT button repeatedly will...

Страница 19: ...audio To set the recording peak limiter to ON press and hold down the MENU ENTER button for at least two seconds to access REC MENU then select ON for REC LIMITER The peak limiter is available only wh...

Страница 20: ...ord ing level 4 Press the REC PAUSE button again The LED lights up in red and recording begins Indicators displayed during recording 5 Press the STOP ESC button to stop recording The LED will be off a...

Страница 21: ...repeatedly will scroll through the folders As an example select one from folders A D 2 Press the REC PAUSE button The LED lights up in red and recording begins Hint If the recording level is too high...

Страница 22: ...ay back a file Hint Pressing the FOLDER A B REPEAT button repeatedly will scroll through the folders 2 Press T Y buttons to select the desired file number 3 Press the PLAY SPEED button The LED lights...

Страница 23: ...mputer Windows based computer with built in USB interface OS Windows Vista XP Professional Home Edition Macintosh Computer Macintosh computer with built in USB interface OS Mac OS X 10 4 10 5 Note Vis...

Страница 24: ...red USB hub remove the hub then use the included USB cable to connect the recorder directly to the computer s USB terminal Connected to PC Transmitting to from PC Precautions when using the USB termin...

Страница 25: ...y the file to the desired location Macintosh 1 Connect the recorder to a computer 2 Double click the drive icon NO NAME of the recorder on the desktop 3 Double click VOICE folder 4 Double click the fo...

Страница 26: ...onds to access the COM MON MENU BATTERY SET then make sure that eneloop is selected 3 Connect the recorder to a computer page 23 4 Make sure that the LCD screen on the recorder indicates that the unit...

Страница 27: ...port for the DAW software in the accessory disk About the DAW software in the accessory disk The accessory disk contains DAW software both for Windows and Macintosh NOTE Make sure to install DAW soft...

Страница 28: ...maha s copyright notice and any other proprietary legends that were on the original copy of the SOFT WARE You may permanently transfer to a third party all your rights in the SOFTWARE only when you tr...

Страница 29: ...QUIREMENTS THAT THE OPERATION OF THE SOFTWARE WILL BE UNINTERRUPTED OR ERROR FREE OR THAT DEFECTS IN THE SOFT WARE WILL BE CORRECTED 6 LIMITATION OF LIABILITY YAMAHA S ENTIRE OBLIGATION HEREUNDER SHAL...

Страница 30: ...H Branch Switzerland in Z rich Seefeldstrasse 94 8008 Z rich Switzerland Tel 01 383 3990 AUSTRIA Yamaha Music Europe GmbH Branch Austria Schleiergasse 20 A 1100 Wien Austria Tel 01 60203900 CZECH REPU...

Страница 31: ...ha Music Korea Ltd 8F 9F Dongsung Bldg 158 9 Samsung Dong Kangnam Gu Seoul Korea Tel 080 004 0022 MALAYSIA Yamaha Music Malaysia Sdn Bhd Lot 8 Jalan Perbandaran 47301 Kelana Jaya Petaling Jaya Selango...

Страница 32: ...ite English only http www yamahasynth com Yamaha Manual Library http www yamaha co jp manual U R G Pro Audio Digital Musical Instrument Division Yamaha Corporation 2008 Yamaha Corporation 1AJ6P1P0043...

Отзывы: