


NP-31/NP-11 Owner’s Manual
19
Connecting MIDI Instruments
The instrument features MIDI IN/OUT terminals, allowing you to connect the instrument to other instruments and
devices—including computers—and take advantage of the various performance and recording capabilities in
MIDI applications.
Since MIDI data that can be transmitted or
received varies depending on the type of
MIDI device, check the chapter “MIDI data
format” on page 4 in “MIDI Reference” to
find out what MIDI data and commands
your devices can transmit or receive.
MIDI [IN] [OUT] terminals
Use MIDI cables to connect external MIDI devices to
these connectors.
About MIDI
MIDI (Musical Instrument Digital Interface) is a standard format for data transmis-
sion/ reception. It enables the transmission of performance data and commands
between MIDI devices and personal computers. Using MIDI, you can control a con-
nected MIDI device from the instrument, or control the instrument from a con-
nected MIDI device or computer.
MIDI functions enable you to transmit performance data between MIDI devices.
You cannot transmit the Voice Demo
Songs and the Piano Preset Songs from
the instrument to another MIDI device.
For MIDI connections, use a standard
(optional) MIDI cable, available at most
musical instrument stores.
When the instrument is used as a tone
module, performance data with Voices
that are not found on the instrument will
not be played correctly.
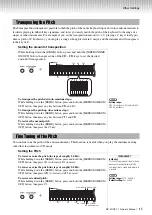
Transmitting performance data to and from another MIDI device
Transmitting performance data to and from a computer
You must install an appropriate software
application on the computer to be able to
transmit performance data between the
instrument and a computer.
Connecting the USB port on the computer to the instrument via an
optional USB-MIDI interface (such as the Yamaha UX16)
Use a USB-MIDI interface device to connect the USB port on your computer
to the instrument’s MIDI terminals. You must install the USB-MIDI interface
(such as the UX16) driver. For more information, refer to the user’s manual
that came with the USB-MIDI interface device.
Connecting to the MIDI [IN] [OUT] terminals
NOTE
MIDI Capabilities
NOTE
• Before connecting the instrument to other electronic components, turn off the power of all
the components.
NOTICE
NOTE
NOTE
Instrument
MIDI [OUT] terminal
MIDI device
MIDI cables
(optional)
MIDI [IN] terminal
MIDI [OUT] terminal
MIDI [IN] terminal
Computer
USB terminal
USB-MIDI interface
(optional)
Instrument
MIDI [IN] terminal
MIDI [OUT]terminal
NOTE
• When connecting the instrument to a computer, first turn off the power to the instru-
ment, and then exit any open applications on the computer before connecting any
cables. After making all connections, turn on the power to the instrument.
NOTICE


