background image

7

 En

Eng

lish

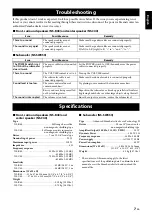
If this product doesn’t work as expected, look for a possible cause below. If the issue you are experiencing is not 
listed, or you cannot resolve it after reading through these instructions, disconnect the power cable and contact an 
authorized Yamaha dealer or service center.

Front, surround speakers (NS-B40) and center speaker (NS-C40)

Subwoofer (NS-SW050)

Front, surround speakers (NS-B40) and 
center speaker (NS-C40)

Type

NS-B40 ................................................... Full range bass reflex

non magnetic shielding type

NS-C40...................................Full range acoustic suspension

non magnetic shielding type

Driver

...................................................7 cm (2-3/4") cone type

Nominal input power

....................................................... 30 W

Maximum input power

.................................................. 100 W

Impedance

............................................................................. 6 Ω

Frequency response

NS-B40 .............................................. 50 Hz–25 kHz (–10 dB)

–45 kHz (–30 dB)

NS-C40.............................................. 70 Hz–25 kHz (–10 dB)

–45 kHz (–30 dB)

Sensitivity 

NS-B40 .........................................................83 dB/2.83 V, 1 m
NS-C40.........................................................84 dB/2.83 V, 1 m

Dimensions (W x H x D)

NS-B40 ........ 112 x 176 x 116 mm (4-3/8" x 6-7/8" x 4-5/8")
NS-C40...........276 x 111 x 118 mm (10-7/8" x 4-3/8" x 4-5/8")

Weight

NS-B40 ......................................................... 0.59 kg (1.30 lbs.)
NS-C40......................................................... 0.73 kg (1.61 lbs.)

Subwoofer (NS-SW050)

Type 

..............Advanced Yamaha Active Servo Technology II

Driver

................................................... 20 cm (8") cone woofer

non magnetic shielding type

Amplifier Output (100 Hz, 5 Ω, 10% T.H.D)

.............. 50 W

Dynamic Power

....................................................... 100 W, 5 Ω

Frequency response

...........................................28 Hz–200 Hz

Power supply

...................................................AC 230 V, 50 Hz

Power Consumption

......................................................... 40 W

Dimensions (W x H x D)

 .......................291 x 292 x 341 mm

(11-1/2" x 11-1/2" x 13-3/8")

Weight

.............................................................. 8.5 kg (18.7 lbs.)

* The contents of this manual apply to the latest 

specifications as of the publishing date. To obtain the latest 
manual, access the Yamaha website then download the 
manual file.

Troubleshooting

Issue

Possible cause

Remedy

There’s no sound.

The speaker cables are not 
connected properly.

Make sure the speaker cables are connected properly.

The sound is very quiet.

The speaker cables are not 
connected properly.

Make sure the speaker cables are connected properly: 
L (left) to L, R (right) to R, “+” to “+” and “–” to “–”.

Issue

Possible cause

Remedy

The POWER switch is set 
to ON but the subwoofer 
doesn’t work.

The power cable is not connected 
properly.

Set the POWER switch to OFF, then make sure the power 
cable is connected properly.

There’s no sound.

The VOLUME control is set to 0. Turn up the VOLUME control.

The subwoofer cable is not 
connected properly.

Make sure the subwoofer cable is connected properly.

Sound level is too low.

The source material doesn’t 
contain much bass.

Try playing source material that contains more bass.

Bass sounds are being cancelled 
out by standing waves.

Reposition the subwoofer, or break up parallel wall surfaces 
by placing bookshelves or other large objects along the wall.

The sound is interrupted.

The volume is too loud.

Since the output is excessive, reduce the volume level.

Specifications

Содержание NS-B40

Страница 1: ...E ENCEINTES КОМПЛЕКТ АКУСТИКИ ДЛЯ МИКРОСИСТЕМ PT RU NL ES IT SV DE FR BRUKSANVISNING MANUALE DI ISTRUZIONI MANUAL DE INSTRUCCIONES ИНСТРУКЦИЯ ПО ЭКСПЛУАТАЦИИ MANUAL DO PROPRIETÁRIO GEBRUIKSAANWIJZING MODE D EMPLOI BEDIENUNGSANLEITUNG EN OWNER S MANUAL ...

Страница 2: ...aces where water may drop A liquid such as water getting into the unit may cause a fire electric shocks or malfunctions If any liquid such as water seeps into the device turn off the power immediately and unplug the power cord from the AC outlet Then request an inspection from the dealer where you purchased the unit or from qualified Yamaha service personnel Never insert or remove an electric plug...

Страница 3: ...o the bass reflex port of the subwoofer Failure to observe this may cause injury Do not insert foreign materials such as metal or paper into the bass reflex port of the subwoofer Failure to observe this may cause a fire electric shocks or malfunctions If foreign material gets into the unit immediately shut off the power and pull the power plug from the AC outlet and request an inspection from the ...

Страница 4: ... is hazardous if engaged in a live socket outlet IMPORTANT THE WIRES IN MAINS LEAD ARE COLOURED IN ACCORDANCE WITH THE FOLLOWING CODE Blue NEUTRAL Brown LIVE As the colours of the wires in the mains lead of this apparatus may not correspond with the coloured markings identifying the terminals in your plug proceed as follows The wire which is coloured BLUE must be connected to the terminal which is...

Страница 5: ...1 Installing the front center and surround speakers 2 Installing the subwoofer 2 Wall mounting the speakers 2 Connecting the speakers 3 Connection diagram 3 Connecting the power cables 4 Using the Subwoofer 5 Adjusting the subwoofer before use 5 ADVANCED YAMAHA ACTIVE SERVO TECHNOLOGY II 6 TWISTED FLARE PORT 6 Troubleshooting 7 Specifications 7 Package contents Speaker cable 24 5 m 80 ft x1 To be ...

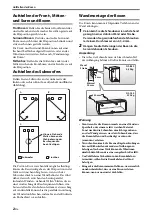
Страница 6: ...he wall It may be necessary to break up parallel wall surfaces by placing bookshelves etc along them Wall mounting the speakers You can mount the speakers on the wall as follows 1 Install screws into a solid wall or wall support as shown below Use 3 5 to 4 mm 1 8 diameter self tapping screws 2 Hang each speaker by its keyhole slots onto the protruding screws Note Make sure the shaft of the screw i...

Страница 7: ...t the bare wires tightly Note Make the speaker cables as short as possible Do not bundle or roll up excess cable Twist the bare wires tightly so the individual strands are not splayed Be careful not to injure yourself while preparing the speaker cables Connecting the speakers ANTENNA FM GND AM COMPONENT VIDEO PR PB Y OPTICAL TV AV 1 AV 2 AV 3 AV 4 AV 5 AUDIO 1 AUDIO 2 COAXIAL CD COAXIAL OPTICAL VI...

Страница 8: ...on page 3 for reference Make sure you connect the speakers with the correct polarity positive terminals to positive terminals and negative terminals to negative terminals If you get them crossed over the sound will be unnatural and lack bass In your AV receiver s speaker size settings specify small or S for all of the NS P40 speakers If you re connecting the subwoofer to a Yamaha DSP amplifier or ...

Страница 9: ...e Before using the subwoofer adjust the subwoofer to obtain the optimum volume balance between the subwoofer and the front speakers by following the procedure described below 1 Set the VOLUME control to minimum 0 2 Turn on the power of all the other components 3 Make sure that the POWER switch is set to the ON position The Power indicator lights up in green 4 Play a source containing low frequency...

Страница 10: ...oltz resonator air moves violently in and out through the port between the interior and exterior of the speaker sometimes producing noise due to the turbulent air flow at the end of the port The port and the cabinet resonate at a frequency that is determined by their dimensions and shape On the other hand turbulence in the air flow at the end of the port contains a broad range of frequency compone...

Страница 11: ...30 V 50 Hz Power Consumption 40 W Dimensions W x H x D 291 x 292 x 341 mm 11 1 2 x 11 1 2 x 13 3 8 Weight 8 5 kg 18 7 lbs The contents of this manual apply to the latest specifications as of the publishing date To obtain the latest manual access the Yamaha website then download the manual file Troubleshooting Issue Possible cause Remedy There s no sound The speaker cables are not connected properl...
Страница 12: ...reil par le revendeur auprès duquel vous l avez acheté ou par un technicien Yamaha qualifié Avertissement relatif à la présence d eau N exposez pas l appareil à la pluie ne l utilisez pas près d une source d eau ou dans un milieu humide et ne déposez pas dessus des récipients tels que des vases des bouteilles ou des verres contenant des liquides qui risqueraient de s infiltrer par les ouvertures o...

Страница 13: ...cer l appareil veillez à désactiver l interrupteur d alimentation et à déconnecter tous les câbles de connexion Le non respect de cette consigne peut entraîner l endommagement des câbles ou provoquer le trébuchement et la chute de l utilisateur s il s agit de vous même ou d autres personnes Perte de capacités auditives N utilisez pas l appareil de manière prolongée à un niveau sonore trop élevé ou...

Страница 14: ...urs de gauche et de droite L air peut être soufflé à partir du port bass reflex Il ne s agit pas d un dysfonctionnement de l instrument Cela se produit particulièrement souvent en cas d émission de musique aux accents marqués de basses À propos du contenu de ce manuel Les illustrations et les captures d écran figurant dans ce manuel servent uniquement à expliciter les instructions Commutateur VOLT...

Страница 15: ...ntes 1 Installation des enceintes avant centrale et surround 2 Installation du subwoofer 2 Suspension murale des enceintes 2 Connexion des enceintes 3 Schéma des connexions 3 Connexion des câbles d alimentation 4 Utilisation du subwoofer 5 Réglage du caisson de graves avant utilisation 5 ADVANCED YAMAHA ACTIVE SERVO TECHNOLOGY II 6 TWISTED FLARE PORT 6 En cas de problème 7 Fiche technique 7 Conten...

Страница 16: ...ant vers un mur Il peut être nécessaire de rompre le parallélisme entre deux murs en plaçant des étagères etc le long de ces murs Suspension murale des enceintes Vous pouvez suspendre les enceintes au mur de la façon suivante 1 Fixez les vis dans un mur solide ou dans un renfort mural résistant comme illustré ci dessous Utilisez des vis auto taraudeuses de 3 5 à 4 mm de diamètre 2 Suspendez chaque...

Страница 17: ...Faites des câbles d enceintes aussi courts que possible Evitez de lier ou d enrouler la longueur de câble excédentaire Torsadez correctement les fils dénudés pour bien rassembler les brins individuels Veillez à ne pas vous blesser lors de la préparation des câbles d enceintes Connexion des enceintes ANTENNA FM GND AM COMPONENT VIDEO PR PB Y OPTICAL TV AV 1 AV 2 AV 3 AV 4 AV 5 AUDIO 1 AUDIO 2 COAXI...

Страница 18: ...llez à respecter la polarité lorsque vous raccordez les câbles reliez les bornes positives d une part et les bornes négatives d autre part Si vous inversez la polarité lors de la connexion d une enceinte le son sera dénaturé et manquera de graves Dans les réglages de votre ampli tuner AV relatifs à la taille des enceintes choisissez Petites ou S pour toutes les enceintes du système NS P40 Si vous ...

Страница 19: ...on de graves Réglage du caisson de graves avant utilisation Avant d utiliser le caisson de graves configurez le afin d obtenir un équilibre sonore optimal entre le caisson de graves et les enceintes avant Pour cela procédez comme suit 1 Réglez la commande VOLUME au minimum 0 2 Mettez tous les composants sous tension 3 Assurez vous que le commutateur POWER est en position ON Le témoin d alimentatio...

Страница 20: ... situés dans la plage de fréquence de ce résonateur acoustique de l air sous pression sort de l enceinte et pénètre celle ci par l évent produisant parfois du bruit dû aux turbulences d air au bout de l évent L évent et l enceinte résonnent à une fréquence déterminée par leurs dimensions et forme Par contre les turbulences causées par ces brusques déplacements d air au bout de l évent contiennent ...

Страница 21: ...x P 291 x 292 x 341 mm Poids 8 5 kg Le contenu de ce mode d emploi s applique aux dernières caractéristiques techniques connues à la date de publication du manuel Pour obtenir la version la plus récente du manuel accédez au site Web de Yamaha puis téléchargez le fichier du manuel concerné En cas de problème Problème Cause possible Remède Pas de son Les câbles d enceintes ne sont pas raccordés corr...

Страница 22: ...Sie sich an qualifiziertes Fachpersonal bei Yamaha Gefahr durch Wasser Achten Sie darauf dass die Einheit nicht durch Regen nass wird verwenden Sie es nicht in der Nähe von Wasser oder unter feuchten oder nassen Umgebungsbedingungen und stellen Sie auch keine Behälter wie z B Vasen Flaschen oder Gläser mit Flüssigkeiten darauf die herausschwappen und in Öffnungen hineinfließen könnten oder an Orte...

Страница 23: ...e Einheit umkippen oder herunterfallen und Verletzungen hervorrufen könnte entfernen Sie sich schnell von der Einheit und suchen Sie einen sicheren Ort auf Achten Sie darauf den Netzschalter der Einheit auszuschalten und alle Anschlusskabel von der Einheit zu trennen Bei Nichtbeachtung können die Kabel beschädigt werden oder dazu führen dass Sie oder Andere darüber stolpern und fallen könnten Hörm...

Страница 24: ...e vorgesehen Es kann Luft aus dem Bassreflextunnel ausgestoßen werden Dies stellt keine Fehlfunktion dar Dies tritt insbesondere bei Musik mit starkem Bassanteil auf Über die Inhalte dieser Bedienungsanleitung Die Bildschirm Abbildungen in dieser Anleitung dienen lediglich zur Veranschaulichung VOLTAGE SELECTOR Für China Asien Modell und allegemeines Modell Der Spannungswahlschalter an der Rücksei...

Страница 25: ...en der Boxen 1 Aufstellen der Front Mitten und Surround Boxen 2 Aufstellen des Subwoofers 2 Wandmontage der Boxen 2 Anschließen der Boxen 3 Anschluss Schema 3 Anschließen der Netzkabel 4 Verwendung des Subwoofers 5 Einstellung des subwoofers vor gebrauch 5 ADVANCED YAMAHA ACTIVE SERVO TECHNOLOGY II 6 TWISTED FLARE PORT 6 Fehlersuche 7 Technische Daten 7 Lieferumfang Lautsprecherkabel 24 5 m x1 Mus...

Страница 26: ...de durchbrechen indem Sie an der Rückseite ein Bücherbord o ä aufstellen Wandmontage der Boxen Die Boxen kann man mit folgendem Verfahren an der Wand anbringen 1 Verankern Sie die Schrauben wie nachstehend gezeigt in einer stabilen Wand oder Strebe Verwenden Sie gewindefurchende Schrauben mit einem Durchmesser von 3 5 4 mm 2 Hängen Sie die Halterungen der Boxen in die hervorstehenden Schrauben Anm...

Страница 27: ...rz wie möglich gehalten werden Bündeln Sie sie niemals mit anderen Kabeln und rollen Sie sie nicht zu einem Knäuel auf Verdrillen Sie die Adern so fest wie möglich um Kurzschlüsse zu vermeiden Seien Sie beim Vorbereiten der Kabel vorsichtig dass Sie sich nicht verletzen Anschließen der Boxen ANTENNA FM GND AM COMPONENT VIDEO PR PB Y OPTICAL TV AV 1 AV 2 AV 3 AV 4 AV 5 AUDIO 1 AUDIO 2 COAXIAL CD CO...

Страница 28: ...Seite 3 Achten Sie beim Anschließen auf die richtige Polarität der Pluspol der Box muss mit der Plus polklemme des Verstärkers und der Minuspol der Box mit der Minuspolklemme des Verstärkers verbunden werden Eine falsche Polarität führt zu einer unnatürlichen und bassarmen Wiedergabe Wählen Sie mit den Boxenparametern des AV Receivers für alle verwendeten NS P40 Boxen das kleine Modell bzw S Wenn ...

Страница 29: ...brauch Vor seinem Einsatz ist der Subwoofer gemäß dem nachstehend beschriebenen Verfahren auf optimale Lautstärkebalance mit den Frontlautsprechern einzustellen 1 Stellen Sie Lautstärkeregler VOLUME auf Mindestwert 0 2 Schalten Sie die Stromversorgung aller anderen Komponenten ein 3 Sorgen Sie dafür dass der Netzschalter POWER in Stellung ON ist Daraufhin leuchtet die Netzanzeige grün 4 Spielen Si...

Страница 30: ...asswiedergabe im Frequenzbereich des Helmholtz Resonators strömt allerdings Luft heftig durch den Port zwischen dem Inneren und Äußeren des Lautsprechers und die am Portende entstehenden Turbulenzen können gelegentlich geräuschvoll sein Port und Gehäuse resonieren mit einer Frequenz die von deren Abmessung und Form abhängt Die Turbulenzen am Portende enthalten eine breite Palette von Frequenzantei...

Страница 31: ...chnischen Daten zum Zeitpunkt der Veröffentlichung Um die neueste Version der Anleitung zu erhalten rufen Sie die Website von Yamaha auf und laden Sie dann die Datei mit der Bedienungsanleitung herunter Fehlersuche Störung Mögliche Ursache Abhilfe Sie hören nichts Die Lautsprecherkabel sind nicht richtig angeschlossen Überprüfen Sie ob alle Lautsprecherkabel ordnungsgemäß angeschlossen sind Die La...

Страница 32: ...enheten kan det orsaka brand elektriska stötar eller funktionsfel Om vatten eller andra vätskor skulle läcka in i enheten måste du omedelbart stänga av strömmen och dra ut nätadapterkabeln från vägguttaget Be sedan den återförsäljare du köpte enheten av eller kvalificerad Yamaha servicepersonal att undersöka enheten Sätt aldrig in eller ta ut nätkontakten med våta händer Hantera inte enheten med v...

Страница 33: ... av strömbrytaren och dra ut kontakten ur vägguttaget och be den återförsäljare du köpte enheten av eller kvalificerad Yamaha servicepersonal att undersöka enheten Du får inte göra följande stå eller sitta på utrustningen placera tunga föremål ovanpå utrustningen placera utrustningen i en stapel använda onödigt stor kraft på knappar brytare in och utkontakter osv luta dig mot utrustningen Undvik a...

Страница 34: ...pplad i vägguttaget även om själva enheten är avstängd Enheten är konstruerad för att förbruka en mycket liten mängd ström i detta tillstånd Användarinformation beträffande insamling och dumpning av gammal utrustning Denna symbol på produkter förpackningar och dokument innebär att använda elektriska och elektroniska produkter inte får blandas med vanligt hushållsavfall För rätt handhavande återstä...

Страница 35: ... innehåll 1 Installation av högtalarna 1 Installation av front center och surroundhögtalare 2 Installera subwoofern 2 Väggmontering av högtalarna 2 Anslutning av högtalarna 3 Anslutningsdiagram 3 Anslutning av nätkablarna 4 Använda subwoofern 5 Justering av subwooferhögtalaren innan bruk 5 ADVANCED YAMAHA ACTIVE SERVO TECHNOLOGY II 6 TWISTED FLARE PORT 6 Felsökning 7 Tekniska data 7 Förpackningens...

Страница 36: ... Det kan vara nödvändigt att stycka upp parallella väggytor genom att sätta upp bokhyllor eller liknande på väggarna Väggmontering av högtalarna Du kan montera högtalarna på väggen enligt följande 1 Dra i skruvar i en solid vägg eller ett väggstöd såsom visas nedan Använd 3 5 till 4 0 mm diameter självgängande skruvar 2 Häng upp varje högtalare i dess nyckelhålsöppning på de utskjutande skruvarna ...

Страница 37: ...ledningarna ordentligt Anmärkning Gör högtalarkablarna så korta som möjligt Överskottskabel ska inte buntas eller rullas ihop Tvinna de blottlagda ledningarna ordentligt så att enskilda trådar inte spretar Var försiktig så att du inte gör dig illa när du förbereder högtalarkablarna Anslutning av högtalarna ANTENNA FM GND AM COMPONENT VIDEO PR PB Y OPTICAL TV AV 1 AV 2 AV 3 AV 4 AV 5 AUDIO 1 AUDIO ...

Страница 38: ...blarna som du förberett tidigare Tag hjälp av Anslutningsdiagram på sidan 3 Se till att ansluta högtalarna med korrekt polaritet pluskontakter till pluskontakter och minuskontakter till minuskontakter Om de korsas kommer ljudet att bli onaturligt och sakna bas I AV receiverns högtalarinställningar ska alla NS P40 högtalare anges som små eller S Om du ansluter subwoofern till en Yamaha DSP förstärk...

Страница 39: ...ooferhögtalaren innan bruk Innan du börjar använda subwooferhögtalaren ska du justera den så att du får optimal balans av ljudstyrka mellan subwooferhögtalaren och huvudhögtalarna Följ anvisningarna nedan 1 Ställ VOLUME kontrollen på minimum 0 2 Slå på strömmen till alla andra komponenter Se till att strömbrytaren POWER är i ON läge 3 Driftindikatorn lyser då grönt 4 Spela en källa med lågfrekvens...

Страница 40: ...och ut genom porten mellan högtalarens interiör och exteriör när bas återges i Helmholtz resonatorns frekvensområde vilket kan leda till brus på grund av det turbulenta luftflödet vid portens ände Porten och höljet resonerar vid en frekvens som bestäms av deras dimensioner och form Å andra sidan innehåller det turbulenta luftflödet vid portens ände ett brett spektrum av frekvenskomponenter som int...

Страница 41: ...V 50 Hz Strömförbrukning 40 W Yttermått B x H x D 291 x 292 x 341 mm Vikt 8 5 kg Innehållet i denna bruksanvisning gäller de senaste specifikationerna vid utgivningsdatumet Om du vill ha den senaste bruksanvisningen går du till Yamahas webbplats och laddar ned bruksanvisningsfilen Felsökning Problem Möjlig orsak Åtgärd Inget ljud Högtalarkablarnaär inteanslutna på rätt sätt Se till att alla högtal...

Страница 42: ...ale l acqua penetra nell unità potrebbe causare un incendio scosse elettriche o malfunzionamenti In caso di infiltrazione di liquido all interno del dispositivo come ad esempio acqua spegnere immediatamente lo strumento e scollegare il cavo di alimentazione dalla presa CA Richiedere quindi un ispezione al concessionario presso il quale è stata acquistata l unità o a un tecnico autorizzato Yamaha N...

Страница 43: ...re tutti i dispositivi impostare al minimo tutti i livelli di volume La mancata osservanza di queste precauzioni potrebbe provocare scosse elettriche danni all udito o alle apparecchiature Manutenzione Prima di pulire l unità rimuovere la spina elettrica dalla presa CA La mancata osservanza di tale precauzione potrebbe causare scosse elettriche Precauzioni di utilizzo Non inserire mai la mano o le...

Страница 44: ... vengono fornite esclusivamente a scopo descrittivo VOLTAGE SELECTOR Per modelli per Cina Asia e generale L interruttore del selettore di tensione posto sul pannello posteriore del dispositivo deve essere impostato in base alla tensione locale PRIMA di collegare l unità alla corrente elettrica CA Le tensioni sono 110 120 220 240 V CA 50 60 Hz AVVERTENZA PER RIDURRE IL RISCHIO DI INCENDI O SCOSSE E...

Страница 45: ...altoparlanti anteriori centro e surround 2 Installare il subwoofer 2 Montaggio degli altoparlanti a muro 2 Collegare gli altoparlanti 3 Diagramma dei collegamenti 3 Collegare i cavi dell alimentazione 4 Usare il subwoofer 5 Regolazione del subwoofer prima dell uso 5 ADVANCED YAMAHA ACTIVE SERVO TECHNOLOGY II 6 TWISTED FLARE PORT 6 Risoluzione dei problemi 7 Specifiche tecniche 7 Contenuto dell imb...

Страница 46: ...in modo obliquo rispetto alla parete Potrebbe essere necessario rompere il parallelismo delle pareti grazie all utilizzo di mensole Montaggio degli altoparlanti a muro Potete montare gli altoparlanti a muro come segue 1 Inserite le viti in una parete o su un supporto da parete come mostrato di seguito Utilizzate viti autofilettanti con un diametro compreso tra 3 5 e 4 mm 2 Fissate ogni altoparlant...

Страница 47: ...avo 3 Attorcigliate i fili Nota Fate in modo che i cavi degli altoparlanti siano i più corti possibile Non attorcigliate il cavo in eccesso Attorcigliate bene i fili in modo che questi non fuoriescano Fate attenzione a non ferirvi mentre preparate i cavi degli altoparlanti Collegare gli altoparlanti ANTENNA FM GND AM COMPONENT VIDEO PR PB Y OPTICAL TV AV 1 AV 2 AV 3 AV 4 AV 5 AUDIO 1 AUDIO 2 COAXI...

Страница 48: ...iagramma dei collegamenti a pagina 3 come riferimento Accertatevi di collegare gli altoparlanti con la corretta polarità terminali positivi con terminali positivi e terminali negativi con terminali negativi Se vi confondete il suono risulta sfalsato e privo di bassi Se il vostro ricevitore AV ha delle impostazioni per la dimensione degli altoparlanti specificate piccolo o S per tutti gli altoparla...

Страница 49: ...re il subwoofer regolarlo al fine di ottenere il miglior bilanciamento del volume tra il subwoofer e gli altoparlanti anteriori in base alla procedura descritta di seguito 1 Impostare il comando VOLUME su minimo 0 2 Accendere tutti gli altri componenti 3 Verificare che l interruttore POWER sia impostato sulla posizione ON La spia di alimentazione si accende in verde 4 Eseguire un brano contenente ...

Страница 50: ...ne di un basso rientrante nell intervallo di frequenze del risuonatore l aria entra ed esce con forza attraverso la porta tra l interno e l esterno del diffusore a volte producendo rumore causato dalla turbolenza del flusso d aria all estremità della porta La porta e l alloggiamento risuonano a una frequenza determinata dalle loro dimensioni e forma D altra parte la turbolenza nel flusso d aria al...

Страница 51: ...esente manuale sono conformi alle specifiche più aggiornate a partire dalla data di pubblicazione Per ottenere la versione più recente del manuale accedere al sito Web Yamaha e scaricare il file corrispondente Risoluzione dei problemi Problema Causa possibile Soluzione Non viene emesso alcun suono I cavi degli altoparlanti non sono collegati correttamente Accertatevi che i cavi degli altoparlanti ...

Страница 52: ...rar en el interior del aparato Si cualquier líquido como el agua penetra en la unidad existe riesgo de incendio descargas eléctricas o averías Si entra en el dispositivo cualquier líquido por ejemplo agua apague inmediatamente la alimentación y desenchufe el cable de alimentación de la toma de CA A continuación solicite una inspección al distribuidor a quien compró la unidad o al Servicio técnico ...

Страница 53: ...ón y no provocar daños en los altavoces Por el mismo motivo cuando desconecte la alimentación apague PRIMERO la unidad De no seguirse estas instrucciones existe riesgo de pérdida auditiva o daños en los altavoces Mantenimiento Retire el enchufe de la toma de CA cuando antes de limpiar la unidad De no seguirse estas instrucciones existe riesgo de descargas eléctricas Precauciones de uso No introduz...

Страница 54: ... China Asia y modelos gene rales El interruptor de selección de tensión situado en el panel trasero de esta unidad debe ajustarse a la tensión principal de su emplazamiento ANTES de enchufar esta unidad a la corriente eléctrica La selección de voltajes es para CA de 110 120 220 240 V a 50 60 Hz ADVERTENCIA PARA REDUCIR EL RIESGO DE INCENDIO Y DESCARGA ELÉCTRICA NO EXPONGA ESTA UNIDAD A LA LLUVIA O...

Страница 55: ...surround 2 Instalar el subwoofer 2 Instalar los altavoces en la pared 2 Conectar los altavoces 3 Diagrama de conexión 3 Conectar los cables de alimentación 4 Utilizar el subwoofer 5 Ajuste del altavoz de ultragraves antes de utilizarlo 5 ADVANCED YAMAHA ACTIVE SERVO TECHNOLOGY II 6 TWISTED FLARE PORT 6 Solucionar problemas 7 Especificaciones 7 Contenido del paquete Cable del altavoz 24 5 m x1 Debe...

Страница 56: ...de la pared Es posible que tenga que dividir las superficies de las paredes paralelas colocando estanterías etc en ellas Instalar los altavoces en la pared Puede instalar los altavoces en una pared de la manera siguiente 1 Fije los tornillos a una pared firme o en un soporte para la pared tal como se muestra a continuación Utilice tornillos autorroscantes de 3 5 a 4 mm de diámetro 2 Cuelgue cada a...

Страница 57: ...ables pelados Nota El cable de los altavoces debe ser tan corto como sea posible No ate ni enrolle los cables excesivamente Trence los cables pelados firmemente para que los filamentos individuales no se separen Procure no lesionarse cuando prepare los cables de altavoz Conectar los altavoces ANTENNA FM GND AM COMPONENT VIDEO PR PB Y OPTICAL TV AV 1 AV 2 AV 3 AV 4 AV 5 AUDIO 1 AUDIO 2 COAXIAL CD C...

Страница 58: ...te Diagrama de conexión de la página 3 Asegúrese de conectar los altavoces con la polaridad correcta los terminales positivos a los terminales positivos y los negativos a los terminales negativos Si los cruza el sonido no será natural y sin graves En los ajustes de tamaño del receptor AV especifique pequeño o Small o S para todos los altavoces del NS P40 Si conecta el subwoofer a un amplificador D...

Страница 59: ...tavoz de ultragraves ajuste el altavoz de ultragraves para obtener el balance de volumen óptimo entre el altavoz de ultragraves y los altavoces principales Para ello siga el procedimiento que se describe a continuación 1 Ajuste el control VOLUME al mínimo 0 2 Conecte la alimentación de los demás componentes 3 Asegúrese de que el interruptor POWER esté en la posición ON El indicador de alimentación...

Страница 60: ... región de frecuencia de este resonador Helmholtz el aire entra y sale violentamente a través del puerto entre el interior y el exterior del altavoz lo que en ocasiones genera ruido debido al flujo de aire turbulento en el extremo del puerto El puerto y la carcasa resuenan en una frecuencia determinada por sus dimensiones y forma Por otra parte la turbulencia del flujo de aire en el extremo del pu...

Страница 61: ... 8 5kg El contenido de este manual es aplicable a las especificaciones más recientes en la fecha de publicación Para obtener el último manual acceda al sitio web de Yamaha y descargue el archivo del manual Solucionar problemas Problema Posible causa Solución No hay sonido Los cables del altavoz no están conectados correctamente Compruebe que los cables de los altavoces estén conectados correctamen...

Страница 62: ... of storingen veroorzaken Als er een vloeistof zoals water in het apparaat terechtkomt zet dan onmiddellijk het instrument uit en haal de stekker uit het stopcontact Laat het apparaat vervolgens controleren bij de dealer bij wie u het hebt gekocht of door gekwalificeerd Yamaha servicepersoneel Haal nooit een stekker uit en steek nooit een stekker in het stopcontact als u natte handen heeft Raak di...

Страница 63: ...richtlijnen houdt kunnen elektrische schokken ontstaan Zorgvuldig behandelen Steek uw hand of vingers niet in de basreflexpoorten van de subwoofer Als u zich niet aan deze richtlijnen houdt kan letsel ontstaan Zorg dat er geen vreemde voorwerpen terechtkomen in de basreflexpoorten van de subwoofer zoals metaal of papier Als u zich niet hieraan houdt kan dat leiden tot brand elektrische schokken of...

Страница 64: ...r van dit toestel in het stopcontact te steken Instelbare netspanningen zijn 110 120 220 240 V wisselstroom 50 60 Hz WAARSCHUWING STEL HET APPARAAT NIET BLOOT AAN REGEN OF VOCHT OM HET RISICO OP BRAND OF ELEKTRISCHE SCHOKKEN TE VOORKOMEN De stroomvoorziening van dit toestel is niet afgesloten zolang de stekker in het stopcontact zit ook al is het toestel zelf uitgeschakeld Het toestel werd ontworp...

Страница 65: ... speakers 1 Plaatsing van de front midden en surroundspeakers 2 Installeren van de subwoofer 2 Wandmontage van de speakers 2 Aansluiten van de speakers 3 Aansluitschema 3 Aansluiten van de netsnoeren 4 Gebruik van de subwoofer 5 Instelling van de subwoofer voor gebruik 5 ADVANCED YAMAHA ACTIVE SERVO TECHNOLOGY II 6 TWISTED FLARE PORT 6 Verhelpen van problemen 7 Specificaties 7 Geleverde onderdelen...

Страница 66: ...opende wanden d m v een boekenkast e d te verstoren Wandmontage van de speakers U kunt de speakers als volgt aan de wand monteren 1 Draai de schroeven zoals hierna getoond in een stevige muur of pijler Gebruik hiervoor zelftap pende schroeven met een diameter van 3 5 4 mm 2 Hang de houder van elke speaker over de uitstekende schroeven Opmerking De as van de schroef moet zich in het smalle gedeelte...

Страница 67: ...altijd zo kort mogelijk zijn Draai ze nooit samen en rol de overtollige lengte nooit op Draai de aders zo stevig mogelijk vast om te voorkomen dat ze andere onderdelen raken Wees tijdens het voorbereiden van de speakerkabels voorzichtig dat u zich niet verwondt Aansluiten van de speakers ANTENNA FM GND AM COMPONENT VIDEO PR PB Y OPTICAL TV AV 1 AV 2 AV 3 AV 4 AV 5 AUDIO 1 AUDIO 2 COAXIAL CD COAXIA...

Страница 68: ...a 3 als referentie Let tijdens het aansluiten op de juiste polariteit de pluspool van de speaker moet op de positieve klem en de minpool van de speaker moet op de negatieve klem van de versterker worden aangesloten Een foute polariteit leidt tot een onnatuurlijk geluid met veel te weinig bas Voor alle gebruikte NS P40 speakers moet u de betreffende grootteparameters van uw AV receiver op klein oft...

Страница 69: ...n de subwoofer voor gebruik Stel de subwoofer in voor u deze in gebruik neemt U verkrijgt de optimale volumebalans tussen de subwoofer en de voorluidsprekers door de hieronder aangegeven procedure te volgen 1 Zet de VOLUME regelaar in de laagste stand 0 2 Schakel alle overige componenten in 3 Zorg dat de POWER schakelaar in de stand ON is gezet De spanningsindicator licht groen op 4 Speel een bron...

Страница 70: ...asklanken die zich binnen de frequentieregio van deze Helmholtz resonator bevinden beweegt lucht zich heftig in en uit de poort tussen de binnenen buitenkant van de luidspreker waardoor soms ruis wordt geproduceerd wegens de turbulente luchtstroom aan het uiteinde van de poort De poort en de kast resoneren op een frequentie die door hun afmetingen en vorm wordt gevormd De turbulentie in de luchtst...

Страница 71: ...291 x 292 x 341 mm Gewicht 8 5 kg De inhoud van deze handleiding geldt voor de meest recente specificaties op de datum van publicatie Voor de meest recente handleiding gaat u naar de website van Yamaha waar u het bestand met de handleiding kunt downloaden Verhelpen van problemen Probleem Mogelijke oorzaak Oplossing U hoort niets De luidsprekerkabels zijn niet naar behoren aangesloten Controleer of...

Страница 72: ...осмотр или ремонт представителю у которого вы приобрели устройство или специалисту центра технического обслуживания корпорации Yamaha Беречь от воды Данное устройство предназначено для повседневного использования в офисе или дома Не используйте его в областях требующих высокой надежности например в сфере жизнеобеспечения здравоохранения или при работе с активами высокой стоимости Затем отправьте з...

Страница 73: ... может стать причиной неисправности Не рекомендуется находиться в непосредственной близости от устройства во время стихийных бедствий например землетрясений Так как устройство может перевернуться или упасть и причинить травму немедленно отойдите от него в безопасное место Перед перемещением устройства отключите выключатель питания и отсоедините все подключенные кабели Несоблюдение этого указания м...

Страница 74: ...ппарата при наличии в нем сконденсировавшейся влаги может привести к его повреждению Техническое обслуживание При резких изменениях температуры или влажности на поверхности устройства могут образоваться капли воды конденсат В случае появления капель сразу же вытрите их мягкой тканью Оставшиеся на устройстве капли воды могут быть поглощены деревянными частями что вызовет их деформацию Для чистки ус...

Страница 75: ...ля настенного монтажа 2 Подключение колонок 3 Схема подключения 3 Подключение силовых кабелей 4 Использование сабвуфера 5 Регулировка сабвуфера перед использованием 5 ТЕХНОЛОГИЯ ADVANCED YAMAHA ACTIVE SERVO TECHNOLOGY II 6 Фазоинвертор TWISTED FLARE PORT 6 Поиск и устранение неисправностей 7 Технические характеристики 7 Содержимое упаковки Кабель колонок 24 5 м x1 Егонеобходимо разрезатьна5отрезко...

Страница 76: ...д углом к стене Возможно понадобится нарушить параллельность поверхностей стен посредством установки вдоль них книжных полок и т п Колонки для настенного монтажа Вы можете выполнить монтаж колонок на стене как показано ниже 1 Установите винты в твердую стену или опору стены как показано на рисунке ниже Используйте самонарезающие винты диаметром от 3 5 до 4 мм 2 Повесьте каждую колонку шпоночным па...

Страница 77: ...ленные провода Примечание Кабели колонок должны быть максимально короткими Не связывайте и не сматывайте избыточную часть кабеля Оголенные провода необходимо плотно сплести чтобы отдельные жилы не выступали наружу Будьте осторожны чтобы предотвратить травмы в процессе подготовки кабелей Подключение колонок ANTENNA FM GND AM COMPONENT VIDEO PR PB Y OPTICAL TV AV 1 AV 2 AV 3 AV 4 AV 5 AUDIO 1 AUDIO ...

Страница 78: ...итесь в том что при подключении колонок была соблюдена правильная полярность положительные терминалы к положительным терминалам а отрицательные терминалы к отрицательным терминалам Если их перепутать звук будет неестественным и будет плохо слышно низкие звуковые частоты В настройках размеров акустической системы AV ресивера укажите малый размер или S для всех акустических систем NS P40 При подсоед...

Страница 79: ...ованием сабвуфера отрегулируйте его для обеспечения оптимального баланса громкости между сабвуфером и фронтальными динамиками выполнив описанную нижу процедуру 1 Установите регулятор громкости VOLUME в минимальное положение 0 2 Включите питание всех компонентов 3 Убедитесь что выключатель POWER установлен в положение включения ON Индикатор питания загорится зеленым 4 Начните воспроизведение источн...

Страница 80: ...оспроизведении низких частот в диапазоне данного резонатора Гельмгольца воздух движется резко внутрь и наружу через порт между внутренней и наружной частью колонки что иногда создает шум из за турбулентного воздушного потока на конце порта Порт и корпус резонируют на частоте которая определяется их размерами и формой С другой стороны турбулентность воздушного потока на конце порта состоит из широк...

Страница 81: ...Г 291 x 292 x 341 мм Масса 8 5 кг В содержании данного руководства приведены последние на момент публикации технические характеристики Для получения последней версии руководства посетите веб сайт корпорации Yamaha и загрузите файл с руководством Поиск и устранение неисправностей Проблема Возможная причина Метод устранения Отсутствует звук Кабели колонок не подключены надлежащим образом Убедитесь в...

Страница 82: ...como água entrar na unidade um incêndio choques elétricos ou mau funcionamento poderão ocorrer Se algum líquido como água penetrar no dispositivo desligue o imediatamente e desconecte o cabo de alimentação da tomada de corrente alternada CA Em seguida solicite uma inspeção do fornecedor que vendeu a unidade ou do Serviço Técnico Yamaha Nunca conecte nem desconecte o plugue elétrico com as mãos mol...

Страница 83: ...dos choques elétricos poderão ocorrer Cuidado no manuseio Não coloque a mão ou os dedos na abertura do refletor de grave do subwoofer Se você não tomar esses cuidados lesões poderão ocorrer Não coloque materiais estranhos tais como metal ou papel na abertura do refletor de grave do subwoofer Se você não tomar esses cuidados incêndio choques elétricos ou mau funcionamento poderão ocorrer Se entrar ...

Страница 84: ... alto falantes O não cumprimento deste pode danificar as unidades de alto falante Informações Sobre as funções e dados incluídos na unidade Os alto falantes não têm distinção entre esquerda e direita O ar pode ser soprado pela abertura do refletor de grave Isso não é um defeito Isto ocorre especialmente quando estiver reproduzindo música com grave pesado Sobre o conteúdo deste manual As ilustraçõe...

Страница 85: ...Instalação do subwoofer 2 Montagem dos alto falantes na parede 2 Ligar os alto falantes 3 Diagrama de conexões 3 Conexão dos cabos de alimentação 4 Usar o subwoofer 5 Ajustando o subwoofer antes de usar 5 ADVANCED YAMAHA ACTIVE SERVO TECHNOLOGY II 6 TWISTED FLARE PORT 6 Solução de problemas 7 Especificações 7 Conteúdo da embalagem Cabo para alto falante 24 5 m x1 Deve ser cortado em 5 comprimentos...

Страница 86: ...io quebrar as superfícies de parede paralela substituindo por prateleiras etc ao longo delas Montagem dos alto falantes na parede É possível montar os alto falantes na parede conforme segue 1 Instale os parafusos em uma parede sólida ou suporte de parede conforme mostrado abaixo Use parafusos autoperfurantes com diâmetro de 3 5 a 4 mm 2 Suspenda cada alto falante por seus orifícios de encaixe até ...

Страница 87: ... firmemente a torção dos fios desencapados Observação Certifique se de que os cabos dos alto falantes estejam o mais curto possível Não dobre ou enrole o excesso de cabos Torça os fios desencapados firmemente para que não fiquem alargados Tome cuidado para não se machucar enquanto prepara os cabos dos alto falantes Ligar os alto falantes ANTENNA FM GND AM COMPONENT VIDEO PR PB Y OPTICAL TV AV 1 AV...

Страница 88: ...gina 3 para referência Certifique se de que você conectou os alto falantes com as polaridades corretas terminais positivos com terminais positivos e terminais negativos com terminais negativos Se você os cruzar o som será artificial e sem graves Nas configurações de tamanho do alto falante do seu receptor AV especifique pequeno ou S para todos os alto falantes e subwoofer Se você está conectando o...

Страница 89: ...não tiver certeza da configuração correta Ajustando o subwoofer antes de usar Antes de utilizar o subwoofer ajustar o subwoofer para obter o balanço de volume ideal entre o subwoofer e os alto falantes frontais seguindo o procedimento descrito abaixo 1 Ajuste o VOLUME controle para o mínimo 0 2 Ligue a força de todos os componentes 3 Certifique se que o POWER interruptor está na posição ON The Pow...

Страница 90: ... de frequência deste ressonador Helmholtz ar move se violentamente dentro e para fora através da porta entre o interior e o exterior do alto falante às vezes produzindo ruído devido ao fluxo de ar turbulento no final da porta A porta e o gabinete ressoam em uma freqüência que é determinada por suas dimensões e forma Por outro lado a turbulência no fluxo de ar no final da porta contém uma ampla gam...

Страница 91: ...sões L x A x P 291 x 292 x 341 mm Peso 8 5 kg O conteúdo deste manual aplica se as especificações mais recentes a partir da data de publicação Para obter o manual mais recente acesse o site da Yamaha em seguida baixe o arquivo Solução de problemas Problema Possível causa Solução Não há emissão de som Os cabos do alto falante não estão conectados adequadamente Certifique se de que os cabos estão co...

Страница 92: ...Development Group 2018 Yamaha Corporation Published 06 2018 IPEI A0 10 1 Nakazawa cho Naka ku Hamamatsu 430 8650 Japan VAS0200 Yamaha Global Site https www yamaha com Yamaha Downloads http download yamaha com ...

Отзывы: