background image

Setting up the MusicCAST c

lient

Connecting to the network

33

SELECT

[

0.

0.

0.

0]

Save & Network restart
Cancel

Subnet Mask

SELECT

[

0.

0.

0.

0]

Save & Network restart
Cancel

Subnet Mask

SELECT

[

0.

0.

0.

0]

Save & Network restart
Cancel

Subnet Mask

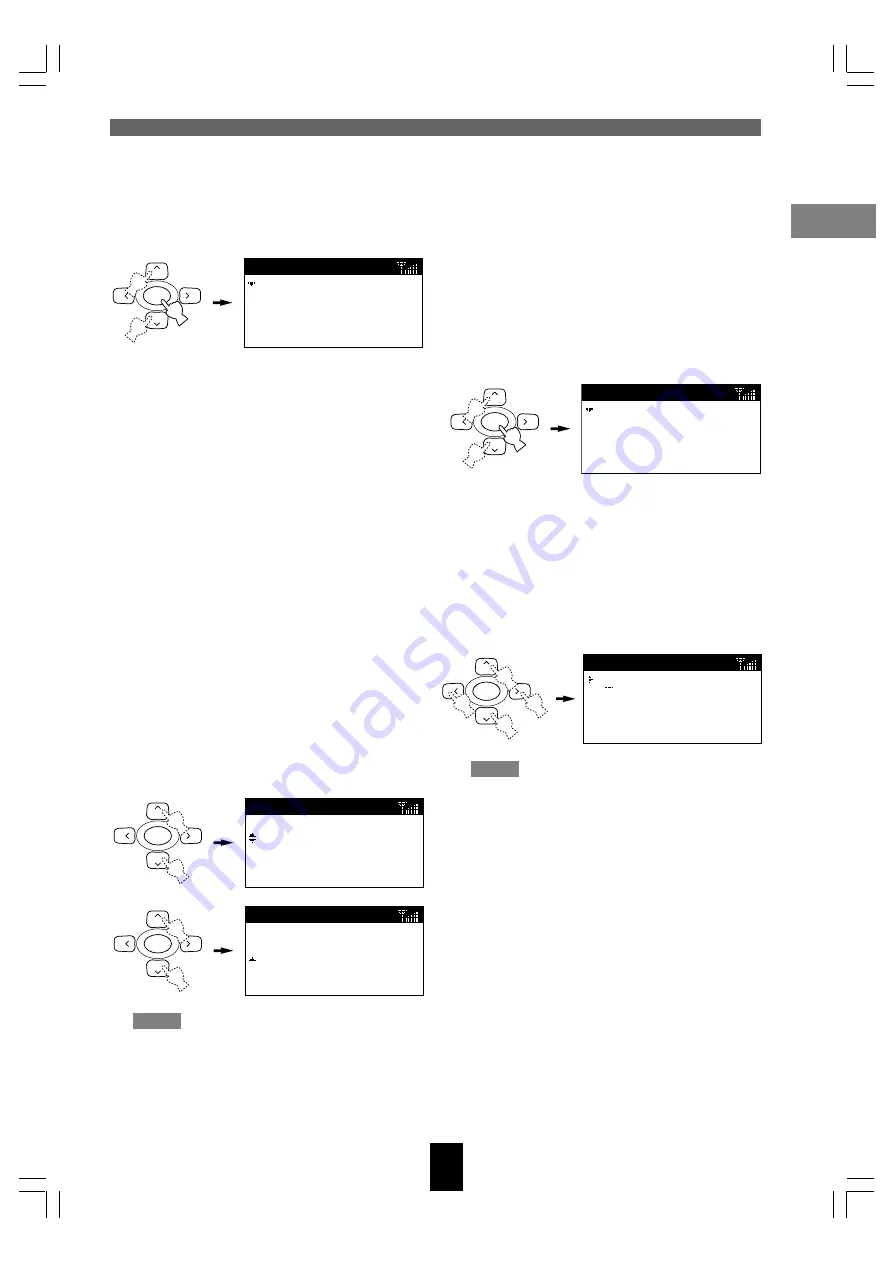
Setting the Subnet Mask Address

1.

From the Manual Setup menu, use 

u

 / 

d

to move the cursor to “Subnet Mask”
and press SELECT.

The Subnet Mask screen appears on the display.

2.

Press SELECT.

The cursor enters the IP address setting field.
You need to enter same subnet mask IP address
here that you have set on the MusicCAST
server. Refer to the “Status view” screens on the
MusicCAST server On Screen Display for the
correct address.

3.

Use 

u

 / 

d

 to select the desired 3 digit IP

number, then press 

j

 / 

i

 to move to the

next number to set.

4.

When you have set all four numbers,
press SELECT to confirm the setting.

The cursor returns to the left of the IP address
setting field.

5.

If you are satisfied with the settings you
have made, move the cursor to “Save &
Network restart” and press SELECT.

This confirms the settings and restarts the
network hardware on the MusicCAST client,
returning the display to the Network menu.
Alternatively, select “Cancel” to exit from the
menu without saving and confirmation.

Note

• This setting is only valid when the

MusicCAST client is not set to act as a DHCP
client (see page 31 for an explanation of how
to do this).

Setting the WEP key for your MusicCAST
client

In order for your MusicCAST client and server to
share data over a wireless network, you must give
them both the same encryption key (WEP key).
Refer to the MusicCAST server main manual for an
explanation of how to set this key on the
MusicCAST server.

1.

From the Manual Setup menu, use 

u

 / 

d

to scroll the menu to “WEP key” and
press SELECT.

The WEP key screen appears on the display.

2.

Press SELECT.

The cursor enters the WEP key setting field.
You need to enter the characters here as you
have set in the WEP key field on the
MusicCAST server.

3.

Use 

u

 / 

d

 to select the desired

character, then press 

j

 / 

i

 to move the

cursor to the left or right.

Note

• The MusicCAST network uses 128-bit

encryption, which requires a 13-digit WEP
key. If you enter less than 13 digits, the
MusicCAST client automatically adds zeroes
to the code you set to make up the difference.

4.

When you finish entering the key, press
SELECT to confirm the setting.

The cursor returns to the left of the WEP key
setting field.

SELECT

[

]

Save & Network restart
Cancel

WEP key

[MC1

]

Save & Network restart
Cancel

WEP key

SELECT

102_Musiccast_E.p65

2003.06.28, 19:02

33

Содержание MusicCAT MCX-A10

Страница 1: ...DIGITAL AUDIO TERMINAL MCX A10 100_Musiccast_E p65 2003 06 28 19 01 1 ...

Страница 2: ...in a residential environment will not result in harmful interference with other electronic devices This equipment generates uses radio frequencies and if not installed and used according to the instructions found in the users manual may cause interference harmful to the operation of other electronic devices IMPORTANT SAFETY INSTRUCTIONS 1 Read these instructions 2 Keep these instructions 3 Heed al...

Страница 3: ...ened for any reasons When not planning to use this unit for long periods of time i e vacation disconnect the AC power plug from the wall outlet Be sure to read the TROUBLESHOOTING section on common operating errors before concluding that this unit is faulty Before moving this unit press STANDBY ON to place the unit in standby mode and disconnect the AC power plug from the wall outlet Be sure to us...

Страница 4: ...cause undesired operation of the device The installer of this radio equipment must ensure that the antenna is located or pointed such that it does not emit RF field in excess of Health Canada limits for the general population consult Safety Code 6 obtainable from Health Canada s website www hc sc gc ca rpb For U K and European customers We the manufacturer YAMAHA hereby declare that the MCX A10 is...

Страница 5: ...MusicCAST client 25 Using the Auto Configuration function 26 Configuring your MusicCAST client manually 28 Accessing the Manual Setup screen 29 Setting the Network Mode 29 Setting the ESS ID 30 Setting your MusicCAST client to act as a DHCP client 31 Setting the MusicCAST server Server ID 32 Setting the MusicCAST client IP Address 32 Setting the Subnet Mask Address 33 Setting the WEP key for your ...

Страница 6: ...e ON Timer function 58 Setting the timer 58 Using the ON TIMER key to activate the ON Timer 59 Using the Auto Play function 59 Using the Auto Level Control function 60 Turning Auto Level Control on or off 60 Using the tone controls 61 Altering the tone settings 61 Using the contrast controls 62 Altering the contrast settings 62 Using the Sleep function 63 Switching the unit to sleep mode 63 Turnin...

Страница 7: ...Ω outputs Slim Desktop Wall mountable design This owner s manual refers to the MCX 1000 DIGITAL AUDIO SERVER as the MusicCAST server and the MCX A10 DIGITAL AUDIO TERMINAL as the MusicCAST client YAMAHA and the Electronic Industries Association s Consumer Electronics Group want you to get the most out of your equipment by playing it at a safe level One that lets the sound come through loud and cle...

Страница 8: ...the following parts are included Lithium battery Audio pin cable Subwoofer cable Video pin cable AC adaptor LSE0107A1240 AC power cable OFF TIMER ON TIMER I 2 3 REPEAT RANDOM SLEEP 4 5 6 PAUSE 7 STOP S PLAY MENU SELECT VOL GROUP GROUP INPUT MUTE RECALL BOOK MARK PLAY INFO 101_Musiccast_E p65 2003 06 28 19 02 9 ...

Страница 9: ...on the front panel display 6 VOL Adjust the volume of the MusicCAST client output 7 STANDBY ON Switches the MusicCAST client between ON and STANDBY modes 8 s Halts playback from the MusicCAST client 9 p Begins playback of the selected track 0 Controller Moves the on screen cursor within the Graphical User Interface and enters deletes or selects the selection highlighted on the front panel display ...

Страница 10: ...he MusicCAST client to a subwoofer to achieve a more powerful better defined bass sound 5 VIDEO OUT jack Use this jack to connect the MusicCAST client to an external view device such as a monitor or television You can view the front panel display on this device 6 SPEAKER OUT terminals Connect speaker cables to these terminals 7 AC adaptor input Connect the AC adaptor to this input LAN AUX IN LINEO...

Страница 11: ...ches the ON TIMER function see pages 58 59 on and off 4 REPEAT Places the unit in repeat playback mode see pages 46 47 5 b Accesses the previous track in the group you are listening to 6 w Searches back through the current song 7 s STOP Halts playback from the MusicCAST client 8 MENU Returns the on screen display to the menu page 9 p PLAY Begins playback of the selected track 0 GROUP Accesses the ...

Страница 12: ...e next song in the group you are listening to p e PAUSE Pauses playback of the track you are currently listening to a f Searches forwards through the current song s PLAY INFO Displays information on the song you are currently listening to on the front panel display d GROUP Accesses the next playback group f u Moves the on screen cursor up g i Enters into menu items highlighted on the front panel d...

Страница 13: ...cCAST client on from STANDBY mode 1 Press STANDBY ON The MusicCAST client turns on displaying its startup screen then displays the Top Menu screen 2 The MusicCAST client attempts to connect to the MusicCAST server displaying the following screen Top Menu Play Recall Play Edit Bookmark Setup Input Top Menu Play Connecting Input 3 If it is able to make a connection the MusicCAST client returns to th...

Страница 14: ...T client offers a wide variety of functions and parameters for your use You can access all of these through the Graphical User Interface GUI viewable from the front panel display on the MusicCAST client itself The interface as laid out below is simple and easy to understand The MusicCAST client controller Moving the controller in the directions indicated on the front panel of the MusicCAST client ...

Страница 15: ...ent is in repeat play mode 7 Random play icon 8 Group skip target Indicates the group within which the group skip function is currently operating 9 Mute icon Play Info Artist name Album name Song name Album Play Info Artist name Album name Song name Album 9 7 8 6 5 4 1 2 3 The Play Info screen displays information on the song the MusicCAST is currently playing or the last song played if it is not ...

Страница 16: ...m into the wall 40 mm apart 2 Mount the MusicCAST client on the screws by positioning it so that the screws on the wall fit snugly into the holes on the mounting bracket Cautions The MusicCAST client weighs 2 kg 4 lbs 6 oz Do not mount it on thin plywood or a wall with soft surface material If mounted the screws may come loose from the flimsy surface and the speaker may fall This damages the Music...

Страница 17: ...tery as it may explode if mistreated Never abuse or disassemble the battery Be sure the battery polarity is correct If it is not installed correctly it may cause fire or explosion Avoid placing the lithium battery and also the remote control with the battery installed in high temperature such as direct sunlight Do not recharge the battery When replacing the battery make sure to only use a CR2025 b...

Страница 18: ...nd humidity become high Make sure the remote control signal receiver is not exposed to direct sunlight or strong lights Such exposure may inhibit the functioning of the remote control ON TIMER PUSH SELECT MENU PLAY INFO VOL PHONES OFF TIMER ON TIMER I 2 3 REPEAT RANDOM SLEEP 4 5 6 PAUSE 7 STOP S PLAY MENU SELECT VOL GROUP GROUP INPUT MUTE RECALL BOOK MARK PLAY INFO DIGITAL AUDIO TERMINAL MCX A10 3...

Страница 19: ...e of the server see page 23 3 If you intend to connect to your MusicCAST server using a wired network connection have you connected your MusicCAST client to the server with a LAN cable to a hub 4 Is the MusicCAST server power turned on 5 Is the MusicCAST client connected to an AC outlet 6 Is the MusicCAST client power turned on LAN AU X IN LINEO UT S W OOFE R L SP EA KER OUT 4Ω MIN CLAS S 2 WIRING...

Страница 20: ...USH SELECT MENU PLAY INFO VOL PHONES ON TIMER PUSH SELECT MENU PLAY INFO VOL PHONES ON TIMER PUSH SELECT MENU PLAY INFO VOL PHONES ON TIMER PUSH SELECT MENU PLAY INFO VOL PHONES ON TIMER PUSH SELECT MENU PLAY INFO VOL PHONES DIGITAL AUDIO SERVER MCX 1000 STANDBY ON TOP MENU MENU PLAY INFO TIMER CLIENT STATUS LAN STANDBY ENCODING BACK CD AUTO STORE SUB MENU PAGE PUSH SELECT 1 2 3 4 5 DIGITAL AUDIO ...

Страница 21: ...NFO VOL PHONES DIGITAL AUDIO TERMINAL MCX A10 DIGITAL AUDIO TERMINAL MCX A10 DIGITAL AUDIO TERMINAL MCX A10 Network addresses Each component on a network uses an address to identify itself to other components on the same network The address consists of four numbers and looks like this 192 168 1 1 This is called an IP address Without these addresses the components on the network cannot transmit dat...

Страница 22: ...orks the MusicCAST server can only distribute to five MusicCAST clients simultaneously using the wireless network Note When using close to the maximum number of MusicCAST clients the surrounding environment strongly affects the ability of the MusicCAST components to make wireless connections To ensure stable playback in this situation reduce the bitrate at which the MusicCAST server stores MP3 fil...

Страница 23: ...eed one A network hub receives signals from multiple components on a network and sends directs them to the correct destination This enables many components to transmit and receive data on the same network We recommend that you use a broadband router if you wish to connect your MusicCAST components to the Internet Note You cannot use MusicCAST system components for any activity on a network that ex...

Страница 24: ...e Metal mounting racks may affect wireless network signals Use wired network connections when mounting MusicCAST components in metal racks Configuring your MusicCAST client There are two methods you can use to configure your MusicCAST client for wireless connection In almost all cases the Auto Configuration function will configure your MusicCAST client correctly and automatically establish a conne...

Страница 25: ...uration mode see the MCX 1000 owner s manual for details If you wish to connect to a MusicCAST server over a wireless network check that the MusicCAST client is close enough to the server to receive a wireless network signal see page 23 for details Check that the MusicCAST client is connected to an AC outlet Carry out the following procedure to configure the MusicCAST client This explanation uses ...

Страница 26: ... seven MusicCAST clients simultaneously and does not attempt to connect to other clients if it already has seven clients registered To remove unwanted MusicCAST clients use u d j i to move the cursor on the MusicCAST server on screen display to a client ID then move the cursor to CLR and press SELECT When finished removing clients move the cursor to OK and press SELECT Carry out Auto Configuration...

Страница 27: ...ower on Turn the MusicCAST client power on Confirm that the following have been set on the MusicCAST server The Client IDs of all of the MusicCAST clients that you wish to use on the network See pages 67 68 for an explanation of how to check the Client ID of your MusicCAST client The ESS ID of the wireless network if you plan to use wireless network connections The Subnet Mask address The WEP key ...

Страница 28: ...old MENU for two seconds to return to the Top Menu screen 2 Use u d to move the cursor to Setup and press SELECT The Setup screen appears on the display 3 Use u d to move the cursor to Network and press SELECT The Network screen appears on the display 4 Use u d to move the cursor to Manual Setup and press SELECT The Manual Setup screen appears on the display SELECT Network Status Auto Configuratio...

Страница 29: ... the u d to move the cursor to ESS ID and press SELECT The ESS ID screen appears on the display 2 Press SELECT The cursor enters the ESS ID setting field You need to enter the same ESS ID you have set on the MusicCAST server 3 Use u d to select the desired character then press j i to move the cursor to the left or right 4 When you finish entering the ID press SELECT to confirm the setting The curs...

Страница 30: ...ing the MusicCAST client as a DHCP client you may sometimes need to reset the IP address the MusicCAST client is receiving from the DHCP server Stop all activity on MusicCAST clients while doing this For more information see the section of your DHCP server s owner s manual that deals with the expiration of IP addresses 1 From the Network Menu use u d to move the cursor to Manual Setup and press SE...

Страница 31: ...ve Network restart Cancel IP Address SELECT 0 0 0 0 Save Network restart Cancel IP Address Setting the MusicCAST server Server ID 1 From the Manual Setup menu use u d to move the cursor to Server ID and press SELECT The Server ID screen appears on the display 2 Press SELECT The cursor enters the Server ID setting field You need to enter the same address here as your MusicCAST server has set as its...

Страница 32: ...cel to exit from the menu without saving and confirmation Note This setting is only valid when the MusicCAST client is not set to act as a DHCP client see page 31 for an explanation of how to do this Setting the WEP key for your MusicCAST client In order for your MusicCAST client and server to share data over a wireless network you must give them both the same encryption key WEP key Refer to the M...

Страница 33: ...ure correctly and the MusicCAST client has achieved a connection the connection icon appears at the top right of the on screen display For wired network connections For wireless network connections The bars on the right of the wireless network signal icon indicate the strength of the network signal One bar indicates a weak signal five bars indicates a maximum strength signal The following icon ind...

Страница 34: ...PCM files to this MusicCAST client See page 125 in the MCX 1000 owner s manual Playback groups The selection criteria you use to choose a song for playback also defines the playback group For example selecting an album from the Album menu for playback sets album as the playback group and plays back all songs in the album Playback continues in the order the songs are registered or in alphabetical o...

Страница 35: ... you have selected an artist then all tracks from that artist are targeted and so on Group ALL SINGLE Sets the group playback function see pages 45 46 ALL The MusicCAST client begins playback of the next group when playback of the present group finishes SINGLE The MusicCAST client halts playback when playback of the present group finishes PLAY INFO Play Info Artist name Album name Song name Album ...

Страница 36: ...ha Triste Artist Songs SELECT Play Info Artist name Album name Song name Album To play a song from an artist Use this option to directly access the songs by a particular artist stored in your MusicCAST server All songs and albums assigned to this artist are available for selection Carry out the following procedure to play a specific song from albums assigned to a particular artist 1 Press and hold...

Страница 37: ...r two seconds to return to the Top Menu screen 2 Use u d to move the cursor to Play from the Top Menu screen and press SELECT The Play Menu screen appears on the display 3 Use u d to move the cursor to Albums and press SELECT The display lists all albums stored in the MusicCAST server in alphabetical order SELECT Artists Albums Genres All Songs Playlists Play Menu SELECT Auberge August Everything ...

Страница 38: ...LL BOOK MARK PLAY INFO ON TIMER PUSH SELECT MENU PLAY INFO VOL PHONES u d j SELECT MENU DIGITAL AUDIO TERMINAL MCX A10 MENU Top Menu Play Recall Play Edit Bookmark Setup Input 4 Use u d to move the cursor to the name of an album Moving the cursor to the bottom of the screen causes the display to scroll upwards while moving it to the top of the screen makes the display scroll downwards Press SELECT...

Страница 39: ...ngs SELECT Play Info Artist name Album name Song name Album SELECT Stone Flower Terra Brasilis Tide Urubu Wave Genre Albums To select a song from the complete list of songs Use this option to directly access all of the songs in the MusicCAST database without selecting an Artist Album or Genre first Carry out the following procedure to select and playback a song from the complete list of songs stor...

Страница 40: ...CT Playlists Collections 1 Collections 2 Collections 3 Collections 4 Collections 5 OFF TIMER ON TIMER I 2 3 REPEAT RANDOM SLEEP 4 5 6 PAUSE 7 STOP S PLAY MENU SELECT VOL GROUP GROUP INPUT MUTE RECALL BOOK MARK PLAY INFO ON TIMER PUSH SELECT MENU PLAY INFO VOL PHONES u d j SELECT MENU DIGITAL AUDIO TERMINAL MCX A10 4 Use u d to move the cursor to the name of a song Moving the cursor to the bottom o...

Страница 41: ...p of the screen makes the display scroll downwards 7 Press SELECT to begin playback of the selected song The Play Info screen appears on the display Press j to return the list screen To stop playback Press s To halt playback temporarily Press e Press e again to resume playback Notes Once playback of the song you select is finished the MusicCAST client begins playback of the next song in the playli...

Страница 42: ...owing procedure to access this list 1 Press and hold MENU for two seconds to return to the Top Menu screen 2 Use u d to move the cursor to Play and press SELECT The Play Menu screen appears on the display 3 Use u d to move the cursor to Bookmarks and press SELECT The Bookmarks screen appears on the display 4 Use u d to move the cursor to the name of a song Moving the cursor to the bottom of the sc...

Страница 43: ...appears on the display Press j to return the list screen To stop playback Press s To halt playback temporarily Press e Press e again to resume playback Note Once playback of the selected song is complete the MusicCAST client begins playback of the next song in the bookmark list 103_Musiccast_E p65 2003 06 28 19 03 44 ...

Страница 44: ...the current setting of the Group parameter accessible by following the procedure on this page To select an entire group for random playback begin playback from one level higher up the Menu tree than you would otherwise For example to playback all of the songs from an artist at Random rather than from one particular album press PLAY with the cursor on the Artist name in the Artist selection screen ...

Страница 45: ... back playback advances to the next group To target an entire group for random playback you should press PLAY from the Albums Genres Artists or All songs menu 5 Press SELECT to confirm your setting The cursor returns to the left of the Group parameter 6 Press j The display returns to the Play Info screen Repeat Playback When you utilize the Repeat Playback function the MusicCAST repeats playback o...

Страница 46: ...ime remaining to complete playback of the current song To alter the time display 1 Begin playback of a track see pages 35 44 The Play Info screen appears on the display 2 Press i The Play Style screen appears on the display 3 Use u d to move the cursor to Time and press SELECT The cursor moves so that is its displayed under the Time parameter setting Play Info Artist name Album name Song name Albu...

Страница 47: ...owner s manual 1 Press and hold MENU for two seconds to return to the Top Menu screen 2 Use u d to move the cursor to Play from the Top Menu and press SELECT The Play Menu screen appears on the display MENU Top Menu Play Recall Play Edit Bookmark Setup Input SELECT Artists Albums Genres All Songs Playlists Play Menu ON TIMER PUSH SELECT MENU PLAY INFO VOL PHONES OFF TIMER ON TIMER I 2 3 REPEAT RAN...

Страница 48: ...owner s manual for an explanation of how to configure the MusicCAST server and AV receiver or page 133 of the same manual for an explanation of how to display a list of controllable YAMAHA AV receivers on screen The MusicCAST server can only distribute one radio preset source signal to MusicCAST clients Changing the radio preset source selection on any MusicCAST client changes the radio preset sou...

Страница 49: ... screen appears on the display 4 Use u d to move the cursor to AV Receiver and press SELECT The display lists the preset groups available on the receiver 5 Use u d to move the cursor to a preset group and press SELECT The display lists the stations available within the preset group 6 Use u d to move the cursor to the station you want to access and press SELECT The Play Info screen appears and play...

Страница 50: ... any song you are currently listening to stops 4 The audio signal from the external source is output from the MusicCAST client speakers Alternatively selecting a song from the MusicCAST client menus returns this setting to Server To return to playback from the MusicCAST server library Carry out the procedure as above selecting Server instead of Client AUX in step 3 MENU Top Menu Play Recall Play E...

Страница 51: ... menus Adding a song to the list of bookmarks There are two methods you can use to add a song to your list of bookmarks Adding a song using the Play Info screen 1 Follow through the steps described in the Playback section see pages 35 44 to start playback of a song The Play Info screen appears on the display 2 Press BOOKMARK A check sign appears beside the song name on the on screen display To rem...

Страница 52: ...ECT The Play Menu screen appears on the display 3 Access the song list via the Artists Albums Genres or All Songs menus as described on pages 35 44 All songs currently bookmarked have a check symbol displayed beside them 4 Use u d to move the cursor to the song you wish to remove from the bookmark list SELECT Artists Albums Genres All Songs Playlists Play Menu MENU Top Menu Play Recall Play Edit B...

Страница 53: ...e display 3 Use u d to move the cursor to Copy to Playlist and press SELECT 4 Press PLAY to create a playlist The MusicCAST client creates a new playlist in collection 1 on the MusicCAST server The display returns to the Edit Bookmark screen Edit Bookmark Press PLAY to copy STOP to cancel SELECT Copy to Playlist Clear All Edit Bookmark MENU Top Menu Play Recall Play Edit Bookmark Setup Input SELEC...

Страница 54: ...figuration message appears on the display 4 Press PLAY or STOP PLAY Confirm the erase action and return to the Edit Bookmark menu STOP Cancel the action and return to the Edit Bookmark menu SELECT Copy to Playlist Clear All Edit Bookmark MENU Top Menu Play Recall Play Edit Bookmark Setup Input SELECT ON TIMER PUSH SELECT MENU PLAY INFO VOL PHONES OFF TIMER ON TIMER I 2 3 REPEAT RANDOM SLEEP 4 5 6 ...

Страница 55: ...meter group OFF Timer ON Timer Auto Play Auto Level Control Contrast Network Treble Bass Parameter name Manual Setup Mode Manual Setup Server ID Manual Setup DHCP Manual Setup IP Address Manual Setup Subnet Mask Manual Setup ESS ID Manual Setup WEP key Parameter setting OFF OFF OFF OFF 68 Auto SV 00000 ON 192 168 1 2 255 255 255 0 MC none SERVER 0dB 0dB 70dB 104_Musiccast_E p65 2003 06 28 19 03 56...

Страница 56: ...ote control to set the OFF Timer Carry out the following procedure to access the OFF Timer function from any screen 1 Press OFF TIMER The OFF Timer screen appears on the display 2 Press OFF TIMER repeatedly to cycle through the available settings The available OFF Timer settings are 30 60 90 120 minutes and OFF Selecting any setting other than OFF activates the OFF timer function and sets it to pl...

Страница 57: ... specify rather like an alarm clock This is called the ON Timer function You can use the ON timer and OFF Timer simultaneously Setting the timer Carry out the following procedure to set the MusicCAST client to power up at a specified time 1 Press and hold MENU for two seconds to return to the Top Menu screen 2 Use u d to move the cursor to Setup and press SELECT The Setup screen appears on the dis...

Страница 58: ...t Bookmark Setup Input SELECT Setup OFF Timer ON Timer Auto Play Auto Level Control Contrast SELECT Auto Play OFF ON ON TIMER PUSH SELECT MENU PLAY INFO VOL PHONES OFF TIMER ON TIMER I 2 3 REPEAT RANDOM SLEEP 4 5 6 PAUSE 7 STOP S PLAY MENU SELECT VOL GROUP GROUP INPUT MUTE RECALL BOOK MARK PLAY INFO u d SELECT MENU DIGITAL AUDIO TERMINAL MCX A10 Using the ON TIMER key to activate the ON Timer Carr...

Страница 59: ...s you may encounter large differences between the sound levels of songs when playing back songs on your MusicCAST client The Auto Level Control function on the MusicCAST client automatically reduces or increases the base volume level to a theoretical average when it plays back songs in order to eliminate any large differences in the volume at which the original songs were recorded Note The Auto Le...

Страница 60: ... return to the Top Menu screen 2 Use u d to move the cursor to Tone and press SELECT The Tone screen appears on the display 3 Use u d to move the cursor to the desired parameter and press SELECT Treble Increase the setting of this parameter to increase the amount of treble in the sound output by the MusicCAST client Bass Increase the setting of this parameter to increase the amount of bass in the ...

Страница 61: ...Top Menu Play Recall Play Edit Bookmark Setup Input SELECT Setup OFF Timer ON Timer Auto Play Auto Level Control Contrast SELECT Contrast Contrast OFF TIMER ON TIMER I 2 3 REPEAT RANDOM SLEEP 4 5 6 PAUSE 7 STOP S PLAY MENU SELECT VOL GROUP GROUP INPUT MUTE RECALL BOOK MARK PLAY INFO ON TIMER PUSH SELECT MENU PLAY INFO VOL PHONES u j d i SELECT MENU DIGITAL AUDIO TERMINAL MCX A10 3 Use u d to move ...

Страница 62: ...do not use it for 30 minutes Using the Sleep function You can set your MusicCAST client in Sleep mode when you are not using it Power consumption is reduced in Sleep mode but the MusicCAST client still consumes a small amount of power to keep the display and the remote control signal receiver in operation You can place the unit in sleep mode by carrying out the procedure below Switching the unit t...

Страница 63: ... on the display MENU Top Menu Play Recall Play Edit Bookmark Setup Input SELECT Setup OFF Timer ON Timer Auto Play Auto Level Control Contrast SELECT System Information System Update System Reset SELECT Version Date Information System settings 4 Use u d to move the cursor to Information and press SELECT The Information screen appears on the display ON TIMER PUSH SELECT MENU PLAY INFO VOL PHONES OF...

Страница 64: ...appears on the display 5 Use u d to move the cursor to System and press SELECT The System screen appears on the display 6 Use u d to move the cursor to System Update and press SELECT The System Update prompt appears on the display 7 Press PLAY to begin the update process The following screens appear in order MENU Top Menu Play Recall Play Edit Bookmark Setup Input SELECT Setup OFF Timer ON Timer A...

Страница 65: ...ny data stored in your MusicCAST network It resets all settable parameters to their server settings so you need to set them to suit your requirements after performing the reset procedure Note that in resetting all the parameters the MusicCAST client also resets its network parameters and disconnects itself from your MusicCAST network Resetting your MusicCAST client 1 Press and hold MENU for two se...

Страница 66: ...pends on its network connection to obtain data from the MusicCAST server The Network Status screen provides you with information on the quality of the network connection your MusicCAST is currently using Accessing the Network Status screen 1 Press and hold MENU for two seconds to return to the Top Menu screen 2 Use u d to move the cursor to Setup and press SELECT The Setup screen appears on the di...

Страница 67: ...dress is the unique identification code your MusicCAST client uses in the MusicCAST network Select Wireless LAN to display the following information Comm Quality The quality of the network signal your MusicCAST client is receiving Signal Level The strength of the signal your MusicCAST client is receiving BitRate The speed at which your MusicCAST client is receiving data over the network connection...

Страница 68: ... of the MusicCAST client or alternatively changing to a wired network connection Check the configuration procedure and try again Stop recording and start the Auto Configuration process again Increase the volume setting Check the connections between the MusicCAST client and the speakers Run the Auto Configuration process Check the network settings of the MusicCAST client and MusicCAST server Turn t...

Страница 69: ...he cables are not connected correctly You are using low impedance speakers You are using audio or video cables other than those supplied to connect the MusicCAST client to an amplifier or TV monitor The rubber covering of the LAN cable is blocking the panel cover You are using close to the maximum number of MusicCAST clients and simultaneously playing storing or editing on the MusicCAST server Thi...

Страница 70: ...s not receiving a strong radio signal Another MusicCAST component is changing the tuner preset or external input on the MusicCAST server There is more than one DHCP server operation in the network trying to use the same IP addresses Remedy Increase the ANALOG REC LEVEL Configure the AV receiver parameters correctly Turn the AV receiver on Correctly connect the AV receiver to the MusicCAST server R...

Страница 71: ...uous track equivalent to a single track from a CD cassette or other source stored on the MusicCAST server Recording MP3 Format A data format used to store music on the Hard Disk Drive in the MusicCAST server MP3 files take roughly one tenth of the space that PCM files need to store the same song However sound quality is not as good as that of PCM files and the MusicCAST server cannot record MP3 fi...

Страница 72: ...ing data and navigating through the menus contained in these two components Front panel The panel on the MusicCAST server and MusicCAST client on which operational data is displayed Hard disk drive The component within your MusicCAST server that allows it to store the audio material from your CDs as data Hard disk drive capacity is expressed in megabytes with a larger number denoting more storage ...

Страница 73: ...el volume max 1 Vrms PHONES jack Output level phones level max 150 Ω 20dB 650 mV SPEAKER OUT terminals Maximum power EIAJ 4 Ω 1kHz 10 THD 17 W 17 W General Playback data format MP3 linear PCM Power supply AC 100 to 240 V 50 60 Hz Power consumption 40 W Standby power consumption U S A and Canada models 0 7 W Europe and Australia models 1 1 W Operating temperature 5 to 35 C Dimensions W x H x D 210 ...

Страница 74: ...work 21 network addresses 22 network configuration 68 Network menu 28 31 Network status 67 O OFF Timer 12 57 On screen display 12 33 34 52 ON Timer 12 58 59 P PCM 35 Play info screen 16 36 playback group 12 13 35 45 playlist 35 41 52 54 R radio station 49 Random 16 Random play 16 Repeat 12 46 Repeat playback 12 35 46 Resetting 66 Router 21 24 RS 232C 48 S Server ID 22 28 32 Signal level 68 Sleep 1...

Страница 75: ...E S A RUE AMBROISE CROIZAT BP70 CROISSY BEAUBOURG 77312 MARNE LA VALLEE CEDEX02 FRANCE YAMAHA ELECTRONICS UK LTD YAMAHA HOUSE 200 RICKMANSWORTH ROAD WATFORD HERTS WD18 7GQ ENGLAND YAMAHA SCANDINAVIA A B J A WETTERGRENS GATA 1 BOX 30053 400 43 VÄSTRA FRÖLUNDA SWEDEN YAMAHA MUSIC AUSTRALIA PTY LTD 17 33 MARKET ST SOUTH MELBOURNE 3205 VIC AUSTRALIA Printed in Japan WB18780 1 This document is printed ...

Отзывы: