background image

18 

En

If there is a problem with the unit, check the following list first. If you cannot resolve the problem with the suggested 
solutions or if the problem is not listed below, turn off and unplug the unit, and consult the nearest authorized Yamaha dealer 
or service center.

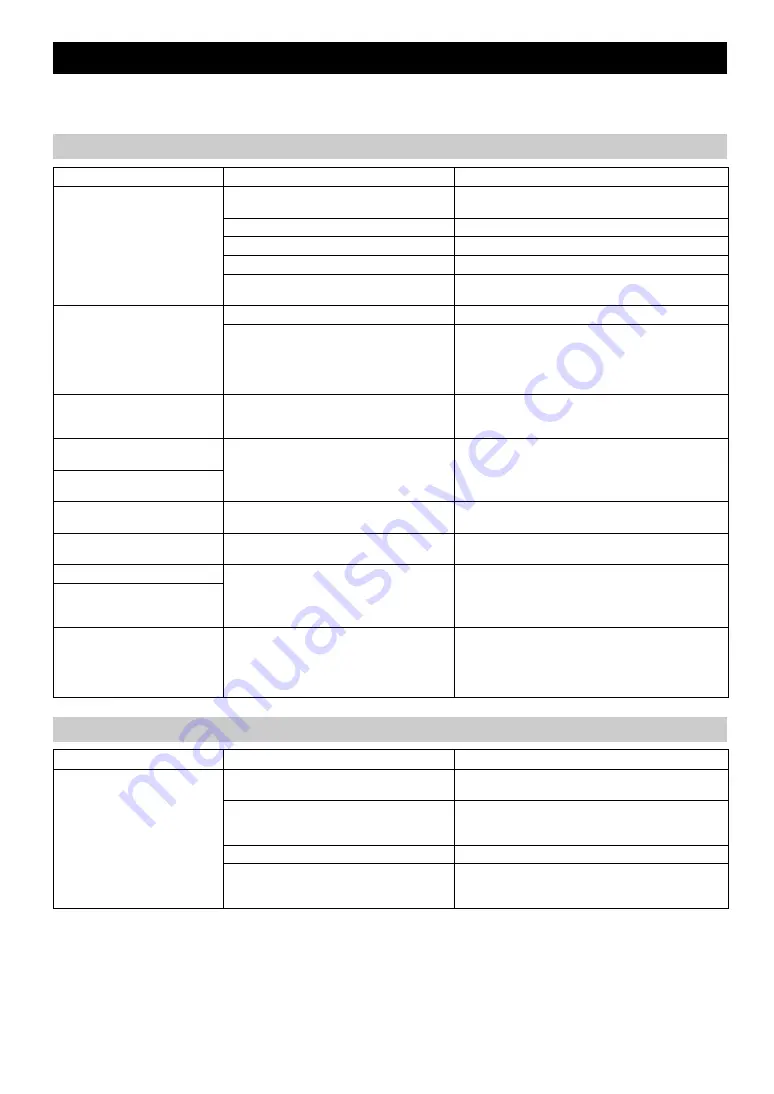
TROUBLESHOOTING

General

Problem

Cause

Solution

The speakers make no sound.

The volume might be set to the minimum level, 
or muted.

Adjust the volume level.

The source may be incorrect.

Select the correct source.

The speakers may not be connected securely.

Check the connections (

P. 4).

Headphones are connected.

Remove the headphones.

The volume of a connected external device is not 
loud enough.

Raise the volume of the external device.

Sound suddenly turns off.

The sleep timer may be set (

P. 15).

Turn the unit on and play the source again.

The auto power standby function may have 
operated.

When the time specified for AUTO PWR STDBY in the 
option menu has elapsed (

P. 14) or when 20 minutes 

have elapsed without any operation being performed after 
stopping USB device or CD playback, the unit will turn off 
automatically.

Sound is cracked/distorted or 
there is abnormal noise.

Input source volume is excessive, or volume of 
this unit is excessive (especially Bass).

Adjust volume with VOLUME, or use the option menu 
(

P. 14) to adjust the bass range. If an external device is 

playing back, lower the volume of the external device.

The unit does not operate 
properly.

The unit may have received a strong electrical 
shock such as lightning or excessive static 
electricity, or power supply may have dropped.

Press the reset button on the rear panel of the unit (

P. 4

using a fine-tipped stick and restart the unit.

The unit turns on but 
immediately shuts off.

A digital or high-frequency 
equipment produces noises.

The unit may be placed too close to the digital or 
high-frequency equipment.

Place the unit farther away from the equipment.

The clock setting has been 
cleared.

The unit remained unpowered for about one hour. Plug the power cable into the wall outlet firmly, and set the 

clock again (

P. 6).

Alarm does not sound.

The unit is set to ECO standby.

In the option menu, set POWER SAVING to NORMAL 
(

P. 14).

The front panel display indicates 
“ALARM not work” and can’t 
set the alarm.

The unit turns off unexpectedly.

The auto power standby function may have 
operated.

When the time specified for AUTO PWR STDBY in the 
option menu has elapsed (

P. 14) or when 20 minutes 

have elapsed without any operation being performed after 
stopping USB device or CD playback, the unit will turn off 
automatically.

Remote control

Problem

Cause

Solution

The remote control does not work 
properly.

The remote control may be operated outside its 
operation range.

For information on the remote control operation range, 
refer to “How to use the remote control” (

P. 5).

The remote control signal receiver on the unit 
(

P. 2) may be exposed to direct sunlight or 

lighting (inverted fluorescent lamps).

Change the lighting or orientation of the unit.

The battery may be worn out.

Replace the battery with a new one (

P. 3).

There are obstacles between the remote control 
signal receiver on the unit (

P. 2) and the 

remote control.

Remove the obstacles.

Содержание MCRB020BLK

Страница 1: ...OWNER S MANUAL AB Micro Component System ...

Страница 2: ...aha service personnel when any service is needed The cabinet should never be opened for any reasons 15 When not planning to use this unit for long periods of time i e vacation disconnect the AC power plug from the wall outlet 16 Be sure to read the TROUBLESHOOTING section on common operating errors before concluding that this unit is faulty 17 Before moving this unit press to set the unit to off a...

Страница 3: ...g 17 TROUBLESHOOTING 18 NOTES ON DISCS AND USB DEVICES 21 SPECIFICATIONS 22 CONTENTS Play back music from external devices such as your audio data CDs USB devices or external devices via the AUX jack and listen to the radio By the Bluetooth technology you can enjoy clear sound without wire connections Use your favorite music as an alarm When the set time arrives the music you select is played at t...

Страница 4: ...d P 12 13 7 Headphone jack Connect headphones 8Front panel display The clock and other information is displayed 9VOLUME knob Adjust the volume 0Disc tray Set a disc P 7 1Alarm time Indicates the alarm time P 16 2Repeat shuffle indicator Displays the playback mode P 8 3Multi function indicator Displays various information including the clock time information about the currently playing track and th...

Страница 5: ... playback folder and select items or edit numerical values when playing music on data CDs or USB devices ENTER Confirm a selected item or value Use these to operate the CD USB device 6TUNING Tune the radio P 11 12 7PRESET Select a radio station that you stored P 12 13 8 Repeat Shuffle Play music on a CD or USB device in repeat shuffle mode P 8 9ALARM Switch the alarm on off P 17 0SNOOZE SLEEP Set ...

Страница 6: ...y If connections are incorrect the sound will be unnatural and the low frequencies may be insufficient There might not be any sound at all if connections are incorrect Take care that the conductors of the speaker cable do not touch each other and that the conductors do not touch any other metal part Such conditions can damage this unit or the speakers Use only the supplied speakers Using other spe...

Страница 7: ...AND USB DEVICES P 21 The USB device is automatically charged when this unit is on or in standby Stop playback before disconnecting the USB device Charging may not be possible depending on the USB device Using a commercially available 3 5 mm stereo mini plug cable connect your external device to the AUX jack on the rear panel of this unit About the standby state Mode Setting menu POWER SAVING Clock...

Страница 8: ...shed the display will indicate Completed The clock will be set to 0 second the moment you complete the clock settings While making these settings you can press DISPLAY to select the time format 12 hour 24 hour If you decide to cancel without changing the setting press OPTION before confirming the change The time settings will be reset if the unit remains unpowered for about one hour 2 6 A p r Jan ...

Страница 9: ... the CD source button to switch the audio source to CD If a CD is already set playback will start 2 Press the eject button to open the disc tray 3 Set a CD into the disc tray Set the CD with the label side facing upward 4 Press the eject button to close the disc tray 5 Press the to start playback Playback can be controlled with either the remote control or the top panel on this unit P 2 3 Folders ...

Страница 10: ... a USB device is playing you can use the remote control s FOLDER buttons to select the folder The folder file number is shown for several seconds when starting playback or skipping tracks If you press DISPLAY on the remote control while a song is playing or paused the information shown on the front panel display will be switched in the following order Elapsed song playback time Song name Album nam...

Страница 11: ... source button for more than 2 seconds to enter pairing mode Pairing mode lasts for 5 minutes In pairing mode the front panel display of this unit will indicate BT Pairing You can also enter pairing mode by holding down SOURCE on this unit 2 Perform Bluetooth pairing on the Bluetooth device For details refer to the owner s manual of the Bluetooth device 3 From the Bluetooth connection list of the ...

Страница 12: ... panel display this unit will search for the Bluetooth device that was most recently connected via Bluetooth and will then establish a connection You must first turn on the Bluetooth setting of the Bluetooth device When the Bluetooth connection has been established the Bluetooth indicator will light and the name of the Bluetooth device will be displayed 1 In the Bluetooth settings of the Bluetooth...

Страница 13: ...EREO A strong FM stereo broadcast is being received TUNED MONO A monaural FM broadcast is being received even if the FM broadcast is stereo reception will be monaural if the signal is weak Not TUNED No broadcast is being received Displaying Radio Data System information U K model only If you press DISPLAY on the remote control while Radio Data System information is being received the information s...

Страница 14: ...at you want to preset 2 Press MEMORY The display will indicate PRESET MEMORY and the preset number will blink 3 Press PRESET to select the preset number that you want to store The lowest preset number that has not been stored will be selected first If you want to cancel the presetting press If you select a preset number in which a station has already been stored it will be overwritten by the new s...

Страница 15: ...ERNAL SOURCES 1 Using a commercially available 3 5 mm stereo mini plug cable connect your external device to the AUX jack on the rear panel of this unit Turn the unit off before connecting the audio cable Turn down the volume of the unit and your external audio device before connection 2 Press to turn the unit on 3 Press the AUX source button to switch the audio source to AUX 4 Start playback on t...

Страница 16: ...ER 1 R 10 POWER SAVING Switches the standby state NORMAL or ECO 1 power saving mode 5 AUTO PWR STDBY You can specify the time after which the unit will turn off standby automatically If no operation occurs for the duration you specify the unit will turn off standby automatically TIME 12H 12 hours TIME 8H 1 8 hours TIME 4H 4 hours TIME 2H 2 hours OFF the unit will not turn off standby CLOCK SET Set...

Страница 17: ...r 5 minutes P 17 Using the sleep timer Press SNOOZE SLEEP repeatedly to specify the time after which the unit will turn off You can specify 30 60 90 120 or OFF When you select a time the sleep timer is turned on and the sleep indicator is shown in the front panel display If you press SNOOZE SLEEP while the sleep timer is activated the sleep timer setting will be canceled Using the alarm function S...

Страница 18: ... Completed and your settings will be confirmed The alarm will be turned on and the alarm indicator will light If you press OPTION or turn the unit off while making alarm settings the settings will be cancelled 4 9 1 2 C o m p l e t e d Alarm time Alarm indicator 3 1 2 1 If you choose RESUME when specifying the track folder preset number the last played track folder station will be played resume pl...

Страница 19: ...rm will not function P 14 Operations while the alarm sound is playing Press SNOOZE SLEEP Snooze will stop the alarm and play it again 5 minutes later If you press SNOOZE SLEEP while the alarm is activated the alarm sound will stop for about 5 minutes Buttons on the unit other than the will also function as the snooze button Press ALARM or You can also stop the alarm by holding down SNOOZE SLEEP If...

Страница 20: ...k such as lightning or excessive static electricity or power supply may have dropped Press the reset button on the rear panel of the unit P 4 using a fine tipped stick and restart the unit The unit turns on but immediately shuts off A digital or high frequency equipment produces noises The unit may be placed too close to the digital or high frequency equipment Place the unit farther away from the ...

Страница 21: ... be compatible Use a disc supported by the unit P 21 The disc may be dirty or a foreign object may have adhered to it Wipe the disc clean Alternatively remove any foreign object that has adhered to the disc P 21 The disc does not contain playable files Use a disc contains playable files P 21 The disc was set upside down Set the disc with the label facing upward USB device playback Problem Cause So...

Страница 22: ...to this unit There is a device microwave oven wireless LAN etc outputs signals in the 2 4 GHz frequency band nearby Move this unit away from the device that is emitting radio frequency signals The Bluetooth function of the Bluetooth device is off Turn on the Bluetooth function of the Bluetooth device The Bluetooth device is not set to send Bluetooth audio signals to this unit Check that the Blueto...

Страница 23: ... dust If a disc becomes dirty wipe it with a clean dry cloth from the center out to the edge Do not use record cleaner or paint thinner To avoid malfunction do not use a commercially available lens cleaner This unit supports USB mass storage class devices e g flash memories or portable audio players using FAT16 or FAT32 format Some devices may not work properly even if they meet the requirements D...

Страница 24: ...d remove the cover or attempt to service this device DANGER This unit emits visible laser radiation when open Avoid direct eye exposure to beam When this unit is plugged into the wall outlet do not place your eyes close to the opening of the disc tray and other openings to look into inside Bluetooth Bluetooth is a technology for wireless communication between devices within an area of about 10 met...

Страница 25: ...ed in combination with a chemical symbol In this case it complies with the requirement set by the Directive for the chemical involved If there should be color blotching or noise when used near a TV move this unit away from the TV when using it Do not use this unit within 22 cm 9 inches of persons with a heart pacemaker implant or defibrillator implant Radio waves may affect electro medical devices...

Страница 26: ...IATION WHEN OPEN DO NOT STARE INTO BEAM DANGER INVISIBLE LASER RADIATION WHEN OPEN AVOID DIRECT EXPOSURE TO THE BEAM at the end of this manual Additional information à la fin de ce manuel Complément d informations am Ende dieser Anleitung Zusätzliche Informationen i slutet av denna bruksanvisning Ytterligare information in fondo al presente manuale Información adicional al final de este manual Inf...

Страница 27: ......

Страница 28: ...Printed in China AV17 0048 ...

Отзывы: