103
9
Input/output patching
Directly outputting an INPUT channel
LS9-16/32 Owner’s Manual
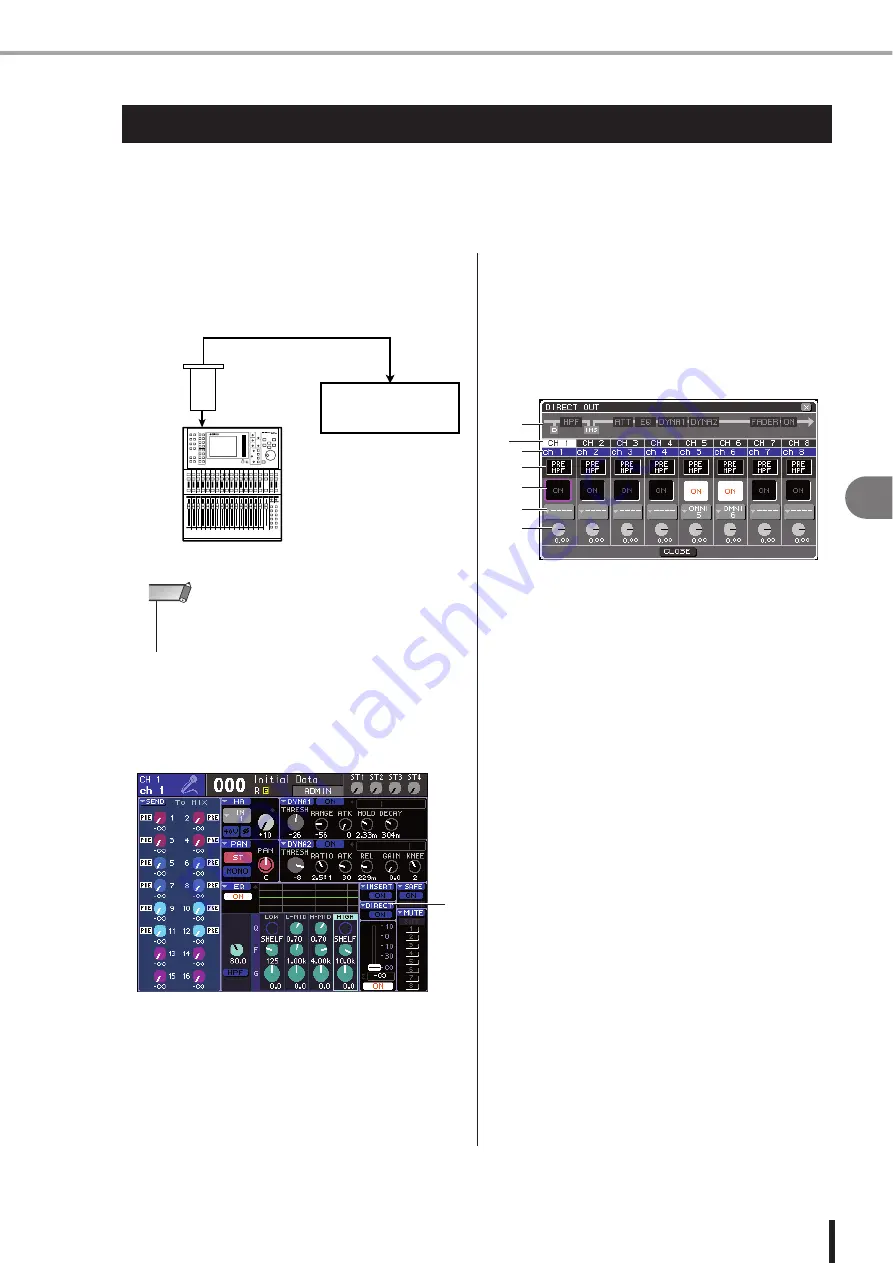
The signal of an INPUT channel can be output directly from the desired OMNI OUT jack or from
the output channel of a desired slot. For example by sending signals to an external digital
recorder via a digital I/O card installed in a slot, you can make a live recording without affecting
the LS9’s internal mixing.
1
Connect your external device to an OMNI
OUT jack or to an I/O card installed in a slot
{1/2}.
2
Press the [HOME] key to access the
SELECTED CH VIEW screen, and use the
[SEL] keys to select the INPUT channel
from which you want to take a direct output.
1
DIRECT popup button
3
Move the cursor to the DIRECT popup but-
ton in the screen, and press the [ENTER]
key.
The DIRECT OUT popup window will appear. In this
popup window you can view the name of each chan-
nel, switch the direct output point, and adjust the out-
put level, in groups of eight channels.
1
Channel block diagram
This shows the direct output point for the selected
channel.
B
Channel number
This is the channel number.
C
Channel name
This is the channel name.
D
Direct out point select box
This selects the point from which the signal will be
directly output. Move the cursor to this box and use
the dial or the [DEC]/[INC] keys to switch between
PRE HPF (immediately before the high pass filter),
PRE EQ (immediately before the EQ), or PRE
FADER (immediately before the fader).
E
DIRECT ON/OFF button
This button turns direct output on/off. To switch this
on/off, move the cursor to this button and use the
[DEC]/[INC] keys or the [ENTER] key.
F
Port select popup button
This button selects the output port that will be patched
to direct output. The currently selected output port is
shown.
G
DIRECT OUT LEVEL knob
This knob adjusts the level of the direct output.
Directly outputting an INPUT channel
DIGITAL OUT
LS9
DIGITAL IN
Digital recorder
Digital I/O
card
• If you install a digital I/O card in a slot and digitally connect an
external device, you must synchronize the word clock of the
LS9 and the external device (
NOTE
1
1
2
3
4
5
6
7
Содержание LS9 Editor
Страница 1: ...Owner s Manual LS9 16 LS9 32 EN ...
Страница 80: ...80 LS9 16 32 Owner s Manual ...
Страница 90: ...90 LS9 16 32 Owner s Manual ...
Страница 94: ...94 LS9 16 32 Owner s Manual ...
Страница 286: ...286 LS9 16 32 Owner s Manual ...


