保証書
この度はヤマハ・ヘッドフォンアンプをお買上げ戴きましてありがとうございました。
本書は、本書記載内容で修理を行なう事をお約束するものです。お買上げの日から左
記期間中に故障が発生した場合は、本書をご提示の上お買上げの販売店に修理をご
依頼ください。
(詳細は裏面をご覧ください)
修理(サービス)メモ
内 容
年 月 日
担 当 者
印
ご販売店様へ ※印欄は必ずご記入してお渡しください。
※
販
売
店
店
名
住
所
電
話
ヘッドフォンアンプ/HA-G1
製番
本体:お買上げの日から1ヶ年間
年 月 日
ご住所 〒
お名前 様
電 話 ( )
印
( )
品 名 / 品 番
保 証 期 間
※お買上げ日
お
客
様
持込修理
弦打楽器営業部 営業課
〒430-8650 静岡県浜松市中沢町10番1号
053-460-2433
9710 R1 Printed in Hong Kong
Bij dit produkt zijn batterijen geleverd.
Wanneer deze leeg zijn, moet u ze
niet weggooien maar inleveren als KCA.
HA-G1
■
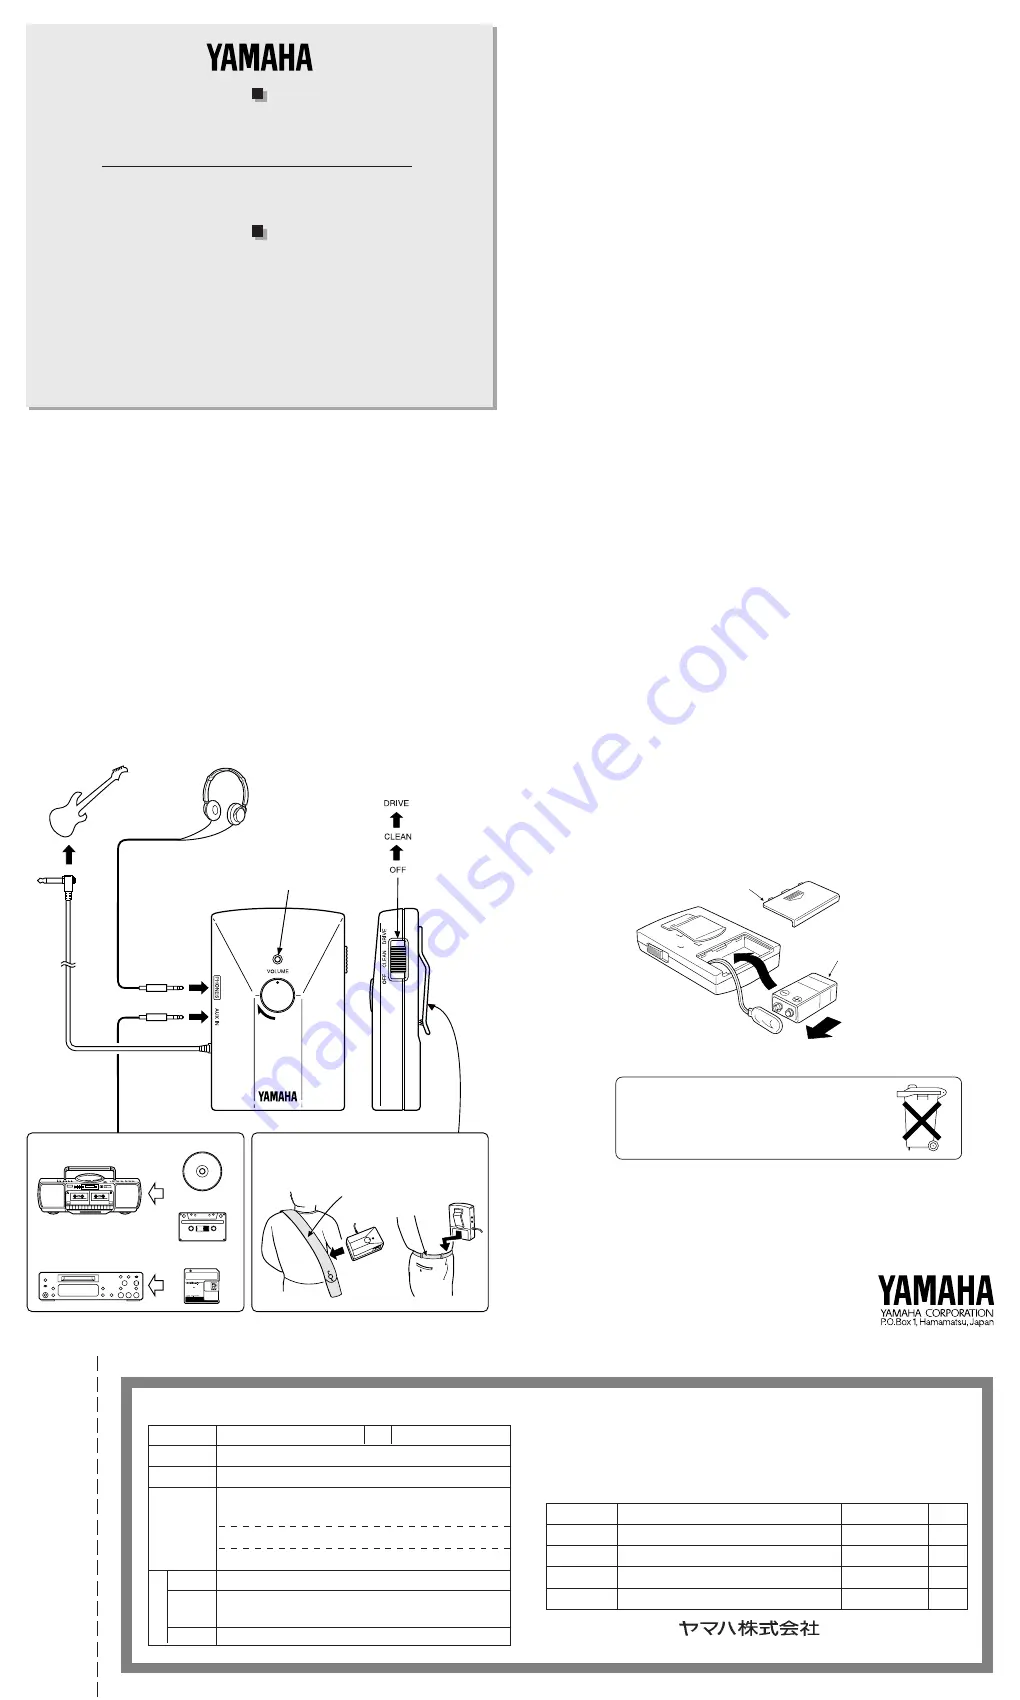
USING THE HA-G1
1
With the Power Switch turned OFF, connect a pair of headphones to the
PHONES jack (stereo mini jack).
* The HA-G1's AUX IN jack (stereo mini jack) can be used to connect an external
signal source to the HA-G1. Connecting a CD player, MD player, cassette player,
etc., to the AUX IN jack with an audio cable allows you to play along with an
external audio source.
2
The clip on the back of the HA-G1 is convenient for clipping the unit to your
guitar strap or belt.
3
Connect the HA-G1’s guitar cable to your guitar.
4
Slide the HA-G1’s Power Switch to the CLEAN or DRIVE position.
* Just as on a guitar amp, the CLEAN setting provides a distortion free tone, while
the DRIVE setting provides a distorted tone.
5
Use the HA-G1’s VOLUME control to adjust the level of the overall sound.
* The volume of the CD player, etc. connected to the AUX IN jack should be adjusted
using the volume control on the CD player, etc.
Thank you for purchasing the Yamaha HA-G1 Headphone Amplifier.
The HA-G1 contains a 2 mode (clean/drive) headphone guitar amp. With a
guitar and headphones connected to the HA-G1, you can easily enjoy
realistic guitar sound anywhere. Connecting a CD, MD or cassette player
to the HA-G1 allows you to play or practice along with an external audio
source.
To thoroughly understand the functions of, and obtain long life from your
HA-G1, please read this owner’s manual before using.
Owner’s Manual
HEADPHONE AMPLIFIER
■
BATTERY REPLACEMENT
When battery power is nearly exhausted, the overall volume decreases and the
tone, when in the CLEAN mode, becomes distorted. When this condition oc-
curs, replace the battery with a new one (6F22:006P-9V) as soon as possible.
* Always turn the power OFF before replacing the battery.
* Check the battery's polarity markings (+ and –) and attach accordingly.
HA-G1
Battery
Compartment
Cover
6F22:006P-9V
battery
5
3
4
1
2
Guitar
Headphone
Distorted tone
Clean tone
Power OFF
CD Radio Cassette
MD Player
CD
MD
Guitar strap
Belt
[Using the Clip]
Cassette tape
■
PRECAUTIONS
◆
To avoid possible damage do not expose the unit to:
- direct sunlight
- very high or low temperature/humidity
- sand or excessive dust
* Especially inside a vehicle, the temperature may rise excessively —
do not leave the HA-G1 in your parked car on a sunny day!
◆
Always set the VOLUME to “0” or remove the headphones before making
any connections or turning the power ON/OFF.
◆
Always turn the unit off after use. To avoid battery leakage, remove the
batteries when the unit is not to be used for an extended period of time.
* The indicator will light when the Power Switch is in any position other than
OFF.
◆
Neon and fluorescent lamps may induce noise. Keep the unit away from
such lighting sources.
◆
Handle the unit carefully — never apply excessive force to the controls and
avoid dropping the unit.
◆
Clean the exterior with a dry, soft cloth. Never use volatile liquids such as
benzine or thinner.
◆
After reading this owner’s manual, keep it in a safe place for future reference.
■
SPECIFICATIONS
◆
Switch
: POWER OFF / CLEAN / DRIVE
◆
Control
: VOLUME
◆
Input/Output terminals
: PHONES (Stereo mini), AUX IN (Stereo mini)
◆
Power supply
: 9V dry cell battery (6F22 or 006P)
◆
Dimensions
(WxHxD) : 70 x 106 x 35 mm
(2.8" x 4.2" x 1.4")
◆
Weight
: 147 g (5.2 oz)
◆
Accessory
: 9V dry cell battery (6F22) x 1
* Specifications and design subject to change without notice.
LINE OUT or
PHONES jack
The indicator will light when
the Power Switch is in any
position other than OFF.


