background image

E-12

COMPACT DISC PLAYER OPERATION

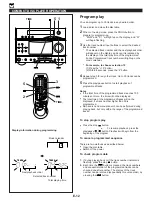
Program play

You can program up to 30 tracks in any desired order.

1

Load a disc and close the disc table.

2

When in the stop mode, press the PROG button to 
prepare for programming.
*

“PGM” and “P- 1” will light up on the display, and “01”
will begin flashing.

3

Use the track number input buttons to select the desired
track number.
*

The selected track number and the next playback order
will appear on the display, and soon it is replaced by
the display of the total play time of the programmed
tracks. Programmed track numbers will light up on the
music calendar.

* For example, to choose selection 12

(1) Press the “+10” button.
(2) Within 8 seconds, press the “2” button.

4

Repeat step 3 for any other track. Up to 30 tracks can be
programmed.

5

Press the play/pause button to start playback of
programmed tracks.

Notes

If the total time of the programmed tracks reaches 100
minutes or more, the time will not be displayed.

The total time of the programmed tracks will not be
displayed, if a track number higher than 30 is
programmed.

Skip search and manual search can be performed during
playing back, but only within the range of the programmed
tracks.

To stop program play

Press the stop 

button.

To resume playback, press the

play/pause 

/

button. Playback will begin from the

beginning of the program.

To cancel a programmed sequence

There are two methods as described below.

Open the disc table

Switch off the power.

To check program data

1. If during playing back or if the track number indicator is

flashing, press the stop 

button.

2. Each time the 

button is pressed, the track numbers

and sequential order of the programmed tracks can be
checked one after another. The display of the track
number can be returned (sequentially in reverse order) by
pressing the 

button.

TRACK

TRACK

4

Next playback order

Music calendar

Display information during programming

Total playing time

Selected track number

CD

TUNER

TAPE

POWER

1

2

3

1

2

3

FM/AM

4

5

6

4

5

6

7

8

9

7

8

9

0

0

CD/TUNER

+10

DISPLAY

SLEEP

AUX

PLAY/PAUSE

TIME

REPEAT

STOP

TAPE

EDIT

PROG

RANDOM

MUSIC

LOCATION

USER

VOLUME

TAPE

A

B

REC/

PAUSE

DECK

5  1

TIME

TIME

5

2

3

Содержание GX-3

Страница 1: ...hnology TIMER GX 3 OWNER S MANUAL MANUAL DE INSTRUCCIONES Active Servo Technology GX 3 TCD GX3 KMA GX3 NX GX3 Natural Sound Mini Component System Sistema de Componentes con Sonido Natural MIC MIN MAX MIC MIXING KARAOKE MODE DOLBY NR B DUBBING NORMAL HIGH TIMER REC PLAYBACK REC PLAYBACK EJECT A DECK A B B PLAY DIRECTION REC PAUSE EJECT A B RANDOM REPEAT TIME EDIT OPEN CLOSE LOCATION USER MEMORY MUS...

Страница 2: ...de los altavoces Pin plug connection cord Cable de conexión de toma SUPPLIED ACCESSORIES After unpacking check that the following parts are included ACCESORIOS INCLUIDOS Desembale el aparato y verificar que los siguientes accesorios están en la caja CD TUNER TAPE POWER 1 2 3 1 2 3 FM AM 4 5 6 4 5 6 7 8 9 7 8 9 0 0 CD TUNER 10 DISPLAY SLEEP AUX PLAY PAUSE TIME REPEAT STOP TAPE EDIT PROG RANDOM MUSI...

Страница 3: ...MIN AUTO MAN L MEMORY TIME ADJ Active Servo Technology 1 9 2 3 4 5 6 7 8 0 A B C D E F G H I J L M STEREO SLEEP TUNED AUTO TIMER MEMORY TRACK TOTAL REMAIN REPEAT RANDOM SINGLE FULL EDIT PGM A B ARENA NORMAL CLUB STUDIO KARAOKE ROCK BLUES RAP JAZZ FLAT USER 1 USER 2 USER 3 USER 4 60Hz I50Hz 400Hz IkHz 2 5kHz 6kHz I5kHz 1 6 2 7 3 8 4 9 5 10 OVER 15 15 14 13 12 11 PM AM FM kHz MHz VOLUME MIN MAX K N ...

Страница 4: ... GX3 3 NX GX3 U V W X Z i j h g f e d c b a MIC MIN MAX MIC MIXING KARAOKE MODE DOLBY NR B DUBBING NORMAL HIGH TIMER REC PLAYBACK REC PLAYBACK EJECT A DECK A B B PLAY DIRECTION REC PAUSE EJECT T S R Q Y A B l k ...

Страница 5: ...REPEAT STOP TAPE EDIT PROG RANDOM MUSIC LOCATION USER VOLUME TAPE A B REC PAUSE DECK 4 5 30 30 0 2 m 6 m 8 20 6 D K M L E F G HI J CD TUNER TAPE POWER 1 2 3 1 2 3 FM AM 4 5 6 4 5 6 7 8 9 7 8 9 0 0 CD TUNER 10 DISPLAY SLEEP AUX PLAY PAUSE TIME REPEAT STOP TAPE EDIT PROG RANDOM U N O P Q T S R MUSIC LOCATION USER VOLUME TAPE A B REC PAUSE DECK ...

Страница 6: ...6 6 R L 7 SYSTEM CONNECTOR SYSTEM CONNECTOR OUTPUT CD R L 9 OUTPUT CD R L INPUT AUX CD R L 8 CD TUNER TAPE POWER 1 2 3 1 2 3 FM AM 4 5 6 4 5 6 0 To AC outlet Al tomacorriente ...

Страница 7: ...URES 35W 35W 8Ω Output Power 10 THD 1 kHz 4 Preset Graphic Equalizer Modes Selectable According to the Music Source MUSIC 3 Mode Sound Field Processor LOCATION 4 User s Equalizer Pattern Storing Capability Karaoke Function Which Makes a General Stereo Source Usable for Karaoke Microphone Jack and Mixing Level Control for Karaoke Random Access Programmable CD Playback Single Track Entire Disc Repea...

Страница 8: ...ot planning to use this unit for long periods of time ie vacation etc disconnect the AC power plug from the wall outlet Grounding or polarization Precautions should be taken so that the grounding or polarization of an appliance is not defeated Do not use force on switches controls or connection wires When moving the unit first disconnect the power plug and the wires connected to other equipment Ne...

Страница 9: ...not open the cabinet Refer servicing to qualified personnel only Laser Diode Properties Material GaAlAs Wavelength 780nm Emission Duration continuous Laser Output max 44 6µW This output is the value measured at a distance of about 200mm from the objective lens surface on the Optical Pick up Block The apparatus is not disconnected from the AC power source as long as it is connected to the wall outl...

Страница 10: ...ER Button P VOLUME Control Display For pre amplifier tuner 1 Current Time Station Frequency Display 2 FM AM Indicator 3 Preset Equalizer Mode Indicators MUSIC 4 User Program Number Indicators 5 Sound Field Mode Indicators LOCATION 6 KARAOKE Indicator 7 AUTO Tuning Indicator 8 MEMORY Indicator 9 TIMER Set Indicator 0 VOLUME Level Indicator A SLEEP Indicator B TUNED Indicator C STEREO Indicator D In...

Страница 11: ... INDICATORS See figure 2 and 3 on page 4 4 at the beginning part of this manual Names of control buttons See figure 4 on page 5 5 at the beginning part of this manual Pre amplifier tuner control buttons 1 Remote Control Transmitter Window 2 POWER Switch 3 Preset Station Number Buttons 4 MUSIC Button 5 LOCATION Button 6 USER Button 7 VOLUME Down Up Button 8 Equalizer Control Buttons 9 AUX Input Sel...

Страница 12: ...mp etc may interfere with operation In this case reposition the main unit to avoid direct lighting Keep the remote control transmitter away from moisture excessive heat shock and vibrations The remote control transmitter s usable range is within 0 2m 8 and 6m 20 away from the sensor REMOTE CONTROL TRANSMITTER Be sure that your headphones have a 3 5 mm 1 8 diameter plug and are between 16 ohms and ...

Страница 13: ...ternal AM antenna if you need better reception Consult your dealer Note When using an external AM antenna be sure to keep the wire of the AM loop antenna connected Connecting the AC supply lead See figure 9 on page 6 6 After connecting the speakers and system connectors plug the AC supply lead into a convenient AC outlet Unplug the AC supply lead from the AC outlet if the unit is not to be used fo...

Страница 14: ... advance continuously The hour setting will not advance even if minute is advanced from 59 to 00 In the event of a power failure or when the AC supply lead is disconnected The time display will go out and the time which you had set will be cleared So set the time again if the AC power supply is resumed TUNING HOUR MIN MEMORY TIME ADJ TUNING HOUR MIN MEMORY TIME ADJ AM AM SETTING THE CLOCK Changes ...

Страница 15: ...layback will begin As the playback of each track on the music calendar is finished that track number will go out To interrupt playback 1 1 Press the play pause button The time display will flash 2 2 Press the play pause button to resume playback from the same point To stop playback Press the stop button To switch the unit off after use Turn the unit off by pressing the POWER switch The indicators ...

Страница 16: ...compact discs at high volume can cause mistracking In this case listen at lower volume Do not push the disc table while it is moving If the power fails while the table is open wait until the power supply returns or gently push the table manually to close it The temperature range for playing compact discs is recommended to be 5 C 41 F 35 C 95 F Direct selection play By using the track number input ...

Страница 17: ... pause button when your desired track number appears in the track number display Playback will begin from the beginning of the track This function will be performed forward or backward from any point on the disc However it will not move forward during playback of the final track Manual search 1 Begin playback 2 Press and hold the button to advance play rapidly and the button to reverse play rapidl...

Страница 18: ...grammed tracks will not be displayed if a track number higher than 30 is programmed Skip search and manual search can be performed during playing back but only within the range of the programmed tracks To stop program play Press the stop button To resume playback press the play pause button Playback will begin from the beginning of the program To cancel a programmed sequence There are two methods ...

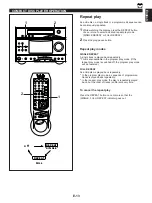
Страница 19: ...play mode will be resumed FULL REPEAT An entire disc is played back repeatedly In the program play mode a sequence of programmed tracks is played back repeatedly In the random play mode the disc is repeatedly played back but the order of tracks is different every time To cancel the repeat play Press the REPEAT button once or more so that the SINGLE FULL REPEAT indicator goes out COMPACT DISC PLAYE...

Страница 20: ... remaining play time for the current track will be displayed 2 minutes and 58 seconds remain till the end of the second track The total remaining play time from the point being played at that time will be displayed 41 minutes remain till the end of the disc Notes During random play the total remaining play time on the disc will not be displayed During program play the total remaining play time wil...

Страница 21: ...at the desired station change to the Manual tuning method as described below STEREO indicator will light up when an FM stereo broadcast with sufficient signal strength is received Manual tuning 1 1 Follow steps 1 and 2 of the Automatic tuning method 2 2 Press the AUTO MAN L button so that AUTO disappears from the display In this mode stations are received in monaural 3 3 Press and hold the TUNING ...

Страница 22: ...re the selected station by pressing the corresponding preset station number button on the remote control transmitter before the MEMORY indicator goes out In this case select 1 P1 will appear on the information display area Preset station number can also be selected by pressing the PRESET buttons on the front panel repeatedly 5 Within about 10 seconds press the tuner MEMORY button again The MEMORY ...

Страница 23: ...lity tapes since they can cause malfunctions Before loading a tape into the cassette compartment tighten the tape slack with a pen or pencil Tapes have removable tabs which prevent accidental recording or erasing from taking place Removing the tab on the top left protects the side facing you from erasure Cover the tab holes with adhesive tape to erase or record again This deck is a Double Cassette...

Страница 24: ...n which the tape you want to play back is loaded by pressing the DECK A B button so that the corresponding indicator lights up 7 Press the play button to listen to side A or the play button for side B To stop playback Press the stop button Notes Switching the tape by pressing the DECK A B button will not stop the running or fast running of the tape to which the selection has been canceled Before s...

Страница 25: ...ent playback is To listen to the next selection Press the button if the direction of the current playback is Press the button if the direction of the current playback is While searching the corresponding play direction indicator flashes Notes This function may not work for tapes with Material with long pauses or quiet passages Low recording levels or excessive noise Pauses of less than 4 seconds b...

Страница 26: ...noise reduction system If a tape recorded with a different type of Dolby noise reduction is played back on this system a good sound quality will not be obtained Dolby noise reduction manufactured under license from Dolby Laboratories Licensing Corporation DOLBY and the double D symbol are trademarks of Dolby Laboratories Licensing Corporation TAPE DECK OPERATION 3 4 2 1 3 4 1 7 8 9 7 8 9 0 0 CD TU...

Страница 27: ... button lights up If not set it off For details on the Dolby noise reduction refer to the Dolby NR Noise Reduction system on page 20 4 If desired switch the reverse mode by pressing the reverse MODE selector button When the tape is set so that side A faces you recording will be done as follows automatically according to the selected reverse mode Side A only Side A Side B 5 Press the REC PAUSE butt...

Страница 28: ...ecording on side B starts from the beginning of the same track Recording programmed tracks Programmed tracks can also be recorded in the same way 1 1 Program desired tracks Refer to page 12 for the programming procedure 2 2 Follow steps 2 4 described above To cancel this function Before recording press the stop button of the CD player To stop recording Press the stop button of the CD player At thi...

Страница 29: ...enever pressed C46 C54 C60 and C90 appear on the display in turn and next it returns to the normal display mode When using tapes other than C46 C54 C60 or C90 When C46 C54 C60 or C90 is appearing on the display input the tape length by using the track number input buttons on the remote control transmitter Examples C62 Press 6 and then 2 C30 Press 3 and then 0 5 Press the EDIT button EDIT appears o...

Страница 30: ...ding is carried out on both side A and B of the tape While recording on side A track numbers selected for side A and A are illuminated on the display The track number being recorded flashes and the number which has been already recorded is turned off For side B display information is as the same as side A except that B is illuminated in place of A Notes on automatic tape editing This function may ...

Страница 31: ...B NR button so that the indicator over the button lights up If not set it off For details on the Dolby noise reduction refer to the Dolby NR Noise Reduction system on page 20 5 Select the reverse mode to record on only one side or for continuous recording on both sides by pressing the reverse MODE selector button 6 Press the REC PAUSE button The indicator over the button will light up and the play...

Страница 32: ...op button Tape A and tape B will stop at the same time Note Only tapes originally encoded with Dolby NR will be dubbed onto tapes with Dolby NR encoding The use of Dolby NR will have no effect on the recording of tape B during dubbing However the playback tonal quality of tape A will change according as Dolby NR is used or not Erasing recorded tapes 1 1 Load the tape to be erased into the DECK B c...

Страница 33: ...es LOCATION ARENA NORMAL CLUB STUDIO ROCK BLUES RAP JAZZ FLAT USER 1 USER 2 USER 3 USER 4 60Hz l50Hz 400Hz lkHz 2 5kHz 6kHz l5kHz Mode ROCK BLUES RAP JAZZ FLAT Feature High and low frequencies are emphasized This mode is suitable for reproducing dynamic and powerful sounds of rock music etc Low and medium frequencies are moderately emphasized This mode is suitable for music with a blue feeling Low...

Страница 34: ...ing on page 9 2 Press the LOCATION button once or more so that the name of a desired mode appears on the sound field mode indicators Whenever you press the LOCATION button the mode changes and is displayed as follows To cancel the use of the sound field processor Press the LOCATION button once or more so that NORMAL lights up on the preset sound field mode indicators Note Sound field effect cannot...

Страница 35: ...ed frequency band on the graphic equalizer level indicators will flash 3 Press the equalizer control or button once or more to adjust the level The VOLUME control on the front panel can also be used to adjust the level 4 In the same way make adjustment for other frequency band Note Adjusted equalizer pattern will be cancelled when another equalizer mode is selected GRAPHIC EQUALIZER SOUND FIELD PR...

Страница 36: ...ORY button before the number selected in step 3 stops flashing In the same way store other patterns to other three user positions Notes A new program can be stored in place of the former one In step 3 or 4 if the user program number indicator stops flashing before operation return to step 2 To recall a user program 1 1 Playback a source For source playback refer to the sections beginning on page 9...

Страница 37: ...button KARAOKE appears on the display The sound level of vocals is automatically attenuated 3 While singing adjust the mixing level of singing voice by turning the MIC MIXING level control To restore the attenuated vocal sound level Press the KARAOKE button again so that KARAOKE disappears from the display Notes There may be a case that vocals cannot be attenuated effectively according to a source...

Страница 38: ... TIME Set to the time when you want to begin the timer play by pressing the HOUR button and the MIN button with the TIME ADJ button kept being pressed Time setting mode OFF TIME Set to the time when you want to finish the timer play to turn this unit off by pressing the HOUR button and the MIN button with the TIME ADJ button kept being pressed Even if you do not set the time it has already been se...

Страница 39: ...begin the timer recording In step set the time when you want to finish the timer recording Next before the display is changed from time setting mode to another mode press the TIMER button so that TIMER appears on the display and then press the TIMER REC button so that the indicator over the button lights up Note The TIMER REC button will function only when the display shows the time setting mode 5...

Страница 40: ...s the SLEEP button repeatedly until the desired time appears To stop the sleep timer operation Press the POWER switch or press the SLEEP button repeatedly until a normal display mode is restored The SLEEP indicator will go out Using the timer and the sleep timer at the same time 1 Prepare timer play See page 32 Do not turn the power of this unit off after the timer setting is finished 2 Press the ...

Страница 41: ...openings from being blocked with dust etc Do not use chemically treated cleaning cloths or other chemicals See Precautions MAINTENANCE DECK A DECK B INPUT AUX CD R L Other audio units This system has auxiliary input AUX terminals to allow you to connect an external unit such as a video cassette player LD player etc to this system To connect an external unit to the AUX terminals Connect the audio o...

Страница 42: ... rpm CLV Approx Error correction CIRC Cross Interleave Reed Solomon Code D A converter 16 bit Frequency response 20 20 000 Hz Wow and flutter Unmeasurable less than 0 001 W peak KMA GX3 Tape deck power amplifier Power source DC supplies from CD player pre amplifier tuner unit Continuous power output 2 x 35W 1 kHz 8 ohms 10 T H D 2 x 25W 1 kHz 8 ohms 0 1 T H D Load impedance Speakers 8 ohms Dimensi...

Страница 43: ...tops suddenly always at same spot Tape won t move during playback or recording Can t record Sound is distorted or fades out Poor sound quality Stereo balance is poor Excessive noise Tape travel stops in middle of playback or recording Can t find the beginning of desired selections on tape Remote control doesn t work TV functions strangely when the remote control is used If your unit fails to opera...

Страница 44: ...5462 RELLINGEN BEI HAMBURG F R OF GERMANY YAMAHA ELECTRONIQUE FRANCE S A RUE AMBROISE CROIZAT BP70 CROISSY BEAUBOURG 77312 MARNE LA VALLEE CEDEX02 FRANCE YAMAHA ELECTRONICS UK LTD YAMAHA HOUSE 200 RICKMANSWORTH ROAD WATFORD HERTS WD1 7JS ENGLAND YAMAHA SCANDINAVIA A B J A WETTERGRENS GATA 1 BOX 30053 400 43 VÄSTRA FRÖLUNDA SWEDEN YAMAHA MUSIC AUSTRALIA PTY LTD 17 33 MARKET ST SOUTH MELBOURNE 3205 ...

Отзывы: