CHK
ADJ
Periodic checks and adjustments
3-11
6C13G11
3.
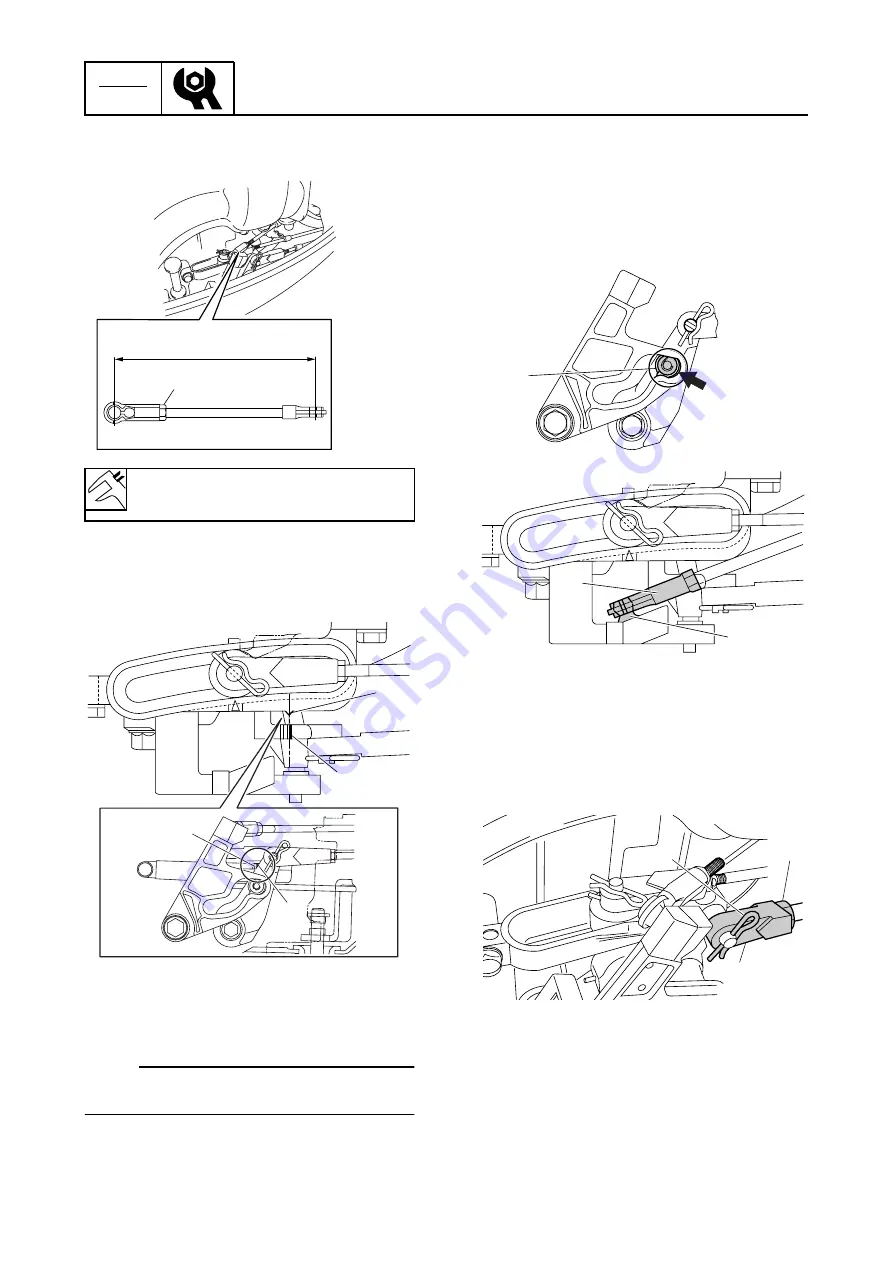
Loosen the locknut
1
, and then adjust
the throttle link rod length
a
.
4.
Align the alignment mark
b
on the throt-
tle control lever with the alignment mark
c
on the bracket.
5.
Connect the throttle link rod to the throttle
body.
NOTE:
Connect the end of the throttle link rod that
does not have a locknut to the throttle body.
6.
Contact the cam roller
2
on the throttle
control lever to the throttle cam as
shown, and then adjust the position of
the throttle link rod until the joint
3
of the
throttle link rod is aligned with the joint
4
of the control lever.
7.
Connect the throttle link rod to the throttle
link, and then tighten the locknut.
8.
Loosen the locknut
5
, remove the clip
6
, and then disconnect the throttle cable
joint
7
.
9.
Adjust the throttle cam
8
until the align-
ment mark
d
on the throttle cam is
aligned with the alignment mark
e
on
the bracket.
Throttle link rod length
a
:
121 mm (4.76 in)
a
1
S6C13120
S6C13130
b
c
b
c
S6C13140
2
S6C13150
3
4
S6C13160
6
7
5
Содержание F50F
Страница 1: ...F50F FT50G F60C FT60D SERVICE MANUAL 6C1 28197 3G 11 290551 ...
Страница 4: ......
Страница 48: ...SPEC Specifications 2 25 6C13G11 MEMO ...
Страница 147: ...6C13G11 6 4 1 2 3 4 5 6 7 8 9 Ring nut wrench 3 90890 06511 Ring nut wrench extension 90890 06513 Special service tools ...
Страница 165: ...6C13G11 6 22 1 2 3 4 5 6 7 8 9 Shimming F50 F60 6 Drive shaft and lower case F50 F60 Shimming F50 F60 ...
Страница 190: ...LOWR Lower unit 6 47 6C13G11 Shimming FT50 FT60 6 ...
Страница 195: ...6C13G11 6 52 1 2 3 4 5 6 7 8 9 MEMO Backlash FT50 FT60 ...
Страница 221: ...6C13G11 7 24 1 2 3 4 5 6 7 8 9 Steering arm ...
Страница 249: ...6C13G11 7 52 1 2 3 4 5 6 7 8 9 MEMO Power trim and tilt electrical system ...
Страница 272: ...ELEC Electrical systems 8 21 6C13G11 MEMO ...
Страница 301: ...6C13G11 i 5 1 2 3 4 5 6 7 8 9 Index MEMO ...
Страница 303: ......
Страница 304: ...YAMAHA MOTOR CO LTD Printed in the Netherlands Jul 2004 1 2 1 CR E_2 ...


